
8.4.1: Decimal Representation of Rational Numbers
- Page ID
- 37750

\( \newcommand{\vecs}[1]{\overset { \scriptstyle \rightharpoonup} {\mathbf{#1}} } \)
\( \newcommand{\vecd}[1]{\overset{-\!-\!\rightharpoonup}{\vphantom{a}\smash {#1}}} \)
\( \newcommand{\id}{\mathrm{id}}\) \( \newcommand{\Span}{\mathrm{span}}\)
( \newcommand{\kernel}{\mathrm{null}\,}\) \( \newcommand{\range}{\mathrm{range}\,}\)
\( \newcommand{\RealPart}{\mathrm{Re}}\) \( \newcommand{\ImaginaryPart}{\mathrm{Im}}\)
\( \newcommand{\Argument}{\mathrm{Arg}}\) \( \newcommand{\norm}[1]{\| #1 \|}\)
\( \newcommand{\inner}[2]{\langle #1, #2 \rangle}\)
\( \newcommand{\Span}{\mathrm{span}}\)
\( \newcommand{\id}{\mathrm{id}}\)
\( \newcommand{\Span}{\mathrm{span}}\)
\( \newcommand{\kernel}{\mathrm{null}\,}\)
\( \newcommand{\range}{\mathrm{range}\,}\)
\( \newcommand{\RealPart}{\mathrm{Re}}\)
\( \newcommand{\ImaginaryPart}{\mathrm{Im}}\)
\( \newcommand{\Argument}{\mathrm{Arg}}\)
\( \newcommand{\norm}[1]{\| #1 \|}\)
\( \newcommand{\inner}[2]{\langle #1, #2 \rangle}\)
\( \newcommand{\Span}{\mathrm{span}}\) \( \newcommand{\AA}{\unicode[.8,0]{x212B}}\)
\( \newcommand{\vectorA}[1]{\vec{#1}} % arrow\)
\( \newcommand{\vectorAt}[1]{\vec{\text{#1}}} % arrow\)
\( \newcommand{\vectorB}[1]{\overset { \scriptstyle \rightharpoonup} {\mathbf{#1}} } \)
\( \newcommand{\vectorC}[1]{\textbf{#1}} \)
\( \newcommand{\vectorD}[1]{\overrightarrow{#1}} \)
\( \newcommand{\vectorDt}[1]{\overrightarrow{\text{#1}}} \)
\( \newcommand{\vectE}[1]{\overset{-\!-\!\rightharpoonup}{\vphantom{a}\smash{\mathbf {#1}}}} \)
\( \newcommand{\vecs}[1]{\overset { \scriptstyle \rightharpoonup} {\mathbf{#1}} } \)
\( \newcommand{\vecd}[1]{\overset{-\!-\!\rightharpoonup}{\vphantom{a}\smash {#1}}} \)
Lesson
Let's learn more about how rational numbers can be represented.
Exercise \(\PageIndex{1}\): Notice and Wonder: Shaded Bars
What do you notice? What do you wonder?

Exercise \(\PageIndex{2}\): Halving The Length
Here is a number line from 0 to 1.

- Mark the midpoint between 0 and 1. What is the decimal representation of that number?
- Mark the midpoint between 0 and the newest point. What is the decimal representation of that number?
- Repeat step two. How did you find the value of this number?
- Describe how the value of the midpoints you have added to the number line keep changing as you find more. How do the decimal representations change?
Exercise \(\PageIndex{3}\): Recalculating Rational Numbers
- Rational numbers are fractions and their opposites. All of these numbers are rational numbers. Show that they are rational by writing them in the form \(\frac{a}{b}\) or \(-\frac{a}{b}\).
- \(0.2\)
- \(-\sqrt{4}\)
- \(0.333\)
- \(\sqrt[3]{1000}\)
- \(-1.000001\)
- \(\sqrt{\frac{1}{9}}\)
- All rational numbers have decimal representations, too. Find the decimal representation of each of these rational numbers.
- \(\frac{3}{8}\)
- \(\frac{7}{5}\)
- \(\frac{999}{1000}\)
- \(\frac{111}{2}\)
- \(\sqrt[3]{\frac{1}{8}}\)
Exercise \(\PageIndex{4}\): Zooming In On \(\frac{2}{11}\)
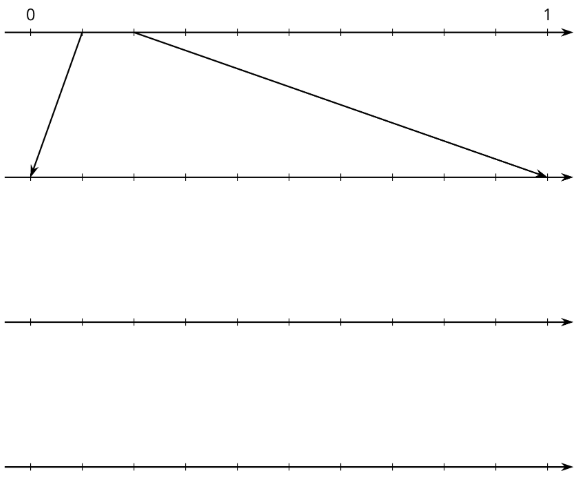
- On the topmost number line, label the tick marks. Next, find the first decimal place of \(\frac{2}{11}\) using long division and estimate where \(\frac{2}{11}\) should be placed on the top number line.
- Label the tick marks of the second number line. Find the next decimal place of \(\frac{2}{11}\) by continuing the long division and estimate where \(\frac{2}{11}\) should be placed on the second number line. Add arrows from the second to the third number line to zoom in on the location of \(\frac{2}{11}\).
- Repeat the earlier step for the remaining number lines.
- What do you think the decimal expansion of \(\frac{2}{11}\) is?
Are you ready for more?
Let \(x=\frac{25}{11}=2.272727\ldots\) and \(y=\frac{58}{33}=1.75757575\ldots\)
For each of the following questions, first decide whether the fraction or decimal representations of the numbers are more helpful to answer the question, and then find the answer.
- Which of \(x\) or \(y\) is closer to 2?
- Find \(x^{2}\).
Summary
We learned earlier that rational numbers are a fraction or the opposite of a fraction. For example, \(\frac{3}{4}\) and \(-\frac{5}{2}\) are both rational numbers. A complicated-looking numerical expression can also be a rational number as long as the value of the expression is a positive or negative fraction. For example, \(\sqrt{64}\) and \(-\sqrt[3]{\frac{1}{8}}\) are rational numbers because \(\sqrt{64}=8\) and \(-\sqrt[3]{\frac{1}{8}}=-\frac{1}{2}\).
Rational numbers can also be written using decimal notation. Some have finite decimal expansions, like 0.75, -2.5, or -0.5. Other rational numbers have infinite decimal expansions, like 0.7434343 . . . where the 43s repeat forever. To avoid writing the repeating part over and over, we use the notation \(0.7\overline{43}\) for this number. The bar over part of the expansion tells us the part which is to repeat forever.
A decimal expansion of a number helps us plot it accurately on a number line divided into tenths. For example, \(0.7\overline{43}\) should be between 0.7 and 0.8. Each further decimal digit increases the accuracy of our plotting. For example, the number \(0.7\overline{43}\) is between 0.743 and 0.744.
Glossary Entries
Definition: Repeating Decimal
A repeating decimal has digits that keep going in the same pattern over and over. The repeating digits are marked with a line above them.
For example, the decimal representation for \(\frac{1}{3}\) is \(0.\overline{3}\), which means 0.3333333 . . . The decimal representation for \(\frac{25}{22}\) is \(1.1\overline{36}\) which means 1.136363636 . . .
Practice
Exercise \(\PageIndex{5}\)
Andre and Jada are discussing how to write \(\frac{17}{20}\) as a decimal.
Andre says he can use long division to divide \(17\) by \(20\) to get the decimal.
Jada says she can write an equivalent fraction with a denominator of \(100\) by multiplying by \(\frac{5}{5}\), then writing the number of hundredths as a decimal.
- Do both of these strategies work?
- Which strategy do you prefer? Explain your reasoning.
- Write \(\frac{17}{20}\) as a decimal. Explain or show your reasoning.
Exercise \(\PageIndex{6}\)
Write each fraction as a decimal.
- \(\sqrt{\frac{9}{100}}\)
- \(\frac{99}{100}\)
- \(\sqrt{\frac{9}{16}}\)
- \(\frac{23}{10}\)
Exercise \(\PageIndex{7}\)
Write each decimal as a fraction.
- \(\sqrt{0.81}\)
- \(0.0276\)
- \(\sqrt{0.04}\)
- \(10.01\)
Exercise \(\PageIndex{8}\)
Find the positive solution to each equation. If the solution is irrational, write the solution using square root or cube root notation.
- \(x^{2}=90\)
- \(p^{3}=90\)
- \(z^{2}=1\)
- \(y^{3}=1\)
- \(w^{2}=36\)
- \(h^{3}=64\)
(From Unit 8.3.2)
Exercise \(\PageIndex{9}\)
Here is a right square pyramid.

- What is the measurement of the slant height \(l\) of the triangular face of the pyramid? If you get stuck, use a cross section of the pyramid.
- What is the surface area of the pyramid?
(From Unit 8.2.5)