
Section 0.2P: Practice
- Page ID
- 192780

\( \newcommand{\vecs}[1]{\overset { \scriptstyle \rightharpoonup} {\mathbf{#1}} } \)
\( \newcommand{\vecd}[1]{\overset{-\!-\!\rightharpoonup}{\vphantom{a}\smash {#1}}} \)
\( \newcommand{\dsum}{\displaystyle\sum\limits} \)
\( \newcommand{\dint}{\displaystyle\int\limits} \)
\( \newcommand{\dlim}{\displaystyle\lim\limits} \)
\( \newcommand{\id}{\mathrm{id}}\) \( \newcommand{\Span}{\mathrm{span}}\)
( \newcommand{\kernel}{\mathrm{null}\,}\) \( \newcommand{\range}{\mathrm{range}\,}\)
\( \newcommand{\RealPart}{\mathrm{Re}}\) \( \newcommand{\ImaginaryPart}{\mathrm{Im}}\)
\( \newcommand{\Argument}{\mathrm{Arg}}\) \( \newcommand{\norm}[1]{\| #1 \|}\)
\( \newcommand{\inner}[2]{\langle #1, #2 \rangle}\)
\( \newcommand{\Span}{\mathrm{span}}\)
\( \newcommand{\id}{\mathrm{id}}\)
\( \newcommand{\Span}{\mathrm{span}}\)
\( \newcommand{\kernel}{\mathrm{null}\,}\)
\( \newcommand{\range}{\mathrm{range}\,}\)
\( \newcommand{\RealPart}{\mathrm{Re}}\)
\( \newcommand{\ImaginaryPart}{\mathrm{Im}}\)
\( \newcommand{\Argument}{\mathrm{Arg}}\)
\( \newcommand{\norm}[1]{\| #1 \|}\)
\( \newcommand{\inner}[2]{\langle #1, #2 \rangle}\)
\( \newcommand{\Span}{\mathrm{span}}\) \( \newcommand{\AA}{\unicode[.8,0]{x212B}}\)
\( \newcommand{\vectorA}[1]{\vec{#1}} % arrow\)
\( \newcommand{\vectorAt}[1]{\vec{\text{#1}}} % arrow\)
\( \newcommand{\vectorB}[1]{\overset { \scriptstyle \rightharpoonup} {\mathbf{#1}} } \)
\( \newcommand{\vectorC}[1]{\textbf{#1}} \)
\( \newcommand{\vectorD}[1]{\overrightarrow{#1}} \)
\( \newcommand{\vectorDt}[1]{\overrightarrow{\text{#1}}} \)
\( \newcommand{\vectE}[1]{\overset{-\!-\!\rightharpoonup}{\vphantom{a}\smash{\mathbf {#1}}}} \)
\( \newcommand{\vecs}[1]{\overset { \scriptstyle \rightharpoonup} {\mathbf{#1}} } \)
\(\newcommand{\longvect}{\overrightarrow}\)
\( \newcommand{\vecd}[1]{\overset{-\!-\!\rightharpoonup}{\vphantom{a}\smash {#1}}} \)
\(\newcommand{\avec}{\mathbf a}\) \(\newcommand{\bvec}{\mathbf b}\) \(\newcommand{\cvec}{\mathbf c}\) \(\newcommand{\dvec}{\mathbf d}\) \(\newcommand{\dtil}{\widetilde{\mathbf d}}\) \(\newcommand{\evec}{\mathbf e}\) \(\newcommand{\fvec}{\mathbf f}\) \(\newcommand{\nvec}{\mathbf n}\) \(\newcommand{\pvec}{\mathbf p}\) \(\newcommand{\qvec}{\mathbf q}\) \(\newcommand{\svec}{\mathbf s}\) \(\newcommand{\tvec}{\mathbf t}\) \(\newcommand{\uvec}{\mathbf u}\) \(\newcommand{\vvec}{\mathbf v}\) \(\newcommand{\wvec}{\mathbf w}\) \(\newcommand{\xvec}{\mathbf x}\) \(\newcommand{\yvec}{\mathbf y}\) \(\newcommand{\zvec}{\mathbf z}\) \(\newcommand{\rvec}{\mathbf r}\) \(\newcommand{\mvec}{\mathbf m}\) \(\newcommand{\zerovec}{\mathbf 0}\) \(\newcommand{\onevec}{\mathbf 1}\) \(\newcommand{\real}{\mathbb R}\) \(\newcommand{\twovec}[2]{\left[\begin{array}{r}#1 \\ #2 \end{array}\right]}\) \(\newcommand{\ctwovec}[2]{\left[\begin{array}{c}#1 \\ #2 \end{array}\right]}\) \(\newcommand{\threevec}[3]{\left[\begin{array}{r}#1 \\ #2 \\ #3 \end{array}\right]}\) \(\newcommand{\cthreevec}[3]{\left[\begin{array}{c}#1 \\ #2 \\ #3 \end{array}\right]}\) \(\newcommand{\fourvec}[4]{\left[\begin{array}{r}#1 \\ #2 \\ #3 \\ #4 \end{array}\right]}\) \(\newcommand{\cfourvec}[4]{\left[\begin{array}{c}#1 \\ #2 \\ #3 \\ #4 \end{array}\right]}\) \(\newcommand{\fivevec}[5]{\left[\begin{array}{r}#1 \\ #2 \\ #3 \\ #4 \\ #5 \\ \end{array}\right]}\) \(\newcommand{\cfivevec}[5]{\left[\begin{array}{c}#1 \\ #2 \\ #3 \\ #4 \\ #5 \\ \end{array}\right]}\) \(\newcommand{\mattwo}[4]{\left[\begin{array}{rr}#1 \amp #2 \\ #3 \amp #4 \\ \end{array}\right]}\) \(\newcommand{\laspan}[1]{\text{Span}\{#1\}}\) \(\newcommand{\bcal}{\cal B}\) \(\newcommand{\ccal}{\cal C}\) \(\newcommand{\scal}{\cal S}\) \(\newcommand{\wcal}{\cal W}\) \(\newcommand{\ecal}{\cal E}\) \(\newcommand{\coords}[2]{\left\{#1\right\}_{#2}}\) \(\newcommand{\gray}[1]{\color{gray}{#1}}\) \(\newcommand{\lgray}[1]{\color{lightgray}{#1}}\) \(\newcommand{\rank}{\operatorname{rank}}\) \(\newcommand{\row}{\text{Row}}\) \(\newcommand{\col}{\text{Col}}\) \(\renewcommand{\row}{\text{Row}}\) \(\newcommand{\nul}{\text{Nul}}\) \(\newcommand{\var}{\text{Var}}\) \(\newcommand{\corr}{\text{corr}}\) \(\newcommand{\len}[1]{\left|#1\right|}\) \(\newcommand{\bbar}{\overline{\bvec}}\) \(\newcommand{\bhat}{\widehat{\bvec}}\) \(\newcommand{\bperp}{\bvec^\perp}\) \(\newcommand{\xhat}{\widehat{\xvec}}\) \(\newcommand{\vhat}{\widehat{\vvec}}\) \(\newcommand{\uhat}{\widehat{\uvec}}\) \(\newcommand{\what}{\widehat{\wvec}}\) \(\newcommand{\Sighat}{\widehat{\Sigma}}\) \(\newcommand{\lt}{<}\) \(\newcommand{\gt}{>}\) \(\newcommand{\amp}{&}\) \(\definecolor{fillinmathshade}{gray}{0.9}\)
Practice Makes Progress
In the following exercises, simplify.
\(−\dfrac{108}{63}\)
\(\dfrac{120}{252}\)
\(\dfrac{14x^2}{21y}\)
\(−\dfrac{210a^2}{110b^2}\)
In the following exercises, perform the indicated operation and simplify.
\(−\dfrac{3}{4}\left(−\dfrac{4}{9}\right)\)
\(\left(−\dfrac{14}{15}\right)\left(\dfrac{9}{20}\right)\)
\(\dfrac{3}{7}⋅21n\)
\(\dfrac{5}{18}÷\left(−\dfrac{15}{24}\right)\)
\(−\dfrac{\dfrac{8}{21} }{\dfrac{12}{35}}\)
\(\dfrac{\dfrac{m}{3}}{\dfrac{n}{2}}\)
\(\dfrac{7}{12}+\dfrac{5}{8}\)
\(\dfrac{7}{12}−\dfrac{9}{16}\)
\(−\dfrac{2}{3}−\left(−\dfrac{3}{4}\right)\)
\(\dfrac{x}{3}+\dfrac{1}{4}\)
\(−\dfrac{5a}{3}+\left(−\dfrac{10}{6}\right)\)
\(−\dfrac{5a}{3}÷\left(−\dfrac{10}{6}\right)\)
\(\dfrac{5⋅6−3⋅4}{4⋅5−2⋅3}\)
\(\dfrac{7⋅4−2(8−5)}{9⋅3−3⋅5}\)
\(\dfrac{2}{\dfrac{1}{3}+\dfrac{1}{5}}\)
\(\dfrac{\dfrac{7}{8}−\dfrac{2}{3}}{\dfrac{1}{2}+\dfrac{3}{8}}\)
\(−\dfrac{3}{8}÷\left(−\dfrac{3}{10}\right)\)
\(−\dfrac{3}{8}+\dfrac{5}{12}\)
\(\dfrac{11}{12a}⋅\dfrac{9a}{16}\)
\(\dfrac{1}{2}+\dfrac{2}{3}⋅\dfrac{5}{12}\)
\(1−\dfrac{3}{5}÷\dfrac{1}{10}\)
\(12\left(\dfrac{9}{20}−\dfrac{4}{15}\right)\)
\(\dfrac{\dfrac{5}{8}+\dfrac{1}{6}}{\dfrac{19}{24}}\)
\(\left(\dfrac{5}{9}+\dfrac{1}{6}\right)÷\left(\dfrac{2}{3}−\dfrac{1}{2}\right)\)
Writing Exercises
Why do you need a common denominator to add or subtract fractions? Explain.
Explain how you find the reciprocal of a fraction.
Self Check
Use this checklist to evaluate your mastery of the objectives of this section.
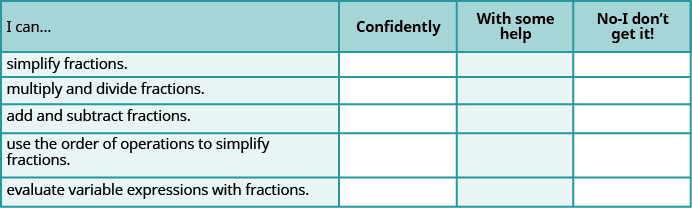
If most of your checks were:
…confidently. Congratulations! You have achieved the objectives in this section. Reflect on the study skills you used so that you can continue to use them.
…with some help. This must be addressed quickly because topics you do not master become potholes in your road to success. In math, every topic builds upon previous work. It is crucial to establish a strong foundation before proceeding. Who can you ask for help? Your classmates, tutors, and class instructor are good resources.
…no - I don’t get it! This is a warning sign, and you must not ignore it. You should get help right away, or you will quickly be overwhelmed. Meet with your instructor during their drop-in hours as soon as you can to discuss your situation. Together, you can devise a plan to get the help you need.