
Section 3.1: Cartesian Plane
- Page ID
- 188499

\( \newcommand{\vecs}[1]{\overset { \scriptstyle \rightharpoonup} {\mathbf{#1}} } \)
\( \newcommand{\vecd}[1]{\overset{-\!-\!\rightharpoonup}{\vphantom{a}\smash {#1}}} \)
\( \newcommand{\dsum}{\displaystyle\sum\limits} \)
\( \newcommand{\dint}{\displaystyle\int\limits} \)
\( \newcommand{\dlim}{\displaystyle\lim\limits} \)
\( \newcommand{\id}{\mathrm{id}}\) \( \newcommand{\Span}{\mathrm{span}}\)
( \newcommand{\kernel}{\mathrm{null}\,}\) \( \newcommand{\range}{\mathrm{range}\,}\)
\( \newcommand{\RealPart}{\mathrm{Re}}\) \( \newcommand{\ImaginaryPart}{\mathrm{Im}}\)
\( \newcommand{\Argument}{\mathrm{Arg}}\) \( \newcommand{\norm}[1]{\| #1 \|}\)
\( \newcommand{\inner}[2]{\langle #1, #2 \rangle}\)
\( \newcommand{\Span}{\mathrm{span}}\)
\( \newcommand{\id}{\mathrm{id}}\)
\( \newcommand{\Span}{\mathrm{span}}\)
\( \newcommand{\kernel}{\mathrm{null}\,}\)
\( \newcommand{\range}{\mathrm{range}\,}\)
\( \newcommand{\RealPart}{\mathrm{Re}}\)
\( \newcommand{\ImaginaryPart}{\mathrm{Im}}\)
\( \newcommand{\Argument}{\mathrm{Arg}}\)
\( \newcommand{\norm}[1]{\| #1 \|}\)
\( \newcommand{\inner}[2]{\langle #1, #2 \rangle}\)
\( \newcommand{\Span}{\mathrm{span}}\) \( \newcommand{\AA}{\unicode[.8,0]{x212B}}\)
\( \newcommand{\vectorA}[1]{\vec{#1}} % arrow\)
\( \newcommand{\vectorAt}[1]{\vec{\text{#1}}} % arrow\)
\( \newcommand{\vectorB}[1]{\overset { \scriptstyle \rightharpoonup} {\mathbf{#1}} } \)
\( \newcommand{\vectorC}[1]{\textbf{#1}} \)
\( \newcommand{\vectorD}[1]{\overrightarrow{#1}} \)
\( \newcommand{\vectorDt}[1]{\overrightarrow{\text{#1}}} \)
\( \newcommand{\vectE}[1]{\overset{-\!-\!\rightharpoonup}{\vphantom{a}\smash{\mathbf {#1}}}} \)
\( \newcommand{\vecs}[1]{\overset { \scriptstyle \rightharpoonup} {\mathbf{#1}} } \)
\(\newcommand{\longvect}{\overrightarrow}\)
\( \newcommand{\vecd}[1]{\overset{-\!-\!\rightharpoonup}{\vphantom{a}\smash {#1}}} \)
\(\newcommand{\avec}{\mathbf a}\) \(\newcommand{\bvec}{\mathbf b}\) \(\newcommand{\cvec}{\mathbf c}\) \(\newcommand{\dvec}{\mathbf d}\) \(\newcommand{\dtil}{\widetilde{\mathbf d}}\) \(\newcommand{\evec}{\mathbf e}\) \(\newcommand{\fvec}{\mathbf f}\) \(\newcommand{\nvec}{\mathbf n}\) \(\newcommand{\pvec}{\mathbf p}\) \(\newcommand{\qvec}{\mathbf q}\) \(\newcommand{\svec}{\mathbf s}\) \(\newcommand{\tvec}{\mathbf t}\) \(\newcommand{\uvec}{\mathbf u}\) \(\newcommand{\vvec}{\mathbf v}\) \(\newcommand{\wvec}{\mathbf w}\) \(\newcommand{\xvec}{\mathbf x}\) \(\newcommand{\yvec}{\mathbf y}\) \(\newcommand{\zvec}{\mathbf z}\) \(\newcommand{\rvec}{\mathbf r}\) \(\newcommand{\mvec}{\mathbf m}\) \(\newcommand{\zerovec}{\mathbf 0}\) \(\newcommand{\onevec}{\mathbf 1}\) \(\newcommand{\real}{\mathbb R}\) \(\newcommand{\twovec}[2]{\left[\begin{array}{r}#1 \\ #2 \end{array}\right]}\) \(\newcommand{\ctwovec}[2]{\left[\begin{array}{c}#1 \\ #2 \end{array}\right]}\) \(\newcommand{\threevec}[3]{\left[\begin{array}{r}#1 \\ #2 \\ #3 \end{array}\right]}\) \(\newcommand{\cthreevec}[3]{\left[\begin{array}{c}#1 \\ #2 \\ #3 \end{array}\right]}\) \(\newcommand{\fourvec}[4]{\left[\begin{array}{r}#1 \\ #2 \\ #3 \\ #4 \end{array}\right]}\) \(\newcommand{\cfourvec}[4]{\left[\begin{array}{c}#1 \\ #2 \\ #3 \\ #4 \end{array}\right]}\) \(\newcommand{\fivevec}[5]{\left[\begin{array}{r}#1 \\ #2 \\ #3 \\ #4 \\ #5 \\ \end{array}\right]}\) \(\newcommand{\cfivevec}[5]{\left[\begin{array}{c}#1 \\ #2 \\ #3 \\ #4 \\ #5 \\ \end{array}\right]}\) \(\newcommand{\mattwo}[4]{\left[\begin{array}{rr}#1 \amp #2 \\ #3 \amp #4 \\ \end{array}\right]}\) \(\newcommand{\laspan}[1]{\text{Span}\{#1\}}\) \(\newcommand{\bcal}{\cal B}\) \(\newcommand{\ccal}{\cal C}\) \(\newcommand{\scal}{\cal S}\) \(\newcommand{\wcal}{\cal W}\) \(\newcommand{\ecal}{\cal E}\) \(\newcommand{\coords}[2]{\left\{#1\right\}_{#2}}\) \(\newcommand{\gray}[1]{\color{gray}{#1}}\) \(\newcommand{\lgray}[1]{\color{lightgray}{#1}}\) \(\newcommand{\rank}{\operatorname{rank}}\) \(\newcommand{\row}{\text{Row}}\) \(\newcommand{\col}{\text{Col}}\) \(\renewcommand{\row}{\text{Row}}\) \(\newcommand{\nul}{\text{Nul}}\) \(\newcommand{\var}{\text{Var}}\) \(\newcommand{\corr}{\text{corr}}\) \(\newcommand{\len}[1]{\left|#1\right|}\) \(\newcommand{\bbar}{\overline{\bvec}}\) \(\newcommand{\bhat}{\widehat{\bvec}}\) \(\newcommand{\bperp}{\bvec^\perp}\) \(\newcommand{\xhat}{\widehat{\xvec}}\) \(\newcommand{\vhat}{\widehat{\vvec}}\) \(\newcommand{\uhat}{\widehat{\uvec}}\) \(\newcommand{\what}{\widehat{\wvec}}\) \(\newcommand{\Sighat}{\widehat{\Sigma}}\) \(\newcommand{\lt}{<}\) \(\newcommand{\gt}{>}\) \(\newcommand{\amp}{&}\) \(\definecolor{fillinmathshade}{gray}{0.9}\)We will rely heavily on these skills throughout this section.
- Simplify: \(-3+7\)
- Identify the opposite of \(-5\)
- Solve: \(x-4=9\)
- Evaluate \(2x+1\) when \(x=-2\)
Motivating Problem
You’re using a map app to meet a friend. They tell you they’re 3 blocks east and 2 blocks north of the coffee shop. If the shop is at \(0,0\), how can you describe exactly where they are—and in what quadrant of the coordinate plane their location falls?
Fun Fact
The Cartesian Plane is named after René Descartes, a French philosopher and mathematician. Legend says he developed the idea while watching a fly crawl across his ceiling and wondering how to describe its location with numbers!
The Goal
In this section, we will learn how to locate and label points on a coordinate plane using ordered pairs. We'll also practice identifying quadrants, understanding axes, and interpreting visual information, which is foundational for graphing equations.
Plot Points on a Rectangular Coordinate System
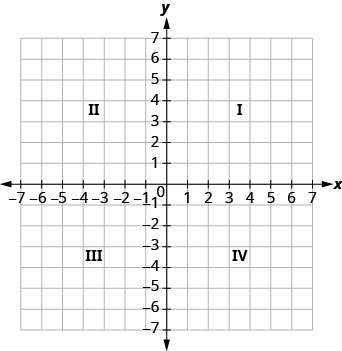
Just like maps use a grid system to identify locations, a grid system is used in algebra to show a relationship between two variables in a rectangular coordinate system. The rectangular coordinate system is also called the xy-plane, the coordinate plane, or the Cartesian Plane.
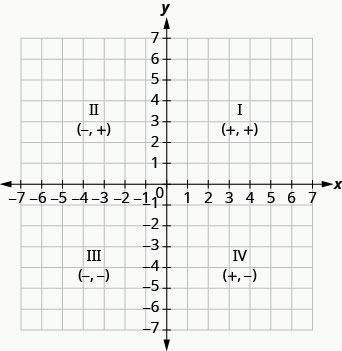
The horizontal number line is called the x-axis, and the vertical number line is called the y-axis. Together, the x-axis and the y-axis form the rectangular coordinate system. These axes divide a plane into four regions, called quadrants. The quadrants are identified by Roman numerals, beginning on the upper right and proceeding counterclockwise.
In the rectangular coordinate system, every point is represented by an ordered pair. The first number in the ordered pair is the x-coordinate of the point, and the second number is the y-coordinate of the point.
An ordered pair, \((x,y)\), gives the coordinates of a point in a rectangular coordinate system.
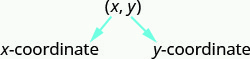
The first number is the x-coordinate.
The second number is the y-coordinate.
The phrase ‘ordered pair’ means the order is important. What is the ordered pair of the point where the axes cross? At that point both coordinates are zero, so its ordered pair is \((0,0)\). The point \((0,0)\) has a special name. It is called the origin.
The point \((0,0)\) is called the origin. It is the point where the x-axis and y-axis intersect.
We use the coordinates to locate a point on the xy-plane. Let’s plot the point \((1,3)\) as an example. First, locate 1 on the x-axis and lightly sketch a vertical line through \(x=1\). Then, locate 3 on the y-axis and sketch a horizontal line through \(y=3\). Now, find the point where these two lines meet — that is the point with coordinates \((1,3)\).
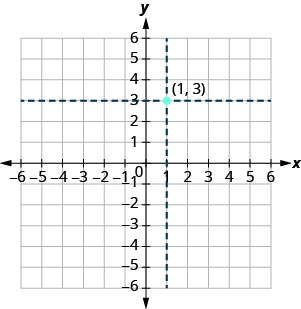
Notice that the vertical line through \(x=1\) and the horizontal line through \(y=3\) are not part of the graph. We just used them to help us locate the point \((1,3)\).
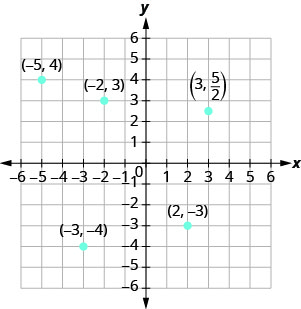
Plot each point in the rectangular coordinate system and identify the quadrant in which the point is located:
- (−5,4)
- (−3,−4)
- (2,−3)
- (−2,3)
- \((3, \frac{5}{2})\)
Solution
The first number of the coordinate pair is the x-coordinate, and the second number is the y-coordinate.
- Since x=−5, the point is to the left of the y-axis. Also, since y=4, the point is above the x-axis. The point (−5,4) is in Quadrant II.
- Since x=−3, the point is to the left of the y-axis. Also, since y=−4, the point is below the x-axis. The point (−3,−4) is in Quadrant III.
- Since x=2, the point is to the right of the y-axis. Since y=−3, the point is below the x-axis. The point (2,−3) is in Quadrant IV.
- Since x=−2, the point is to the left of the y-axis. Since y=3, the point is above the x-axis. The point (−2,3) is in Quadrant II.
- Since x=3, the point is to the right of the y-axis. Since \(y = \frac{5}{2}\), the point is above the x-axis. (It may be helpful to write \(\frac{5}{2}\) as a mixed number or decimal.) The point \((3, \frac{5}{2})\) is in Quadrant I.
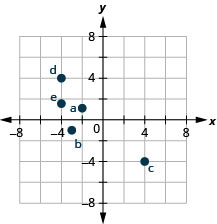
Plot each point in a rectangular coordinate system and identify the quadrant in which the point is located:
- (−2,1)
- (−3,−1)
- (4,−4)
- (−4,4)
- \((-4, \frac{3}{2})\)
- Answer
-
The point a (-2,1) is in Quadrant II.
The point b (-3,-1) is in Quadrant III.
The point c (4,-4) is in Quadrant IV.
The point d (-4,4) is in Quadrant II.
The point e \((-4, \frac{3}{2})\) is in Quadrant II.
How do the signs affect the location of the points? As you graphed the points in the previous example, you may have noticed some patterns.
For the point in Quadrant IV, what do you notice about the signs of the coordinates? What about the signs of the coordinates of points in the third quadrant? The second quadrant? The first quadrant?
Can you tell just by looking at the coordinates in which quadrant the point (−2,5) is located? In which quadrant is (2,−5) located?
We can summarize the sign patterns of the quadrants in this way.
\[\begin{array}{ccc}{\text { Quadrant I }} & {\text { Quadrant II }} & {\text { Quadrant III }} & {\text { Quadrant IV }} \\ {(x, y)} & {(x, y)} & {(x, y)} & {(x, y)} \\ {(+,+)} & {(-,+)} & {(-,-)} & {(+,-)}\end{array}\nonumber\]
What if one coordinate is zero, as shown in the figure below? Where is the point (0,4) located? Where is the point (−2,0) located?
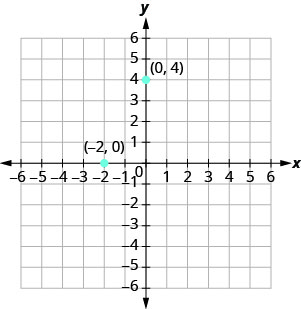
The point (0,4) is on the y-axis and the point (−2,0) is on the x-axis.
Points with a y-coordinate equal to 0 are on the x-axis, and have coordinates (a,0).
Points with an x-coordinate equal to 0 are on the y-axis, and have coordinates (0,b).
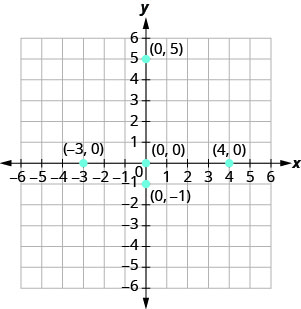
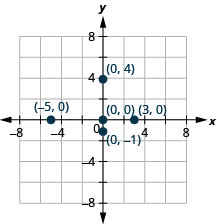
Plot each point:
- (0,5)
- (4,0)
- (−3,0)
- (0,0)
- (0,−1)
Solution
- Since x=0, the point whose coordinates are (0,5) is on the y-axis.
- Since y=0, the point whose coordinates are (4,0) is on the x-axis.
- Since y=0, the point whose coordinates are (−3,0) is on the x-axis.
- Since x=0 and y=0, the point whose coordinates are (0,0) is the origin.
- Since x=0, the point whose coordinates are (0,−1) is on the y-axis.
Plot each point:
- (−5,0)
- (3,0)
- (0,0)
- (0,−1)
- (0,4).
- Answer
-
In algebra, being able to identify the coordinates of a point shown on a graph is just as important as being able to plot points. To identify the x-coordinate of a point on a graph, read the number on the x-axis directly above or below the point. To identify the y-coordinate of a point, read the number on the y-axis directly to the left or right of the point. Remember, when you write the ordered pair, use the correct order, (x,y).
Name the ordered pair of each point shown in the rectangular coordinate system.
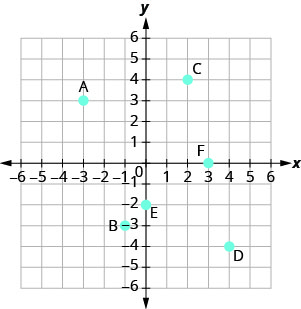
Solution
Point A: Point A is above −3 on the x-axis, so the x-coordinate is −3. It is to the left of 3 on the y-axis, so the y-coordinate is 3. The coordinates of the point are (−3, 3).
Point B: Point B is below −1 on the x-axis, so the x-coordinate is −1. It is to the left of −3 on the y-axis, so the y-coordinate is −3. The coordinates of the point are (−1, −3).
Point C: Point C is above 2 on the x-axis, so the x-coordinate is 2. It is to the right of 4 on the y-axis, so the y-coordinate is 4. The coordinates of the point are (2, 4).
Point D: Point D is below 4 on the x-axis, so the x-coordinate is 4. It is to the right of −4 on the y-axis, so the y-coordinate is −4. The coordinates of the point are (4, −4).
Point E: Point E is on the y-axis at y = −2. The coordinates of point E are (0, −2).
Point F: Point F is on the x-axis at x = 3. The coordinates of point F are (3, 0).
Name the ordered pair of each point shown in the rectangular coordinate system.
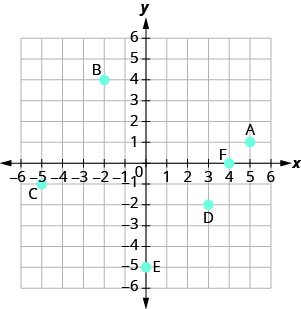
- Answer
-
A: (5,1) B: (−2,4) C: (−5,−1) D: (3,−2) E: (0,−5) F: (4,0)
Verify Solutions to an Equation in Two Variables
Up to now, all the equations you have solved were equations with just one variable. In almost every case, when you solved the equation you got exactly one solution. The process of solving an equation ended with a statement like x=4. (Then, you checked the solution by substituting back into the equation.)
Here’s an example of an equation in one variable, and its one solution.
\[\begin{aligned} 3 x+5 &=17 \\ 3 x &=12 \\ x &=4 \end{aligned}\]
But equations can have more than one variable. Equations with two variables may be of the form Ax+By=C. Equations of this form are called linear equations in two variables.
An equation of the form Ax+By=C, where A and B are not both zero, is called a linear equation in two variables.
Notice the word line in linear. Here is an example of a linear equation in two variables, x and y.

The equation \(y=−3x+5\) is also a linear equation. But it does not appear to be in the form Ax+By=C. We can use the Addition Property of Equality and rewrite it in Ax+By=C form.
\(\begin{array}{llll} {} &{y} &{=} &{-3x + 5} \\ {\text{Add to both sides.}} &{y + 3x } &{=} &{-3x + 5 + 3x} \\{\text{Simplify.}} &{y + 3x} &{=} &{5} \\{\text{Use the Commutative Property to put it in}} &{3x + y} &{=} &{5} \\{Ax+By = C\text{ form.}} &{} &{} &{} \end{array}\)
By rewriting \(y=−3x+5\) as \(3x+y=5\), we can easily see that it is a linear equation in two variables because it is of the form A\(x\)+B\(y\)=C. When an equation is in the form A\(x\)+B\(y\)=C, we say it is in standard form.
A linear equation is in standard form when it is written A\(x\)+B\(y\)=C.
Linear equations have infinitely many solutions. For every number that is substituted for x there is a corresponding y value. This pair of values is a solution to the linear equation and is represented by the ordered pair (x,y). When we substitute these values of x and y into the equation, the result is a true statement, because the value on the left side is equal to the value on the right side.
An ordered pair (x,y) is a solution of the linear equation A\(x\)+B\(y\)=C, if the equation is a true statement when the \(x\)- and \(y\)-values of the ordered pair are substituted into the equation.
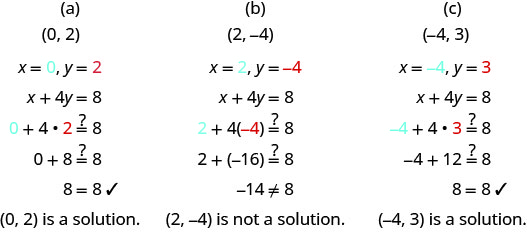
Determine which ordered pairs are solutions to the equation \(x+4y=8\).
(a) (0,2)
(b) (2,−4)
(c) (−4,3)
Solution
Substitute the x- and y-values from each ordered pair into the equation and determine if the result is a true statement.
Which of the following ordered pairs are solutions to the equation \(4x−y=8\)?
- (0,8)
- (2,0)
- (1,−4)
- Answer
-
\((2,0)\) and \((1,-4)\) are solutions to the equation \(4x−y=8\).
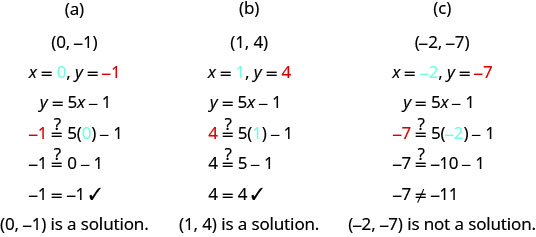
Which of the following ordered pairs are solutions to the equation \(y=5x−1\)?
(a) (0,−1)
(b) (1,4)
(c) (−2,−7)
Solution
Substitute the x- and y-values from each ordered pair into the equation and determine if it results in a true statement.
Which of the following ordered pairs are solutions to the equation \(y=4x−3\)?
- (0,3)
- (1,1)
- (−1,−1)
- Answer
-
\((1,1)\) is a solution to the equation \(y=4x−3\).
Complete a Table of Solutions to a Linear Equation in Two Variables
In the examples above, we substituted the x- and y-values of a given ordered pair to determine whether or not it was a solution to a linear equation. But how do you find the ordered pairs if they are not given? It’s easier than you might think—you can just pick a value for \(x\) and then solve the equation for \(y\). Or, pick a value for \(y\) and then solve for \(x\).
We’ll start by looking at the solutions to the equation \(y = 5x−1\) that we found in Example 5. We can summarize this information in the table of solutions below.
| \(y=5x−1\) | ||
| \(x\) | \(y\) | \((x,y)\) |
| 0 | −1 | (0,−1) |
| 1 | 4 | (1,4) |
To find a third solution, we’ll select another value for \(x\). Let's let \(x=2\), and solve for \(y\).
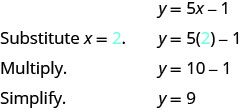
The ordered pair (2,9) is a solution to \(y=5x−1\). We will add it to our table.
| \(y=5x−1\) | ||
| \(x\) | \(y\) | \((x,y)\) |
| 0 | −1 | (0,−1) |
| 1 | 4 | (1,4) |
| 2 | 9 | (2,9) |
We can find more solutions to the equation by substituting in any value of x or any value of y and solving the resulting equation to get another ordered pair that is a solution. There are infinitely many solutions of this equation.
Complete the table to find three solutions to the equation \(y=4x−2\).
| \(y=4x−2\) | ||
| \(x\) | \(y\) | \((x,y)\) |
| 0 | ||
| −1 | ||
| 2 | ||
Solution
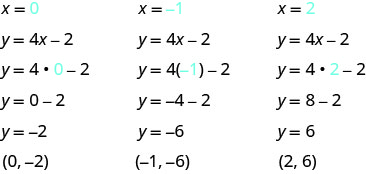
Substitute \(x=0\), \(x=−1\), and \(x=2\) into \(y=4x−2\).
-
The results are summarized in the following table.
\(y=4x−2\) \(x\) \(y\) \((x,y)\) 0 −2 (0,−2) −1 −6 (−1,−6) 2 6 (2,6)
Complete the table to find three solutions to the equation \(y=3x−1\).
| \(y=3x−1\) | ||
| \(x\) | \(y\) | \((x,y)\) |
| 0 | ||
| −1 | ||
| 2 | ||
- Answer
-
\(y=3x−1\) \(x\) \(y\) \((x,y)\) 0 -1 (0, -1) −1 -4 (-1, -4) 2 5 (2, 5)
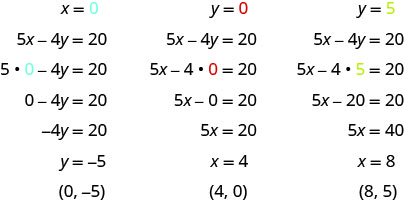
Complete the following table to find three solutions to the equation \(5x−4y=20\).
| \(5x−4y=20\) | ||
| \(x\) | \(y\) | \((x,y)\) |
| 0 | ||
| 0 | ||
| 5 | ||
Solution
Substitute the given value into the equation \(5x−4y=20\) and solve for the other variable. Then, fill in the values in the table.
-
The results are summarized in the table below.
\(5x−4y=20\) \(x\) \(y\) \((x,y)\) 0 −5 (0,−5) 4 0 (4,0) 8 5 (8,5)
Complete the table to find three solutions to the equation \(2x−5y=20\).
| \(2x−5y=20\) | ||
| \(x\) | \(y\) | \((x,y)\) |
| -4 | ||
| 0 | ||
| -5 | ||
- Answer
-
\(2x−5y=20\) \(x\) \(y\) \((x,y)\) 0 −4 (0,−4) 10 0 (10,0) −5 −6 (−5,−6)
Find Solutions to a Linear Equation
To find a solution to a linear equation, you really can pick any number you want to substitute into the equation for x or y. But since you’ll need to use that number to solve for the other variable, choosing a number that’s easy to work with is a good idea.
When the equation is in y-form, with y by itself on one side of the equation, it is usually easier to choose values of x and then solve for y.
Find three solutions to the equation \(y=−3x+2\).
Solution
We can substitute any value we want for \(x\) or any value for \(y\). Since the equation is in \(y\)-form, it will be easier to substitute in values of \(x\). Let’s pick \(x=0\), \(x=1\), and \(x=−1\).
 |
 |
 |
|||
 |
 |
 |
|||
| Substitute the value into the equation. |  |
 |
 |
||
| Simplify. |  |
 |
 |
||
| Simplify. |  |
 |
 |
||
| Write the ordered pair. | (0, 2) | (1, -1) | (-1, 5) | ||
| Check. | |||||
| y=−3x+2 | y=−3x+2 | y=−3x+2 | |||
| \(2 \stackrel{?}{=} -3 \cdot 0 + 2\) | \(-1 \stackrel{?}{=} -3 \cdot 1 + 2\) | \(5 \stackrel{?}{=} -3 (-1) + 2\) | |||
| \(2 \stackrel{?}{=} 0 + 2\) | \(-1 \stackrel{?}{=} -3 + 2\) | \(5 \stackrel{?}{=} -3 + 2\) | |||
| \(2 = 2\checkmark\) | \(-1 = -1\checkmark\) | \(5 = 5\checkmark\) | |||
-
So, (0,2), (1,−1) and (−1,5) are all solutions to \(y=−3x+2\). These solutions are summarized in the table below.
\(y=−3x+2\) \(x\) \(y\) \((x,y)\) 0 2 (0,2) 1 −1 (1,−1) −1 5 (−1,5)
Find three solutions to the equation \(y=−2x+3\).
- Answer
-
Answers will vary. Answers might include (0,3), (1,1) and (−1,5).
We have seen how using zero as one value of x makes finding the value of y easy. When an equation is in standard form, with both the x and y on the same side of the equation, it is usually easier to first find one solution when \(x=0\), find a second solution when y=0, and then find a third solution.
Find three solutions to the equation \(3x+2y=6\).
Solution
We can substitute any value we want for \(x\) or any value for \(y\). Since the equation is in standard form, let’s pick first \(x=0\), then \(y=0\), and then find a third point.
 |
 |
 |
|||
| Substitute the value into the equation. |  |
 |
 |
||
| Simplify. |  |
 |
 |
||
| Solve. |  |
 |
 |
||
 |
 |
 |
|||
| Write the ordered pair. | (0, 3) | (2, 0) | \((1,\frac{3}{2})\) | ||
| Check. | |||||
| \(3x+2y=6\) | \(3x+2y=6\) | \(3x+2y=6\) | |||
| \(3\cdot 0 + 2\cdot 3 \stackrel{?}{=} 6\) | \(3\cdot 2 + 2\cdot 0 \stackrel{?}{=} 6\) | \(3\cdot 1 + 2\cdot \frac{3}{2} \stackrel{?}{=} 6\) | |||
| \(0 + 6 \stackrel{?}{=} 6\) | \(6 + 0 \stackrel{?}{=} 6\) | \(3 + 3 \stackrel{?}{=} 6\) | |||
| \(6 = 6\checkmark\) | \(6 = 6\checkmark\) | \(6 = 6\checkmark\) | |||
So (0,3), (2,0), and \((1,\frac{3}{2})\) are all solutions to the equation \(3x+2y=6\). These solutions are summarized in the table below.
| \(3x+2y=6\) | ||
| \(x\) | \(y\) | \((x,y)\) |
| 0 | 3 | (0,3) |
| 2 | 0 | (2,0) |
| 1 | \(\frac{3}{2}\) | \((1, \frac{3}{2})\) |
Find three solutions to the equation \(2x+3y=6\).
- Answer
-
Answers will vary. Answers might include (0,2), (3,0), and (6, −2).