

6.4: Advanced shared symmetric-key methods
- Page ID
- 214567

\( \newcommand{\vecs}[1]{\overset { \scriptstyle \rightharpoonup} {\mathbf{#1}} } \)
\( \newcommand{\vecd}[1]{\overset{-\!-\!\rightharpoonup}{\vphantom{a}\smash {#1}}} \)
\( \newcommand{\dsum}{\displaystyle\sum\limits} \)
\( \newcommand{\dint}{\displaystyle\int\limits} \)
\( \newcommand{\dlim}{\displaystyle\lim\limits} \)
\( \newcommand{\id}{\mathrm{id}}\) \( \newcommand{\Span}{\mathrm{span}}\)
( \newcommand{\kernel}{\mathrm{null}\,}\) \( \newcommand{\range}{\mathrm{range}\,}\)
\( \newcommand{\RealPart}{\mathrm{Re}}\) \( \newcommand{\ImaginaryPart}{\mathrm{Im}}\)
\( \newcommand{\Argument}{\mathrm{Arg}}\) \( \newcommand{\norm}[1]{\| #1 \|}\)
\( \newcommand{\inner}[2]{\langle #1, #2 \rangle}\)
\( \newcommand{\Span}{\mathrm{span}}\)
\( \newcommand{\id}{\mathrm{id}}\)
\( \newcommand{\Span}{\mathrm{span}}\)
\( \newcommand{\kernel}{\mathrm{null}\,}\)
\( \newcommand{\range}{\mathrm{range}\,}\)
\( \newcommand{\RealPart}{\mathrm{Re}}\)
\( \newcommand{\ImaginaryPart}{\mathrm{Im}}\)
\( \newcommand{\Argument}{\mathrm{Arg}}\)
\( \newcommand{\norm}[1]{\| #1 \|}\)
\( \newcommand{\inner}[2]{\langle #1, #2 \rangle}\)
\( \newcommand{\Span}{\mathrm{span}}\) \( \newcommand{\AA}{\unicode[.8,0]{x212B}}\)
\( \newcommand{\vectorA}[1]{\vec{#1}} % arrow\)
\( \newcommand{\vectorAt}[1]{\vec{\text{#1}}} % arrow\)
\( \newcommand{\vectorB}[1]{\overset { \scriptstyle \rightharpoonup} {\mathbf{#1}} } \)
\( \newcommand{\vectorC}[1]{\textbf{#1}} \)
\( \newcommand{\vectorD}[1]{\overrightarrow{#1}} \)
\( \newcommand{\vectorDt}[1]{\overrightarrow{\text{#1}}} \)
\( \newcommand{\vectE}[1]{\overset{-\!-\!\rightharpoonup}{\vphantom{a}\smash{\mathbf {#1}}}} \)
\( \newcommand{\vecs}[1]{\overset { \scriptstyle \rightharpoonup} {\mathbf{#1}} } \)
\(\newcommand{\longvect}{\overrightarrow}\)
\( \newcommand{\vecd}[1]{\overset{-\!-\!\rightharpoonup}{\vphantom{a}\smash {#1}}} \)
\(\newcommand{\ket}[1]{\left| #1 \right>}\)
\(\newcommand{\bra}[1]{\left< #1 \right|}\)
\(\newcommand{\braket}[2]{\left< #1 \vphantom{#2} \right| \left. #2 \vphantom{#1} \right>}\)
\(\newcommand{\braopket}[3]{\left< #1 \vphantom{#2}\vphantom{#3} \right| #2 \vphantom{#1}\vphantom{#3} \left| #3 \vphantom{#1}\vphantom{#2} \right>}\)
\(\newcommand{\qmvec}[1]{\mathbf{\vec{#1}}}\)
\(\newcommand{\op}[1]{\hat{\mathbf{#1}}}\)
\(\newcommand{\expect}[1]{\langle #1 \rangle}\)
\(\newcommand{\dfn}[1]{\emph{\textbf{#1}}}\)
Both the substitution and transposition methods discussed so far are shared symmetric-key methods, meaning that both sender and receiver would have to have agreed upon the same secret encryption key before any methods could be sent.
All of the methods so far have been susceptible to frequency analysis since each letter is always mapped to the same encrypted character. More advanced methods get around this weakness. For example, the Enigma machines used in World War II had wheels that rotated. Each wheel was a substitution cipher, but the rotation would cause the substitution used to shift after each character.
For a simplified example, in the initial setup, the wheel might provide the mapping
- Original: \(\mathrm{ABCDEFGHIJKLMNOPQRSTUVWXYZ0123456789}\)
- Maps to: \(\mathrm{2BQF5WRTD8IJ6HLCOSUVK3A0X9YZN1G4ME7P}\)
After the first character is encrypted, the wheel rotates, shifting the mapping one space, resulting in a new shifted mapping:
- Original: \(\mathrm{ABCDEFGHIJKLMNOPQRSTUVWXYZ0123456789}\)
- Maps to: \(\mathrm{P2BQF5WRTD8IJ6HLCOSUVK3A0X9YZN1G4ME7}\)
Using this approach, no letter gets encrypted as the same character over and over.
Encrypt the message “See me”. Use a basic Caesar cipher with shift 3 as the initial substitution, but shift the substitution one place after each character.
Solution
The initial mapping is
- Original: \(\mathrm{ABCDEFGHIJKLMNOPQRSTUVWXYZ}\)
- Maps to: \(\mathrm{DEFGHIJKLMNOPQRSTUVWXYZABC}\)
This would map the first letter, S to V. We would then shift the mapping by one.
- Original: \(\mathrm{ABCDEFGHIJKLMNOPQRSTUVWXYZ}\)
- Now maps to: \(\mathrm{EFGHIJKLMNOPQRSTUVWXYZABCD}\)
Now the next letter, E, will map to I. Again we shift the cipher
- Original: \(\mathrm{ABCDEFGHIJKLMNOPQRSTUVWXYZ}\)
- Now maps to: \(\mathrm{FGHIJKLMNOPQRSTUVWXYZABCDE}\)
The next letter, E, now maps to J. Continuing this process, the final message would be VIJSL.
Notice that frequency analysis is much less useful now, since the character E has been mapped to three different characters due to the shifting of the substitution mapping.
Decrypt the message KIQRV if it was encrypted using a basic Caesar cipher with shift 3 as the initial substitution, but shifting the substitution one place after each character.
- Answer
-
The initial mapping was:
- Original: \(\mathrm{ABCDEFGHIJKLMNOPQRSTUVWXYZ}\)
- Now maps to: \(\mathrm{DEFGHIJKLMNOPQRSTUVWXYZABC}\)
Using this, we can see the first character of the encrypted message, \(K\), can be decrypted to the letter H. We now shift the mapping by one character.
- Original: \(\mathrm{ABCDEFGHIJKLMNOPQRSTUVWXYZ}\)
- Now maps to: \(\mathrm{EFGHIJKLMNOPQRSTUVWXYZABCD}\)
The second character in the message, I, can be decrypted to the letter E. Continuing this process of shifting and decrypting, KIQRV decrypts to HELLO.
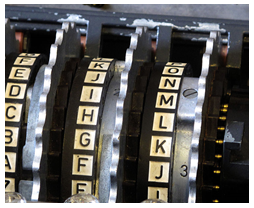 The actual Engima machines used in WWII were more complex. Each wheel consisted of a complex substitution cipher, and multiple wheels were used in a chain[1]. The specific wheels used, order of the wheels, and starting position of the wheels formed the encryption key. While captured Engima devices provided the Allied forces details on the encryption method, the keys still had to be broken to decrypt messages.
These code breaking efforts led to the development of some of the first electronic computers by Alan Turing at Bletchley Park in the United Kingdom. This is generally considered the beginnings of modern computing[2].
In the 1970s, the U.S. government had a competition and ultimately approved an algorithm deemed DES (Data Encryption Standard) to be used for encrypting government data. It became the standard encryption algorithm used. This method used a combination of multiple substitution and transposition steps, along with other steps in which the encryption key is mixed with the message. This method uses an encryption key with length 56 bits, meaning there are 256 possible keys.
This number of keys make a brute force attack extremely difficult and costly, but not impossible. In 1998, a team was able to find the decryption key for a message in 2 days, using about $250,000 worth of hardware. However, the price and time will go down as computer power increases.
From 1997 to 2001 the government held another competition, ultimately adopting a new method, deemed AES (Advanced Encryption Standard). This method uses encryption keys with 128, 192, or 256 bits, providing up to 2256 possible keys, making brute force attacks essentially impossible.
[1] http://en.wikipedia.org/wiki/File:En...abet_rings.jpg
[2] For a good overview, see http://www.youtube.com/watch?v=5nK_ft0Lf1s