6.2.1: Reasoning about Solving Equations (Part 1)
- Page ID
- 38428

\( \newcommand{\vecs}[1]{\overset { \scriptstyle \rightharpoonup} {\mathbf{#1}} } \)
\( \newcommand{\vecd}[1]{\overset{-\!-\!\rightharpoonup}{\vphantom{a}\smash {#1}}} \)
\( \newcommand{\id}{\mathrm{id}}\) \( \newcommand{\Span}{\mathrm{span}}\)
( \newcommand{\kernel}{\mathrm{null}\,}\) \( \newcommand{\range}{\mathrm{range}\,}\)
\( \newcommand{\RealPart}{\mathrm{Re}}\) \( \newcommand{\ImaginaryPart}{\mathrm{Im}}\)
\( \newcommand{\Argument}{\mathrm{Arg}}\) \( \newcommand{\norm}[1]{\| #1 \|}\)
\( \newcommand{\inner}[2]{\langle #1, #2 \rangle}\)
\( \newcommand{\Span}{\mathrm{span}}\)
\( \newcommand{\id}{\mathrm{id}}\)
\( \newcommand{\Span}{\mathrm{span}}\)
\( \newcommand{\kernel}{\mathrm{null}\,}\)
\( \newcommand{\range}{\mathrm{range}\,}\)
\( \newcommand{\RealPart}{\mathrm{Re}}\)
\( \newcommand{\ImaginaryPart}{\mathrm{Im}}\)
\( \newcommand{\Argument}{\mathrm{Arg}}\)
\( \newcommand{\norm}[1]{\| #1 \|}\)
\( \newcommand{\inner}[2]{\langle #1, #2 \rangle}\)
\( \newcommand{\Span}{\mathrm{span}}\) \( \newcommand{\AA}{\unicode[.8,0]{x212B}}\)
\( \newcommand{\vectorA}[1]{\vec{#1}} % arrow\)
\( \newcommand{\vectorAt}[1]{\vec{\text{#1}}} % arrow\)
\( \newcommand{\vectorB}[1]{\overset { \scriptstyle \rightharpoonup} {\mathbf{#1}} } \)
\( \newcommand{\vectorC}[1]{\textbf{#1}} \)
\( \newcommand{\vectorD}[1]{\overrightarrow{#1}} \)
\( \newcommand{\vectorDt}[1]{\overrightarrow{\text{#1}}} \)
\( \newcommand{\vectE}[1]{\overset{-\!-\!\rightharpoonup}{\vphantom{a}\smash{\mathbf {#1}}}} \)
\( \newcommand{\vecs}[1]{\overset { \scriptstyle \rightharpoonup} {\mathbf{#1}} } \)
\( \newcommand{\vecd}[1]{\overset{-\!-\!\rightharpoonup}{\vphantom{a}\smash {#1}}} \)
Lesson
Let's see how a balanced hanger is like an equation and moving its weight is like solving the equation.
Exercise \(\PageIndex{1}\): Hanger Diagrams
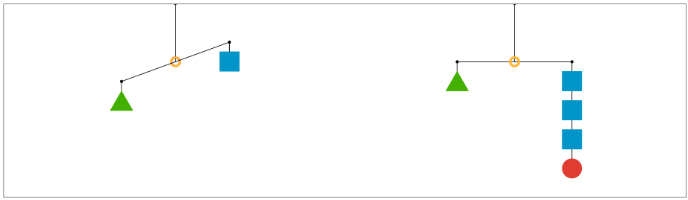
In the two diagrams, all the triangles weigh the same and all the squares weigh the same.
For each diagram, come up with . . .
- One thing that must be true
- One thing that could be true
- One thing that cannot possibly be true
Exercise \(\PageIndex{2}\): Hanger and Equation Matching
On each balanced hanger, figures with the same letter have the same weight.
- Match each hanger to an equation. Complete the equation by writing \(x\), \(y\), \(z\), or \(w\) in the empty box.
- \(2 ?+3=5\)
- \(3 ?+2=3\)
- \(6=2?+3\)
- \(7=3?+1\)
- Find the solution to each equation. Use the hanger to explain what the solution means.

Exercise \(\PageIndex{3}\): Use Hangers to Understand Equation Solving
Here are some balanced hangers where each piece is labeled with its weight. For each diagram:
- Write an equation.
- Explain how to figure out the weight of a piece labeled with a letter by reasoning about the diagram.
- Explain how to figure out the weight of a piece labeled with a letter by reasoning about the equation.

Summary
In this lesson, we worked with two ways to show that two amounts are equal: a balanced hanger and an equation. We can use a balanced hanger to think about steps to finding an unknown amount in an associated equation.
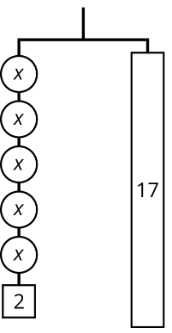
The hanger shows a total weight of 7 units on one side that is balanced with 3 equal, unknown weights and a 1-unit weight on the other. An equation that represents the relationship is \(7=3x+1\).

We can remove a weight of 1 unit from each side and the hanger will stay balanced. This is the same as subtracting 1 from each side of the equation.

An equation for the new balanced hanger is \(6=3x\).
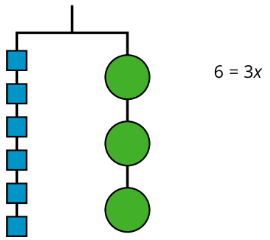
So the hanger will balance with \(\frac{1}{3}\) of the weight on each side: \(\frac{1}{3}\cdot 6=\frac{1}{3}\cdot 3x\).
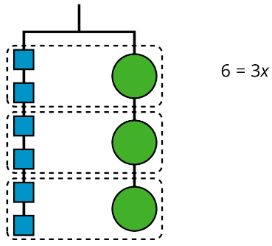
The two sides of the hanger balance with these weights: 6 1-unit weights on one side and 3 weights of unknown size on the other side.

Here is a concise way to write the steps above:
\(\begin{array}{lr}{7=3x+1}&{}\\{6=3x}&{\text{after subtracting 1 from each side}}\\{2=x}&{\text{after multiplying each side by }\frac{1}{3}}\end{array}\)
Practice
Exercise \(\PageIndex{4}\)
There is a proportional relationship between the volume of a sample of helium in liters and the mass of that sample in grams. If the mass of a sample is 5 grams, its volume is 28 liters. (5, 28) is shown on the graph below.

- What is the constant of proportionality in this relationship?
- In this situation, what is the meaning of the number you found in part a?
- Add at least three more points to the graph above, and label with their coordinates.
- Write an equation that shows the relationship between the mass of a sample of helium and its volume. Use \(m\) for mass and \(v\) for volume.
(From Unit 2.4.2)
Exercise \(\PageIndex{5}\)
Explain how the parts of the balanced hanger compare to the parts of the equation.
\(7=2x+3\)

Exercise \(\PageIndex{6}\)
For the hanger below:
- Write an equation to represent the hanger.
- Draw more hangers to show each step you would take to find \(x\). Explain your reasoning.
- Write an equation to describe each hanger you drew. Describe how each equation matches its hanger.