
6.2.2: Reasoning about Solving Equations (Part 2)
- Page ID
- 38427

\( \newcommand{\vecs}[1]{\overset { \scriptstyle \rightharpoonup} {\mathbf{#1}} } \)
\( \newcommand{\vecd}[1]{\overset{-\!-\!\rightharpoonup}{\vphantom{a}\smash {#1}}} \)
\( \newcommand{\id}{\mathrm{id}}\) \( \newcommand{\Span}{\mathrm{span}}\)
( \newcommand{\kernel}{\mathrm{null}\,}\) \( \newcommand{\range}{\mathrm{range}\,}\)
\( \newcommand{\RealPart}{\mathrm{Re}}\) \( \newcommand{\ImaginaryPart}{\mathrm{Im}}\)
\( \newcommand{\Argument}{\mathrm{Arg}}\) \( \newcommand{\norm}[1]{\| #1 \|}\)
\( \newcommand{\inner}[2]{\langle #1, #2 \rangle}\)
\( \newcommand{\Span}{\mathrm{span}}\)
\( \newcommand{\id}{\mathrm{id}}\)
\( \newcommand{\Span}{\mathrm{span}}\)
\( \newcommand{\kernel}{\mathrm{null}\,}\)
\( \newcommand{\range}{\mathrm{range}\,}\)
\( \newcommand{\RealPart}{\mathrm{Re}}\)
\( \newcommand{\ImaginaryPart}{\mathrm{Im}}\)
\( \newcommand{\Argument}{\mathrm{Arg}}\)
\( \newcommand{\norm}[1]{\| #1 \|}\)
\( \newcommand{\inner}[2]{\langle #1, #2 \rangle}\)
\( \newcommand{\Span}{\mathrm{span}}\) \( \newcommand{\AA}{\unicode[.8,0]{x212B}}\)
\( \newcommand{\vectorA}[1]{\vec{#1}} % arrow\)
\( \newcommand{\vectorAt}[1]{\vec{\text{#1}}} % arrow\)
\( \newcommand{\vectorB}[1]{\overset { \scriptstyle \rightharpoonup} {\mathbf{#1}} } \)
\( \newcommand{\vectorC}[1]{\textbf{#1}} \)
\( \newcommand{\vectorD}[1]{\overrightarrow{#1}} \)
\( \newcommand{\vectorDt}[1]{\overrightarrow{\text{#1}}} \)
\( \newcommand{\vectE}[1]{\overset{-\!-\!\rightharpoonup}{\vphantom{a}\smash{\mathbf {#1}}}} \)
\( \newcommand{\vecs}[1]{\overset { \scriptstyle \rightharpoonup} {\mathbf{#1}} } \)
\( \newcommand{\vecd}[1]{\overset{-\!-\!\rightharpoonup}{\vphantom{a}\smash {#1}}} \)
Lesson
Let's use hangers to understand two different ways of solving equations with parentheses.
Exercise \(\PageIndex{1}\): Equivalent to \(2(x+3)\)
Select all the expressions equivalent to \(2(x+3)\).
- \(2\cdot (x+3)\)
- \((x+3)2\)
- \(2\cdot x+2\cdot 3\)
- \(2\cdot x+3\)
- \((2\cdot x)+3\)
- \((2+x)3\)
Exercise \(\PageIndex{2}\): Either Or
1. Explain why either of these equations could represent this hanger:

\(14=2(x+3)\) or \(14=2x+6\)
2. Find the weight of one circle. Be prepared to explain your reasoning.
Exercise \(\PageIndex{3}\): Use Hangers to Understand Equation Solving, Again
Here are some balanced hangers. Each piece is labeled with its weight.

- Assign one of these equations to each hanger:
\[\begin{array}{lll}{2(x+5)=16}&{\qquad}&{3(y+200)=3,000}\\{20.8=4(z+1.1)}&{\qquad}&{\frac{20}{3}=2(w+\frac{2}{3})}\end{array}\nonumber\] - Explain how to figure out the weight of a piece labeled with a letter by reasoning about the diagram.
- Explain how to figure out the weight of a piece labeled with a letter by reasoning about the equation.
Summary
The balanced hanger shows 3 equal, unknown weights and 3 2-unit weights on the left and an 18-unit weight on the right.
There are 3 unknown weights plus 6 units of weight on the left. We could represent this balanced hanger with an equation and solve the equation the same way we did before.

\(\begin{aligned}3x+6&=18 \\ 3x&=12 \\ x&=4\end{aligned}\)
Since there are 3 groups of \(x+2\) on the left, we could represent this hanger with a different equation: \(3(x+2)=18\).
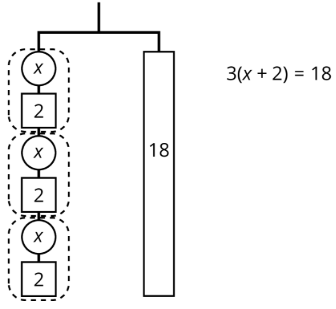
The two sides of the hanger balance with these weights: 3 groups of \(x+2\) on one side, and 18, or 3 groups of 6, on the other side.

The two sides of the hanger will balance with \(\frac{1}{3}\) of the weight on each side: \(\frac{1}{3}\cdot 3(x+2)=\frac{1}{3}\cdot 18\).

We can remove 2 units of weight from each side, and the hanger will stay balanced. This is the same as subtracting 2 from each side of the equation.

An equation for the new balanced hanger is \(x=4\). This gives the solution to the original equation.

Here is a concise way to write the steps above:
\(\begin{array}{lr}{3(x+2)=18}&{}\\{x+2=6}&{\text{after multiplying each side by }\frac{1}{3}}\\{x=4}&{\text{after subtracting }2\text{ from each side}}\end{array}\)
Practice
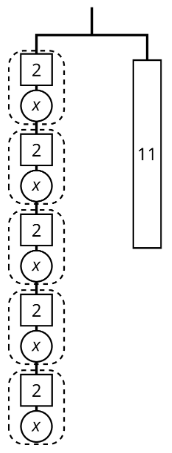
Exercise \(\PageIndex{4}\)
Here is a hanger:
- Write an equation to represent the hanger.
- Solve the equation by reasoning about the equation or the hanger. Explain your reasoning.
Exercise \(\PageIndex{5}\)
Explain how each part of the equation \(9=3(x+2)\) is represented in the hanger.

- \(x\)
- \(9\)
- \(3\)
- \(x+2\)
- \(3(x+2)\)
- the equal sign
Exercise \(\PageIndex{6}\)
Select the word from the following list that best describes each situation.
- You deposit money in a savings account, and every year the amount of money in the account increases by 2.5%.
- For every car sold, a car salesman is paid 6% of the car’s price.
- Someone who eats at a restaurant pays an extra 20% of the food price. This extra money is kept by the person who served the food.
- An antique furniture store pays $200 for a chair, adds 50% of that amount, and sells the chair for $300.
- The normal price of a mattress is $600, but it is on sale for 10% off.
- For any item you purchase in Texas, you pay an additional 6.25% of the item's price to the state government.
- Tax
- Commission
- Discount
- Markup
- Tip or gratuity
- Interest
(From Unit 4.3.2)
Exercise \(\PageIndex{7}\)
Clare drew this diagram to match the equation \(2x+16=50\), but she got the wrong solution as a result of using this diagram.
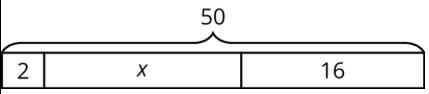
- What value of \(x\) can be found using the diagram?
- Show how to fix Clare's diagram to correctly match the equation.
- Use th new diagram to find a correct value for \(x\).
- Explain how the mistake Clare made when she drew her diagram.
(From Unit 6.1.3)