
26.1: A.1- Basic calculator functions
- Page ID
- 54488

\( \newcommand{\vecs}[1]{\overset { \scriptstyle \rightharpoonup} {\mathbf{#1}} } \)
\( \newcommand{\vecd}[1]{\overset{-\!-\!\rightharpoonup}{\vphantom{a}\smash {#1}}} \)
\( \newcommand{\id}{\mathrm{id}}\) \( \newcommand{\Span}{\mathrm{span}}\)
( \newcommand{\kernel}{\mathrm{null}\,}\) \( \newcommand{\range}{\mathrm{range}\,}\)
\( \newcommand{\RealPart}{\mathrm{Re}}\) \( \newcommand{\ImaginaryPart}{\mathrm{Im}}\)
\( \newcommand{\Argument}{\mathrm{Arg}}\) \( \newcommand{\norm}[1]{\| #1 \|}\)
\( \newcommand{\inner}[2]{\langle #1, #2 \rangle}\)
\( \newcommand{\Span}{\mathrm{span}}\)
\( \newcommand{\id}{\mathrm{id}}\)
\( \newcommand{\Span}{\mathrm{span}}\)
\( \newcommand{\kernel}{\mathrm{null}\,}\)
\( \newcommand{\range}{\mathrm{range}\,}\)
\( \newcommand{\RealPart}{\mathrm{Re}}\)
\( \newcommand{\ImaginaryPart}{\mathrm{Im}}\)
\( \newcommand{\Argument}{\mathrm{Arg}}\)
\( \newcommand{\norm}[1]{\| #1 \|}\)
\( \newcommand{\inner}[2]{\langle #1, #2 \rangle}\)
\( \newcommand{\Span}{\mathrm{span}}\) \( \newcommand{\AA}{\unicode[.8,0]{x212B}}\)
\( \newcommand{\vectorA}[1]{\vec{#1}} % arrow\)
\( \newcommand{\vectorAt}[1]{\vec{\text{#1}}} % arrow\)
\( \newcommand{\vectorB}[1]{\overset { \scriptstyle \rightharpoonup} {\mathbf{#1}} } \)
\( \newcommand{\vectorC}[1]{\textbf{#1}} \)
\( \newcommand{\vectorD}[1]{\overrightarrow{#1}} \)
\( \newcommand{\vectorDt}[1]{\overrightarrow{\text{#1}}} \)
\( \newcommand{\vectE}[1]{\overset{-\!-\!\rightharpoonup}{\vphantom{a}\smash{\mathbf {#1}}}} \)
\( \newcommand{\vecs}[1]{\overset { \scriptstyle \rightharpoonup} {\mathbf{#1}} } \)
\( \newcommand{\vecd}[1]{\overset{-\!-\!\rightharpoonup}{\vphantom{a}\smash {#1}}} \)
\(\newcommand{\avec}{\mathbf a}\) \(\newcommand{\bvec}{\mathbf b}\) \(\newcommand{\cvec}{\mathbf c}\) \(\newcommand{\dvec}{\mathbf d}\) \(\newcommand{\dtil}{\widetilde{\mathbf d}}\) \(\newcommand{\evec}{\mathbf e}\) \(\newcommand{\fvec}{\mathbf f}\) \(\newcommand{\nvec}{\mathbf n}\) \(\newcommand{\pvec}{\mathbf p}\) \(\newcommand{\qvec}{\mathbf q}\) \(\newcommand{\svec}{\mathbf s}\) \(\newcommand{\tvec}{\mathbf t}\) \(\newcommand{\uvec}{\mathbf u}\) \(\newcommand{\vvec}{\mathbf v}\) \(\newcommand{\wvec}{\mathbf w}\) \(\newcommand{\xvec}{\mathbf x}\) \(\newcommand{\yvec}{\mathbf y}\) \(\newcommand{\zvec}{\mathbf z}\) \(\newcommand{\rvec}{\mathbf r}\) \(\newcommand{\mvec}{\mathbf m}\) \(\newcommand{\zerovec}{\mathbf 0}\) \(\newcommand{\onevec}{\mathbf 1}\) \(\newcommand{\real}{\mathbb R}\) \(\newcommand{\twovec}[2]{\left[\begin{array}{r}#1 \\ #2 \end{array}\right]}\) \(\newcommand{\ctwovec}[2]{\left[\begin{array}{c}#1 \\ #2 \end{array}\right]}\) \(\newcommand{\threevec}[3]{\left[\begin{array}{r}#1 \\ #2 \\ #3 \end{array}\right]}\) \(\newcommand{\cthreevec}[3]{\left[\begin{array}{c}#1 \\ #2 \\ #3 \end{array}\right]}\) \(\newcommand{\fourvec}[4]{\left[\begin{array}{r}#1 \\ #2 \\ #3 \\ #4 \end{array}\right]}\) \(\newcommand{\cfourvec}[4]{\left[\begin{array}{c}#1 \\ #2 \\ #3 \\ #4 \end{array}\right]}\) \(\newcommand{\fivevec}[5]{\left[\begin{array}{r}#1 \\ #2 \\ #3 \\ #4 \\ #5 \\ \end{array}\right]}\) \(\newcommand{\cfivevec}[5]{\left[\begin{array}{c}#1 \\ #2 \\ #3 \\ #4 \\ #5 \\ \end{array}\right]}\) \(\newcommand{\mattwo}[4]{\left[\begin{array}{rr}#1 \amp #2 \\ #3 \amp #4 \\ \end{array}\right]}\) \(\newcommand{\laspan}[1]{\text{Span}\{#1\}}\) \(\newcommand{\bcal}{\cal B}\) \(\newcommand{\ccal}{\cal C}\) \(\newcommand{\scal}{\cal S}\) \(\newcommand{\wcal}{\cal W}\) \(\newcommand{\ecal}{\cal E}\) \(\newcommand{\coords}[2]{\left\{#1\right\}_{#2}}\) \(\newcommand{\gray}[1]{\color{gray}{#1}}\) \(\newcommand{\lgray}[1]{\color{lightgray}{#1}}\) \(\newcommand{\rank}{\operatorname{rank}}\) \(\newcommand{\row}{\text{Row}}\) \(\newcommand{\col}{\text{Col}}\) \(\renewcommand{\row}{\text{Row}}\) \(\newcommand{\nul}{\text{Nul}}\) \(\newcommand{\var}{\text{Var}}\) \(\newcommand{\corr}{\text{corr}}\) \(\newcommand{\len}[1]{\left|#1\right|}\) \(\newcommand{\bbar}{\overline{\bvec}}\) \(\newcommand{\bhat}{\widehat{\bvec}}\) \(\newcommand{\bperp}{\bvec^\perp}\) \(\newcommand{\xhat}{\widehat{\xvec}}\) \(\newcommand{\vhat}{\widehat{\vvec}}\) \(\newcommand{\uhat}{\widehat{\uvec}}\) \(\newcommand{\what}{\widehat{\wvec}}\) \(\newcommand{\Sighat}{\widehat{\Sigma}}\) \(\newcommand{\lt}{<}\) \(\newcommand{\gt}{>}\) \(\newcommand{\amp}{&}\) \(\definecolor{fillinmathshade}{gray}{0.9}\)Basic calculator functions
In this section we explain the basic functions of the calculator. There are various buttons and screens. We will describe below those which are most useful for us.
The main screen
The main screen is the screen that appears when you first turn on the calculator. It is the screen where you can perform operations such as adding numbers. You can always return to the main screen by pressing \(\boxed{\text{2nd}}\) \(\boxed{\text{mode}}\). Other screens will be discussed below according to their use.
The buttons
There are three levels of buttons. The physical buttons together with the green and blue print above each button, for example  . To select the items in green (blue) print first select \(\boxed{\text{alpha}}\) (\(\boxed{\text{2nd}}\)) then the button beneath the printed item. For example to select the letter K press \(\boxed{\text{alpha}}\) then \(\boxed{(}\).
From now on we will use ’button’ to mean any of the the physical buttons or the green or blue pseudo-buttons.
The clear button
Whenever you want to erase a line of input or a screen press the \(\boxed{\text{clear}}\) button (once or twice).
The delete and insert buttons
The ’DEL’ button (\(\boxed{\text{del}}\)) and the ’INS’ button (\(\boxed{\text{2nd}}\)\(\boxed{\text{del}}\)) are handy when editing an expression. The ’DEL’ button just deletes the character that is at the location of the cursor. The insert button is inserts the entered numbers or letters at the location of the cursor. For example, if you type 5+5 and you realize you wanted 15+5 instead, you should use the left arrow to move the cursor to the first 5, press \(\boxed{\text{2nd}}\)\(\boxed{\text{del}}\)\(\boxed{\text{1}}\). What happens if you just had pressed \(\boxed{\text{1}}\)? Note that the calculator stays in ’insert mode’ until the cursor is moved with the error or enter is pressed. So you could have changed the first 5 to a 115 by moving the cursor to the first 5 and pressing \(\boxed{\text{2nd}}\)\(\boxed{\text{del}}\)\(\boxed{\text{1}}\)\(\boxed{\text{1}}\).
The ANS button
The answer button is used when you want to use the answer above in an expression. For example suppose you had entered \(\boxed{\text{3}}\)\(\boxed{\text{+}}\)\(\boxed{\text{5}}\)\(\boxed{\text{enter}}\). Now you want to compute 7 minus the result of that computation. You can press \(\boxed{\text{7}}\)\(\boxed{\text{-}}\)\(\boxed{\text{2nd}}\)\(\boxed{\text{(-)}}\).
The ENTRY button
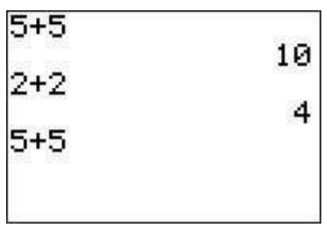
The ’ENTRY’ button (the blue selection above \(\boxed{\text{enter}}\) which is entered by pressing \(\boxed{\text{2nd}}\)\(\boxed{\text{enter}}\)) displays the last entry. This is a particularly useful button when you have entered an expression then realized there is an error. You can recall the expression then edit it. Unlike the ’ANS’ button, using ’ENTRY’ twice gives the entry before the last. For example:
We first prepare the screen: \(\boxed{\text{5}}\)\(\boxed{\text{+}}\)\(\boxed{\text{5}}\)\(\boxed{\text{enter}}\)\(\boxed{\text{2}}\)\(\boxed{\text{+}}\)\(\boxed{\text{2}}\)\(\boxed{\text{enter}}\). Now press the ’ENTRY’ button. \(2+2\) appears in the window. Press the ’ENTRY’ button again. \(5+5\) replaces the \(2+2\).
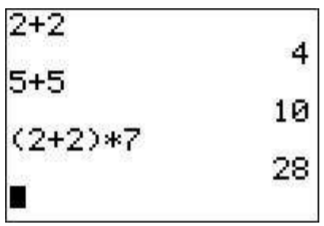
Press \(\boxed{\text{enter}}\) (so that 10 is the answer). To multiply the 2+2 by 7 we can enter: \(\boxed{\text{2nd}}\)\(\boxed{\text{enter}}\)\(\boxed{\text{2nd}}\)\(\boxed{\text{enter}}\). Then move the cursor using the left arrow to the position of the first 2 and press \(\boxed{\text{2nd}}\)\(\boxed{\text{del}}\)\(\boxed{\text{(}}\). Then move the cursor using the right button to after the second 2 and press the sequence \(\boxed{\text{)}}\)\(\boxed{\times}\)\(\boxed{\text{7}}\).
What happens if we leave out the parentheses? Can we enter \(\boxed{\text{(}}\) before \(\boxed{\text{2nd}}\)\(\boxed{\text{enter}}\)?
First type \(\boxed{\text{5}}\)\(\boxed{\text{+}}\)\(\boxed{\text{2}}\)\(\boxed{\text{enter}}\).
Then type \(\boxed{\text{2nd}}\)\(\boxed{\text{(-)}}\)\(\boxed{\text{+}}\)\(\boxed{\text{5}}\)\(\boxed{\text{enter}}\), \(\boxed{\text{2nd}}\)\(\boxed{\text{enter}}\)\(\boxed{\text{enter}}\), \(\boxed{\text{2nd}}\)\(\boxed{\text{enter}}\)\(\boxed{\text{enter}}\)

What would have happened if you had used the ’ANS’ button instead of the ’ENTRY’ button?
Note that instead of the second \(\boxed{\text{2nd}}\)\(\boxed{\text{enter}}\)\(\boxed{\text{enter}}\) you could have just pressed \(\boxed{\text{enter}}\).
\(-\) vs \((-)\)
There are two minus signs on the keyboard: \(\boxed{\text{-}}\) which is between \(\boxed{\times}\) and \(\boxed{\text{+}}\), and \(\boxed{\text{(-)}}\) which is to the lower left of \(\boxed{\text{enter}}\). What is the difference between the two? \(\boxed{\text{-}}\) means subtract. So this is the button you use to compute \(7-5\). The button \(\boxed{\text{(-)}}\) means ’negative’ or ’the opposite of’ so, for example, if you want to compute \(-5+7\) you enter \(\boxed{\text{(-)}}\)\(\boxed{\text{5}}\)\(\boxed{\text{+}}\)\(\boxed{\text{7}}\). Notice what happens if you use instead \(\boxed{\text{-}}\)(what will you subtract from?)! The \(\boxed{\text{(-)}}\) button is also what you use to enter expressions like \(-x+7\) or \(\exp(-x)\).
The MODE button
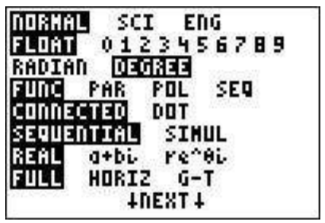
When calculating using the trigonometric functions (\(\sin\), \(\cos\), \(\tan\), and their inverses) it is important that you distinguish between degrees and radians and that you are in sync with your calculator. For that we need to look at the MODE screen. To view the Mode screen press \(\boxed{\text{mode}}\). The third line has the words Radian and Degree. If the word ’radian’ is highlighted and you want to compute in degrees you should press the down arrow twice (so that the highlighted word on the third line blinks) and then the right arrow and press \(\boxed{\text{enter}}\). The word ’degree’ should then be highlighted.
You can also verify your mode by evaluating \(\sin (180)\) on the main screen (you can press ’quit’ - \(\boxed{\text{2nd}}\)\(\boxed{\text{mode}}\) to return to the main screen). If you get \(0\) as an answer then you are in degree mode. What do you get if you are in radian mode?
The STO button
When evaluating complicated expressions, sometimes it is handy to use the storage feature. For example:
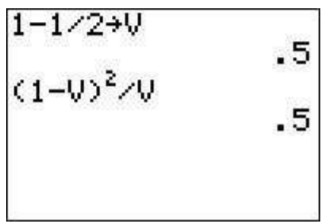
Suppose you want to evaluate \(\dfrac{\left(1-\left(1-\frac 1 2\right)\right)^{2}}{1-\frac 1 2}\). You can first assign a letter, V say, the value \(\left(1-\dfrac 1 2\right)\) since it appears twice. You can do this by pressing \(\boxed{\text{1}}\)\(\boxed{\text{-}}\)\(\boxed{\text{1}}\)\(\boxed{\div}\)\(\boxed{\text{2}}\)\(\boxed{\text{sto}}\)\(\boxed{\text{alpha}}\)\(\boxed{\text{6}}\). Then to evaluate the original expression type \(\boxed{\text{(}}\)\(\boxed{\text{1}}\)\(\boxed{\text{-}}\)\(\boxed{\text{alpha}}\)\(\boxed{\text{6}}\)\(\boxed{\text{)}}\)\(\boxed{x^2}\)\(\boxed{\div}\)\(\boxed{\text{alpha}}\)\(\boxed{\text{6}}\).
Note that you can use this feature with the ’ENTRY’ button to evaluate a function at different places.
Let’s evaluate \(x^2+x\) at \(x=0\) and at \(x=1\).
First set \(x=0\): \(\boxed{\text{0}}\)\(\boxed{\text{sto}}\)\(\boxed{\text{X,T,}\theta,n}\)\(\boxed{\text{enter}}\).
Then evaluate the function: \(\boxed{\text{X,T,}\theta,n}\)\(\boxed{x^2}\)\(\boxed{\text{+}}\)\(\boxed{\text{X,T,}\theta,n}\)\(\boxed{\text{enter}}\)
Now set \(x=1\): \(\boxed{\text{1}}\)\(\boxed{\text{sto}}\)\(\boxed{\text{X,T,}\theta,n}\)
Now evaluate the function again: \(\boxed{\text{2nd}}\)\(\boxed{\text{enter}}\)\(\boxed{\text{2nd}}\)\(\boxed{\text{enter}}\)\(\boxed{\text{enter}}\).
Note that there is another way to evaluate a function at several points which will be introduced below in the graphing section.