26.8: A.8- Programming the calculator
- Page ID
- 54495
\( \newcommand{\vecs}[1]{\overset { \scriptstyle \rightharpoonup} {\mathbf{#1}} } \)
\( \newcommand{\vecd}[1]{\overset{-\!-\!\rightharpoonup}{\vphantom{a}\smash {#1}}} \)
\( \newcommand{\id}{\mathrm{id}}\) \( \newcommand{\Span}{\mathrm{span}}\)
( \newcommand{\kernel}{\mathrm{null}\,}\) \( \newcommand{\range}{\mathrm{range}\,}\)
\( \newcommand{\RealPart}{\mathrm{Re}}\) \( \newcommand{\ImaginaryPart}{\mathrm{Im}}\)
\( \newcommand{\Argument}{\mathrm{Arg}}\) \( \newcommand{\norm}[1]{\| #1 \|}\)
\( \newcommand{\inner}[2]{\langle #1, #2 \rangle}\)
\( \newcommand{\Span}{\mathrm{span}}\)
\( \newcommand{\id}{\mathrm{id}}\)
\( \newcommand{\Span}{\mathrm{span}}\)
\( \newcommand{\kernel}{\mathrm{null}\,}\)
\( \newcommand{\range}{\mathrm{range}\,}\)
\( \newcommand{\RealPart}{\mathrm{Re}}\)
\( \newcommand{\ImaginaryPart}{\mathrm{Im}}\)
\( \newcommand{\Argument}{\mathrm{Arg}}\)
\( \newcommand{\norm}[1]{\| #1 \|}\)
\( \newcommand{\inner}[2]{\langle #1, #2 \rangle}\)
\( \newcommand{\Span}{\mathrm{span}}\) \( \newcommand{\AA}{\unicode[.8,0]{x212B}}\)
\( \newcommand{\vectorA}[1]{\vec{#1}} % arrow\)
\( \newcommand{\vectorAt}[1]{\vec{\text{#1}}} % arrow\)
\( \newcommand{\vectorB}[1]{\overset { \scriptstyle \rightharpoonup} {\mathbf{#1}} } \)
\( \newcommand{\vectorC}[1]{\textbf{#1}} \)
\( \newcommand{\vectorD}[1]{\overrightarrow{#1}} \)
\( \newcommand{\vectorDt}[1]{\overrightarrow{\text{#1}}} \)
\( \newcommand{\vectE}[1]{\overset{-\!-\!\rightharpoonup}{\vphantom{a}\smash{\mathbf {#1}}}} \)
\( \newcommand{\vecs}[1]{\overset { \scriptstyle \rightharpoonup} {\mathbf{#1}} } \)
\( \newcommand{\vecd}[1]{\overset{-\!-\!\rightharpoonup}{\vphantom{a}\smash {#1}}} \)
\(\newcommand{\avec}{\mathbf a}\) \(\newcommand{\bvec}{\mathbf b}\) \(\newcommand{\cvec}{\mathbf c}\) \(\newcommand{\dvec}{\mathbf d}\) \(\newcommand{\dtil}{\widetilde{\mathbf d}}\) \(\newcommand{\evec}{\mathbf e}\) \(\newcommand{\fvec}{\mathbf f}\) \(\newcommand{\nvec}{\mathbf n}\) \(\newcommand{\pvec}{\mathbf p}\) \(\newcommand{\qvec}{\mathbf q}\) \(\newcommand{\svec}{\mathbf s}\) \(\newcommand{\tvec}{\mathbf t}\) \(\newcommand{\uvec}{\mathbf u}\) \(\newcommand{\vvec}{\mathbf v}\) \(\newcommand{\wvec}{\mathbf w}\) \(\newcommand{\xvec}{\mathbf x}\) \(\newcommand{\yvec}{\mathbf y}\) \(\newcommand{\zvec}{\mathbf z}\) \(\newcommand{\rvec}{\mathbf r}\) \(\newcommand{\mvec}{\mathbf m}\) \(\newcommand{\zerovec}{\mathbf 0}\) \(\newcommand{\onevec}{\mathbf 1}\) \(\newcommand{\real}{\mathbb R}\) \(\newcommand{\twovec}[2]{\left[\begin{array}{r}#1 \\ #2 \end{array}\right]}\) \(\newcommand{\ctwovec}[2]{\left[\begin{array}{c}#1 \\ #2 \end{array}\right]}\) \(\newcommand{\threevec}[3]{\left[\begin{array}{r}#1 \\ #2 \\ #3 \end{array}\right]}\) \(\newcommand{\cthreevec}[3]{\left[\begin{array}{c}#1 \\ #2 \\ #3 \end{array}\right]}\) \(\newcommand{\fourvec}[4]{\left[\begin{array}{r}#1 \\ #2 \\ #3 \\ #4 \end{array}\right]}\) \(\newcommand{\cfourvec}[4]{\left[\begin{array}{c}#1 \\ #2 \\ #3 \\ #4 \end{array}\right]}\) \(\newcommand{\fivevec}[5]{\left[\begin{array}{r}#1 \\ #2 \\ #3 \\ #4 \\ #5 \\ \end{array}\right]}\) \(\newcommand{\cfivevec}[5]{\left[\begin{array}{c}#1 \\ #2 \\ #3 \\ #4 \\ #5 \\ \end{array}\right]}\) \(\newcommand{\mattwo}[4]{\left[\begin{array}{rr}#1 \amp #2 \\ #3 \amp #4 \\ \end{array}\right]}\) \(\newcommand{\laspan}[1]{\text{Span}\{#1\}}\) \(\newcommand{\bcal}{\cal B}\) \(\newcommand{\ccal}{\cal C}\) \(\newcommand{\scal}{\cal S}\) \(\newcommand{\wcal}{\cal W}\) \(\newcommand{\ecal}{\cal E}\) \(\newcommand{\coords}[2]{\left\{#1\right\}_{#2}}\) \(\newcommand{\gray}[1]{\color{gray}{#1}}\) \(\newcommand{\lgray}[1]{\color{lightgray}{#1}}\) \(\newcommand{\rank}{\operatorname{rank}}\) \(\newcommand{\row}{\text{Row}}\) \(\newcommand{\col}{\text{Col}}\) \(\renewcommand{\row}{\text{Row}}\) \(\newcommand{\nul}{\text{Nul}}\) \(\newcommand{\var}{\text{Var}}\) \(\newcommand{\corr}{\text{corr}}\) \(\newcommand{\len}[1]{\left|#1\right|}\) \(\newcommand{\bbar}{\overline{\bvec}}\) \(\newcommand{\bhat}{\widehat{\bvec}}\) \(\newcommand{\bperp}{\bvec^\perp}\) \(\newcommand{\xhat}{\widehat{\xvec}}\) \(\newcommand{\vhat}{\widehat{\vvec}}\) \(\newcommand{\uhat}{\widehat{\uvec}}\) \(\newcommand{\what}{\widehat{\wvec}}\) \(\newcommand{\Sighat}{\widehat{\Sigma}}\) \(\newcommand{\lt}{<}\) \(\newcommand{\gt}{>}\) \(\newcommand{\amp}{&}\) \(\definecolor{fillinmathshade}{gray}{0.9}\)This section is more advanced and is only recommended for students who are familiar with programming languages.
Hello world
A ‘Hello World’ program is a program that only displays the words “Hello World.” It is a starting point to understand the procedure of creating and running a program before going to more advanced programming techniques.
To create a new program press \(\boxed{\text{prgm}}\), move to the right \(\boxed{\triangleright}\) to ‘NEW,’ and give it the name ‘HELLO.’

Next, we need to add the Display command. Press \(\boxed{\text{prgm}}\); you see a list of commands. We move to the right to ‘I/O’ for input/output commands. Select the third item ‘Disp’ for display.

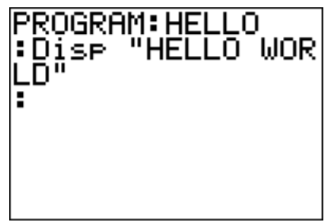
To finish, we need to add ‘"HELLO WORLD."’ (Quotation marks obtained by pressing \(\boxed{\text{alpha}}\)\(\boxed{\text{+}}\); space is obtained by \(\boxed{\text{alpha}}\)\(\boxed{\text{0}}\).) The complete program is shown below.

To execute the program, quit \(\boxed{\text{2nd}}\)\(\boxed{\text{mode}}\), press \(\boxed{\text{prgm}}\) and confirm with \(\boxed{\text{enter}}\). After another \(\boxed{\text{enter}}\), the program should run as shown below.

The quadratic formula
We next implement the quadratic formula
\[ax^2+bx+c=0 \quad\implies \quad x=\dfrac{-b\pm\sqrt{b^2-4ac}}{2a} \nonumber \]
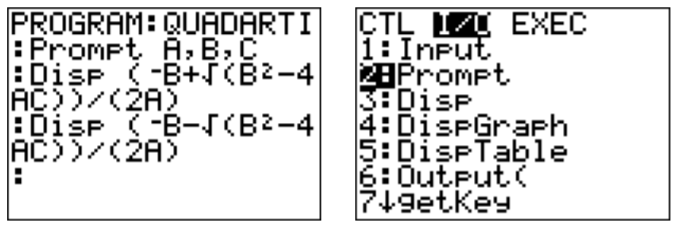
Create a new program ‘QUADRATI.’ We now need a new command, the Prompt command which will ask for three input values and places them in the variables A, B, C. The Prompt command is the second item in the ‘I/O’ menu.

After executing the new program, enter any input values (for example A\(=3\), B\(=-10\), C\(=-8\)). The answer should appear below.

Directional angle
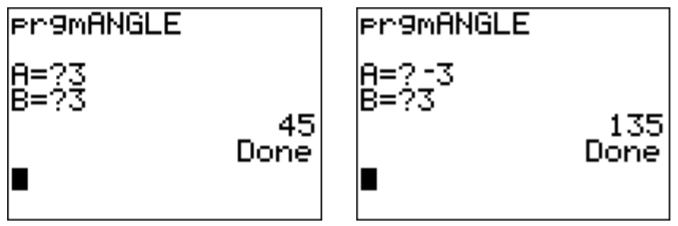
Our third and last program calculates the directional angle of a vector \(\vec{v}=\langle a,b\rangle\). Recall that the angle is \(\tan^{-1}(b/a)\) or \(\tan^{-1}(b/a)+180^\circ\) depending on the quadrant in which \(\vec{v}\) is pointing. In quadrant II and III, we need to add \(180^\circ\) degrees. This is exactly the case when \(a<0\). Thus, we prompt for input values A and B, and we calculate \(\tan^{-1}(b/a)\) and place it into the new variable G. (The arrow is obtained by pressing \(\boxed{\text{sto}}\).) We then check if \(a<0\), in which case we add \(180\) to G. (Here, we are assuming that the calculator is in degree mode).

Note that the ‘If’ command is obtained by pressing \(\boxed{\text{prgm}}\), and ‘\(<\)’ is obtained from the TEST menu, press \(\boxed{\text{2nd}}\)\(\boxed{\text{math}}\)and then \(\boxed{\text{5}}\). We may now run the program and check its correctness in some examples.

Other projects
Here is a list of projects that you may want to try to implement on your calculator.
- Display the final amount of an investment for a given principal \(P\), annual interest rate \(r\), number of compoundings per year \(n\), and number of years \(t\) (see Observation [OBS:n-th-compounding] on page ).
- In the program above for the directional angle, check for the cases when \(a=0\), and display the correct answers.
- Implement the long division (see Chapter 8).
Erasing a program
To erase a program that you have written, press \(\boxed{\text{2nd}}\)\(\boxed{\text{+}}\), then \(\boxed{\text{2}}\), then \(\boxed{\text{1}}\). A list of all your programs appears.

Select the program you want to delete with \(\boxed{\triangle}\)\(\boxed{\triangledown}\) and press the \(\boxed{\text{del}}\) key. Confirm your selection with \(\boxed{\text{2}}\) ‘Yes.’


