
2.1: Remixing a Book to Your Sandbox


- Last updated
- Jul 6, 2021
- Save as PDF

( \newcommand{\kernel}{\mathrm{null}\,}\)
This page will cover the basics of how to use the Remixer to create a custom textbook in your sandbox.
Note that there are more detailed instructions for this process available here: Construction Guide - How to Make a LibreTexts Remix.
Remixing a Custom Textbook:
Although a textbook on the LibreTexts platform can be created one Chapter and Section at a time, either written from scratch, copied from the source books one section at a time, or using the Content Reuse option to transclude/mirror existing source pages from the Bookshelves, the Remixer offers a much faster way to set up a custom course textbook from the source books on the Bookshelves or even from other customized course books in Campus Bookshelves.
If you choose to create a textbook from existing source pages, your remixed textbook will contain transcluded/mirrored links to the source pages rather than immediately creating distinct copies of them all. These sections can still be renumbered to match your chapter and section organization (and this will be reflected in Figures, Examples, Theorems, etc.), and the pages will update if any typos are fixed in the linked source pages. If you find any typos as you proofread your remixed book, please contact Paul Seeburger or someone else at LibreTexts to fix them for you. Once you become proficient at editing LibreText pages, you may also be given permission to go to the source pages to fix them yourself! To contact us about typos, either use the Leave Feedback button near the bottom of the relevant page (to the right of "Was this article helpful?") or email me or Delmar directly about it. Please be very specific, so we can quickly fix the issue(s).
Once your book is created, if you desire to customize the content of a section yourself, you can “fork” it, creating a distinct copy of the original page that is no longer linked to the source page. Your changes to it will not affect the original page on the Bookshelves and edits to the original will no longer affect your copied version. It is even possible to use the Reuse Content feature to transclude subsections of a page and to insert your own additional custom exposition before and after it. In fact, on any transcluded section, you will always have the option to add your own text or other materials at the top or bottom of the page, while leaving the rest of the section linked to the original source!
Now, before you are ready to Remix a new textbook, you will need to survey the textbooks on the Bookshelves and possibly also those that are in Campus Bookshelves. Once you know which books, chapters, and sections you wish to use to create your new custom course text, it’s time to open the Remixer and get started!
Once you are logged into LibreTexts as an author/editor/viewer, you will see the following bar near the top of the page:

Unlike the other options (except Downloads), it does not matter what page you are on for the Remixer. It will take you to the same place. The first time you open the Remixer, it will look like the following:

Note that after you use the Remixer, it will store a cookie on your computer and will therefore remember what you last used the Remixer to do. If you want to go back to that Remix to continue working on it, click on the Load From Previous Session button in the upper-right corner. The Remixer will then show the last remix you worked on in the state in which you left it.
By default, the Remixer provides five empty untitled chapters. I usually don't want these empty chapters. To clear these quickly or to simply start over, we can click on the Start Over button with the circular arrow on the left side of the blue bar above the Library Panel. This will clear any content in the Remix Panel to the lower right. When you start over, you will be asked the number of provided empty Chapters and Sections (pages) in each chapter. I prefer to add empty pages to my custom books directly rather than using the Remixer, so I would usually choose 0 Chapters and 0 Pages per Chapter. You'll still be given Front Matter and Back Matter for your new book.
You can now name your textbook in the top textbox labeled Remix name. We recommend making this the course name, although, you can use whatever makes sense for your situation.
By default your Remixes (custom textbooks) will first be published to your Sandbox. Once you are ready for your custom textbook to go live, one of the curators will be glad to help you move it to your campus bookshelf located in Campus Bookshelves and give you editing rights to your book there so you will be able to continue to customize the book as you begin to use it.
As discussed above, by default the Remixer will create linked (transcluded) copies of the source pages when it creates your custom book. Note that this will still create your own “forked” and editable versions of the top level book page and chapter pages (those that show the sections in each chapter). This means you can add additional pages to these whenever you wish. As mentioned before, you can actually also add your own text before or after the transcluded content on any given page while keeping this content linked to the source. Or you can also "fork" the page, giving you a distinct full copy of the content that you can edit and customize to your heart's content. It will no longer update when typos are fixed in the original source pages, and your changes will not affect others using the source pages.
As you get started using the Remixer (or as a refresher later on), you can turn on the Remixer Tutorial by clicking the slider on the right under Remixer Options labeled Show tutorial. It contains a lot of useful information, some of it similar to what is found here. There is also a chapter in the LibreTexts Construction Guide on Remixes. Although this tutorial covers the basic steps of the process, we recommend that you read that as well. There is a link to this guide on top of the Remix page (and a link to it at the top of this tutorial page too).
The Autonumber feature can be helpful, particularly if you are mixing content from multiple books or not using all the sections in some chapters of the original book. If turned on, it will facilitate the numbering of your chapters and sections to automatically start with Chapter 1 and Section 1.
But occasionally, Autonumber may adjust the numbering in ways that do not match your desires (e.g., if you want to start with Chapter 12). In that case, turn it off and go from there. You can turn it on or off at any time, but when it is on, it will take over and renumber all sections in your Remix.
Now find a book in the Library Panel on the left from which you wish to reuse content. Once you find it, you have several options.
-
You can click and drag on the entire book, dragging it just above the top title layer in the Remix Panel on the right. This will allow you to copy the entire book all at once.
-
You can click and drag a whole chapter at a time and drop it below the top title level of the Remix Panel, placing it in the order you wish it to appear in the book.
-
You can also simply click and drag one section at a time and place it in your remixed book where you wish it to appear.
In the example shown below, a custom book was made for a Calculus 2 class from middle chapters of the OpenStax Calculus text in the Bookshelves. Note that Autonumber needed to be turned off in order to maintain the chapter numbers 5 - 10 rather than automatically converting them to chapters 2 - 7.

If you create any sections you do not want, or if you did not click Start Over to clear the default chapters, you can use the delete button (a trash can icon) to delete them. There are undo and redo buttons, and a pencil icon to allow you rename sections or modify other settings. Many of these are more advanced settings, and it's recommended that you leave them at their default values unless you know what you are doing (or just want to experiment with them to see what they do).
If you already know there are a few Sections that you plan to write yourself, you can add these blank pages now and title them, using the button with the plus sign on it.
But these will be easy to add later as well. You will just go to the Chapter page in which you wish to add a Section and click the New button (which is just to the left of the Remixer button) on the author bar, select a Page/Section, enter a title for the page, save it (before editing it) and then click the Edit button again to add your content. (The first save sets some important settings.)
Just before publishing your new textbook, we recommend that you use the Save Map button to save your new Remix. This makes it easy to share the Remix with someone else or to load it back in to create another version of the text. Most of the time, we will not need this again, but it allows you to keep a record of your Remix that you could review later, if you desire.
Once you are happy with the Chapters and Sections in your new textbook, it’s time to publish it to your Sandbox folder. Click on the green SAVE TO SERVER button. You should see something like the following screen:
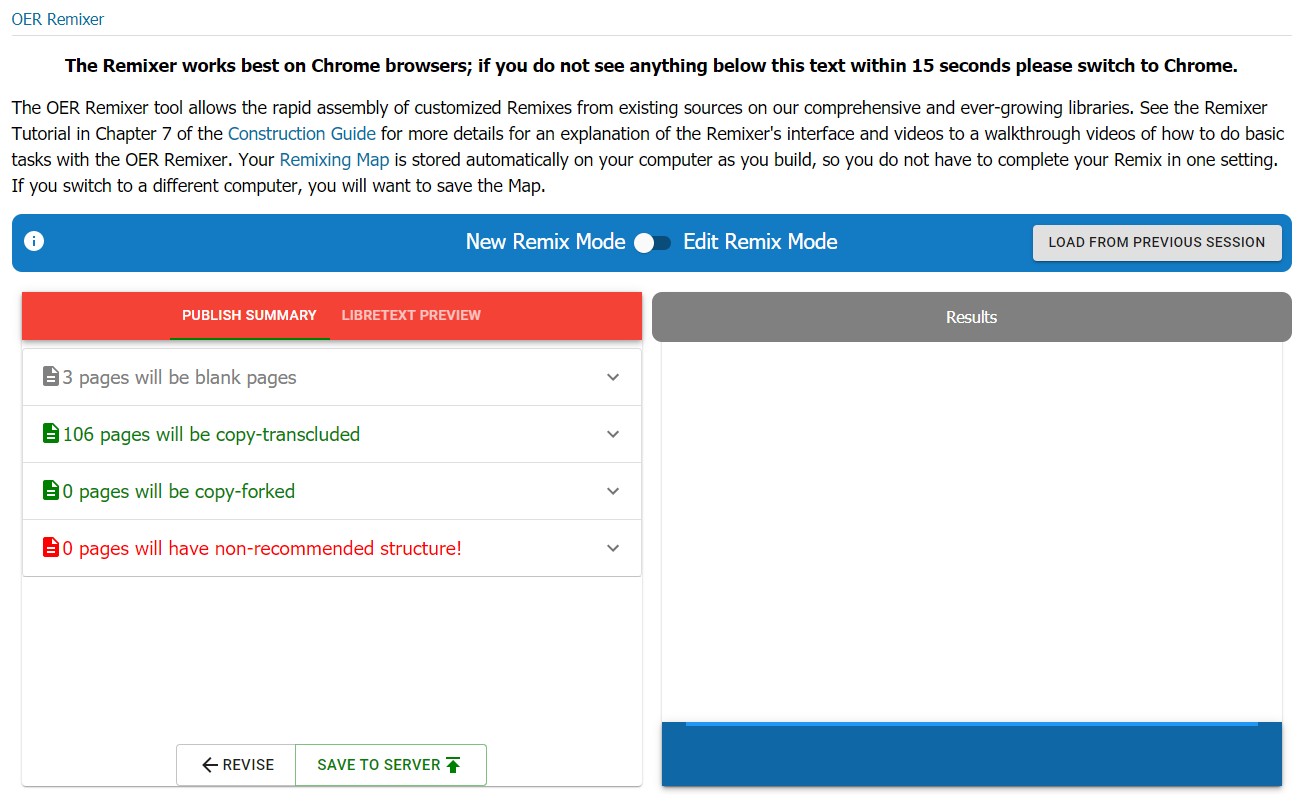
The left panel displays a summary of the pages being created.
Now click the SAVE TO SERVER button again and you will see the progress being made on creating your new textbook, one section/page at a time. The results should look something like this:

Note in Figure 2.1.4 above that the Chapter pages are labeled as “Forked”. As mentioned above, this means that these pages are completely yours to edit freely. The other pages, marked “Transcluded”, can actually also be edited (adding text above and below the transcluded text), but they currently contain Content Reuse elements that you can adjust as you decide to customize them more fully. You’ll be able to “fork” these transcluded pages to fully edit them when and if you choose to do so.
Note the text on right side of the blue bar in the lower right corner of the window, "Contact info@libretexts.org to move this Remix to a Campus Hub." As mentioned before, once you are ready for your textbook to go "live", you can have it published to your Campus folder in the Campus Bookshelves. If one does not yet exist for your institution, one will be created for you. Note that the book does NOT need to be completed before you place it in your Campus Hub. You will likely be continuing to customize it each semester you use it.
Now click the white text on the left side of the blue rectangle, “Your new Text will be available here”. This should open your new textbook in your Sandbox! And now you can begin to customize it. See image below for this textbook.
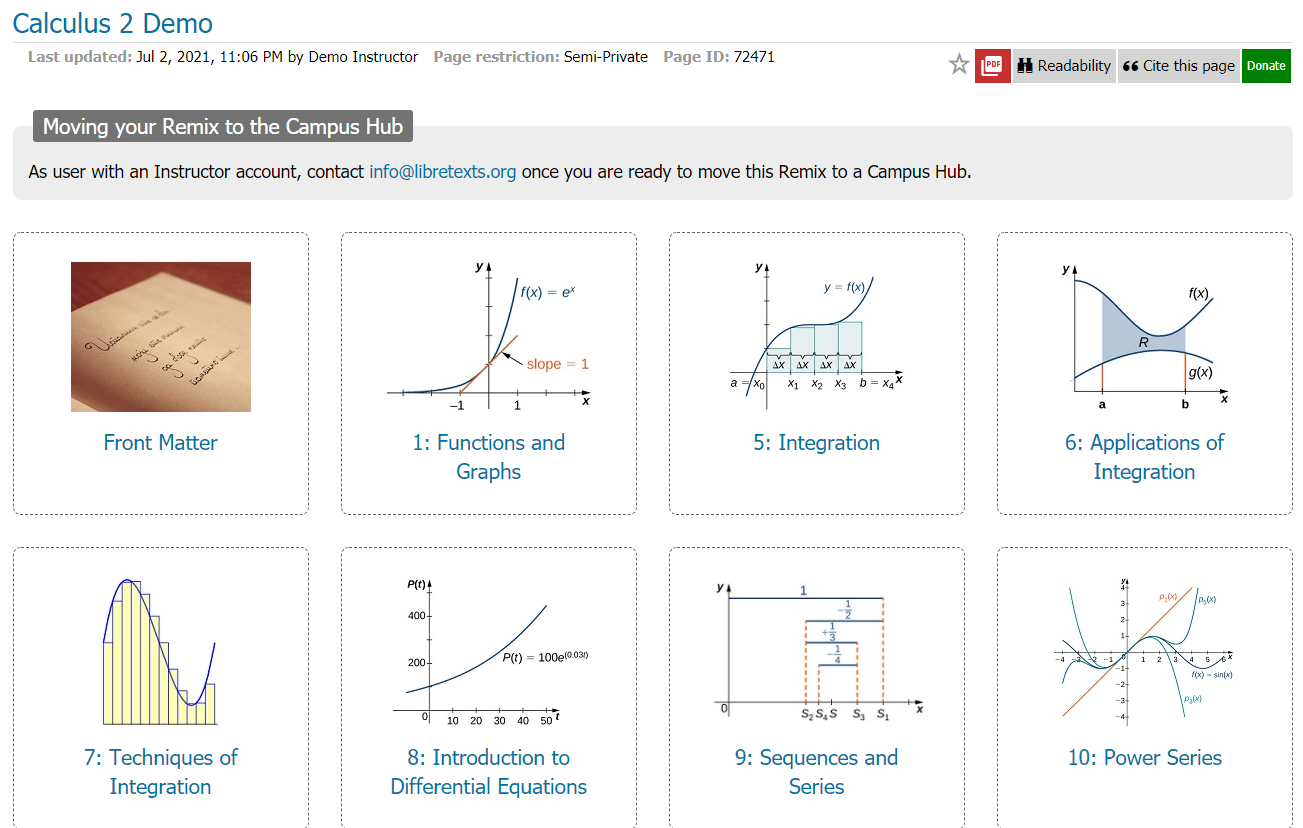
Note that a message is also displayed on the remix's title page reminding you how you can request for it to be moved to your Campus Hub.
Re-Remixing an Existing Textbook to Adjust its Contents:
Once you have created a course textbook, there are several options for adjusting its contents. You can, of course, add your own new material or “fork” and customize the existing sections. You can add new transcluded/mirrored content by using the Reuse Content option in a new Section/Page that you can add directly in your Chapter folders.
But it’s also possible to use the Remixer to Re-Remix the book (or edit the remix), adjusting which sections you include and perhaps adjusting the section numbers and names all in one place. For example, when I created my MCC Intermediate Algebra LibreText, I realized that I needed to add a couple of additional sections to my book from another source book after I had already published it. This was quite easy to do using this feature!
Now let's say we want to remove Section 8.5 from the Calculus 2 book we created above and add an Appendix with Trig identities, etc.
-
First we need to enter the Remixer again. Click on the Remixer button from any page. Now move the selector button from New Remix Mode to Edit Remix Mode. See Figure 2.1.6 below.
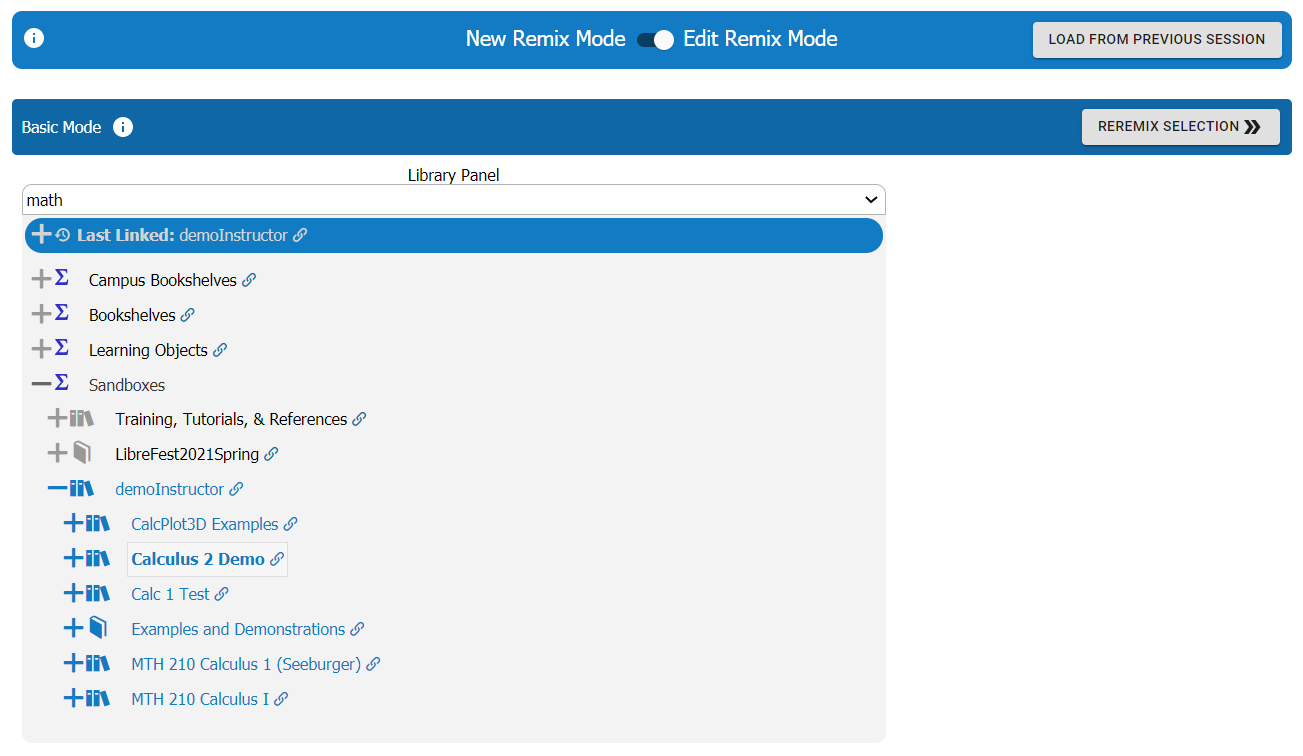
Figure 2.1.6: Re-Remixing the Calculus 2 Demo text. -
The Remix window will change to appear like Figure 2.1.6 above.
-
Use the Library Panel on the left side to find the textbook in your Sandbox (or possibly in your college's folder in Campus Bookshelves) for which you wish to adjust the Remix. Click on it to select it and then click on the REREMIX SELECTION >> button to the upper right corner of the Remix control bar.
-
Now you can add and remove sections quickly. You can double-click on any sections you wish to rename (or renumber, if autonumber is off).
Note that deleted sections/pages are shown crossed out in red. Added sections are shown in green (even if renamed).
Sections that have only adjusted numbers or names would be shown in yellow.

-
Once you are happy with the new version of your remix, click the green SAVE TO SERVER button on the right end of the Remixer control bar. A page like the following should appear:

Note that a summary of all changes should appear here. We can click the downwards pointing chevrons to see details of the changes. (They change to upwards pointing chevrons to indicate you could then close these details.) See Figure 2.1.8 above.
-
Once you are ready to publish your adjusted Remix, click the SAVE TO SERVER button again.
Again a summary of the tasks done in adjusting your text should appear in the panel on the right. See below for an example:

-
Now click the blue text in the black rectangle in the lower right corner of the window, “Your new Text will be available here”. This should open your newly revised textbook in its home location (either your Sandbox or your Campus Hub).
Check it over to see that the changes you made look as you expected them to look.
Let us know if you have any questions on this process!