Mathematics LibreTexts

4.3: The Key Fraction Rule

  • Page ID
    9844
  • \( \newcommand{\vecs}[1]{\overset { \scriptstyle \rightharpoonup} {\mathbf{#1}} } \)

    \( \newcommand{\vecd}[1]{\overset{-\!-\!\rightharpoonup}{\vphantom{a}\smash {#1}}} \)

    \( \newcommand{\id}{\mathrm{id}}\) \( \newcommand{\Span}{\mathrm{span}}\)

    ( \newcommand{\kernel}{\mathrm{null}\,}\) \( \newcommand{\range}{\mathrm{range}\,}\)

    \( \newcommand{\RealPart}{\mathrm{Re}}\) \( \newcommand{\ImaginaryPart}{\mathrm{Im}}\)

    \( \newcommand{\Argument}{\mathrm{Arg}}\) \( \newcommand{\norm}[1]{\| #1 \|}\)

    \( \newcommand{\inner}[2]{\langle #1, #2 \rangle}\)

    \( \newcommand{\Span}{\mathrm{span}}\)

    \( \newcommand{\id}{\mathrm{id}}\)

    \( \newcommand{\Span}{\mathrm{span}}\)

    \( \newcommand{\kernel}{\mathrm{null}\,}\)

    \( \newcommand{\range}{\mathrm{range}\,}\)

    \( \newcommand{\RealPart}{\mathrm{Re}}\)

    \( \newcommand{\ImaginaryPart}{\mathrm{Im}}\)

    \( \newcommand{\Argument}{\mathrm{Arg}}\)

    \( \newcommand{\norm}[1]{\| #1 \|}\)

    \( \newcommand{\inner}[2]{\langle #1, #2 \rangle}\)

    \( \newcommand{\Span}{\mathrm{span}}\) \( \newcommand{\AA}{\unicode[.8,0]{x212B}}\)

    \( \newcommand{\vectorA}[1]{\vec{#1}}      % arrow\)

    \( \newcommand{\vectorAt}[1]{\vec{\text{#1}}}      % arrow\)

    \( \newcommand{\vectorB}[1]{\overset { \scriptstyle \rightharpoonup} {\mathbf{#1}} } \)

    \( \newcommand{\vectorC}[1]{\textbf{#1}} \)

    \( \newcommand{\vectorD}[1]{\overrightarrow{#1}} \)

    \( \newcommand{\vectorDt}[1]{\overrightarrow{\text{#1}}} \)

    \( \newcommand{\vectE}[1]{\overset{-\!-\!\rightharpoonup}{\vphantom{a}\smash{\mathbf {#1}}}} \)

    \( \newcommand{\vecs}[1]{\overset { \scriptstyle \rightharpoonup} {\mathbf{#1}} } \)

    \( \newcommand{\vecd}[1]{\overset{-\!-\!\rightharpoonup}{\vphantom{a}\smash {#1}}} \)

    \(\newcommand{\avec}{\mathbf a}\) \(\newcommand{\bvec}{\mathbf b}\) \(\newcommand{\cvec}{\mathbf c}\) \(\newcommand{\dvec}{\mathbf d}\) \(\newcommand{\dtil}{\widetilde{\mathbf d}}\) \(\newcommand{\evec}{\mathbf e}\) \(\newcommand{\fvec}{\mathbf f}\) \(\newcommand{\nvec}{\mathbf n}\) \(\newcommand{\pvec}{\mathbf p}\) \(\newcommand{\qvec}{\mathbf q}\) \(\newcommand{\svec}{\mathbf s}\) \(\newcommand{\tvec}{\mathbf t}\) \(\newcommand{\uvec}{\mathbf u}\) \(\newcommand{\vvec}{\mathbf v}\) \(\newcommand{\wvec}{\mathbf w}\) \(\newcommand{\xvec}{\mathbf x}\) \(\newcommand{\yvec}{\mathbf y}\) \(\newcommand{\zvec}{\mathbf z}\) \(\newcommand{\rvec}{\mathbf r}\) \(\newcommand{\mvec}{\mathbf m}\) \(\newcommand{\zerovec}{\mathbf 0}\) \(\newcommand{\onevec}{\mathbf 1}\) \(\newcommand{\real}{\mathbb R}\) \(\newcommand{\twovec}[2]{\left[\begin{array}{r}#1 \\ #2 \end{array}\right]}\) \(\newcommand{\ctwovec}[2]{\left[\begin{array}{c}#1 \\ #2 \end{array}\right]}\) \(\newcommand{\threevec}[3]{\left[\begin{array}{r}#1 \\ #2 \\ #3 \end{array}\right]}\) \(\newcommand{\cthreevec}[3]{\left[\begin{array}{c}#1 \\ #2 \\ #3 \end{array}\right]}\) \(\newcommand{\fourvec}[4]{\left[\begin{array}{r}#1 \\ #2 \\ #3 \\ #4 \end{array}\right]}\) \(\newcommand{\cfourvec}[4]{\left[\begin{array}{c}#1 \\ #2 \\ #3 \\ #4 \end{array}\right]}\) \(\newcommand{\fivevec}[5]{\left[\begin{array}{r}#1 \\ #2 \\ #3 \\ #4 \\ #5 \\ \end{array}\right]}\) \(\newcommand{\cfivevec}[5]{\left[\begin{array}{c}#1 \\ #2 \\ #3 \\ #4 \\ #5 \\ \end{array}\right]}\) \(\newcommand{\mattwo}[4]{\left[\begin{array}{rr}#1 \amp #2 \\ #3 \amp #4 \\ \end{array}\right]}\) \(\newcommand{\laspan}[1]{\text{Span}\{#1\}}\) \(\newcommand{\bcal}{\cal B}\) \(\newcommand{\ccal}{\cal C}\) \(\newcommand{\scal}{\cal S}\) \(\newcommand{\wcal}{\cal W}\) \(\newcommand{\ecal}{\cal E}\) \(\newcommand{\coords}[2]{\left\{#1\right\}_{#2}}\) \(\newcommand{\gray}[1]{\color{gray}{#1}}\) \(\newcommand{\lgray}[1]{\color{lightgray}{#1}}\) \(\newcommand{\rank}{\operatorname{rank}}\) \(\newcommand{\row}{\text{Row}}\) \(\newcommand{\col}{\text{Col}}\) \(\renewcommand{\row}{\text{Row}}\) \(\newcommand{\nul}{\text{Nul}}\) \(\newcommand{\var}{\text{Var}}\) \(\newcommand{\corr}{\text{corr}}\) \(\newcommand{\len}[1]{\left|#1\right|}\) \(\newcommand{\bbar}{\overline{\bvec}}\) \(\newcommand{\bhat}{\widehat{\bvec}}\) \(\newcommand{\bperp}{\bvec^\perp}\) \(\newcommand{\xhat}{\widehat{\xvec}}\) \(\newcommand{\vhat}{\widehat{\vvec}}\) \(\newcommand{\uhat}{\widehat{\uvec}}\) \(\newcommand{\what}{\widehat{\wvec}}\) \(\newcommand{\Sighat}{\widehat{\Sigma}}\) \(\newcommand{\lt}{<}\) \(\newcommand{\gt}{>}\) \(\newcommand{\amp}{&}\) \(\definecolor{fillinmathshade}{gray}{0.9}\)

    We know that \(\frac{a}{b}\) is the answer to a division problem: $$\frac{a}{b}$$represents the amount of pie an individual child receives when a pies are shared equally by b children.

    What happens if we double the number of pie and double the number of kids? Nothing! The amount of pie per child is still the same:

    \[\frac{2a}{2b} = \frac{a}{b} \ldotp \nonumber \]

    For example, as the picture shows, \(\frac{6}{3}\) and \(\frac{12}{6}\) both give two pies for each child.

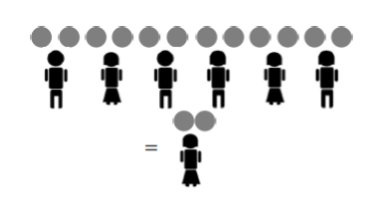
    sixpies3kids.png

    12-pies-6-children.png

    And tripling the number of pies and the number of children also does not change the final amount of pies per child, nor does quadrupling each number, or one trillion-billion-tupling the numbers!

    \[\frac{6}{3} = \frac{12}{6} = \frac{18}{9} = \ldots = \text{two pies per child} \ldotp \nonumber \]
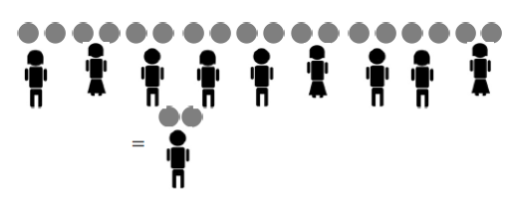
    18-pies-nine-children.png

    This leads us to want to believe:

    Key Fraction Rule

    \[\frac{xa}{xb} = \frac{a}{b}, \nonumber \]

    (at least for positive whole numbers x).

    We say that the fractions \(\frac{xa}{xb}\) and \(\frac{a}{b}\) are equivalent.

    Example: Fractions equivalent to 3/5

    For example,

    \[\frac{3}{5}\; \text{(sharing three pies among five kids)} \nonumber \]

    yields the same result as

    \[\frac{3 \cdot 2}{5 \cdot 2} = \frac{6}{10}\; \text{(sharing six pies among ten kids)} \nonumber \]

    and as

    \[\frac{3 \cdot 100}{5 \cdot 100} = \frac{300}{500}\; \text{(sharing 300 pies among 500 kids)} \ldotp \nonumber \]

    Think / Pair / Share

    Write down a lot of equivalent fractions for \(\frac{1}{2}\), for \(\frac{10}{3}\), and for 1.

    Example: Going Backwards

    \[\frac{20}{32}\; \text{(sharing 20 pies among 32 kids)} \nonumber \]

    is the same problem as:

    \[\frac{5 \cdot 4}{8 \cdot 4} = \frac{5}{8}\; \text{(sharing five pies among eight kids)} \ldotp \nonumber \]

    Most people say we have cancelled or taken a common factor 4 from the numerator and denominator.

    Mathematicians call this process reducing the fraction to lowest terms. (We have made the numerator and denominator smaller, in fact as small as we can make them!)

    Teachers tend to say that we are simplifying the fraction. (You have to admit that \(\frac{5}{8}\) does look simpler than \(\frac{20}{32}\).)

    Example: How Low Can You Go?

    As another example, \(\frac{280}{350}\) can certainly be simplified by noticing that there is a common factor of 10 in both the numerator and the denominator:

    \[\frac{280}{350} = \frac{28 \cdot 10}{35 \cdot 10} = \frac{28}{35} \ldotp \nonumber \]

    We can go further as 28 and 35 are both multiples of 7:

    \[\frac{28}{35} = \frac{4 \cdot 7}{5 \cdot 7} = \frac{4}{5} \ldotp \nonumber \]

    Thus, sharing 280 pies among 350 children gives the same result as sharing 4 pies among 5 children!

    \[\frac{280}{350} = \frac{4}{5} \ldotp \nonumber \]

    Since 4 and 5 share no common factors, this is as far as we can go with this example (while staying with whole numbers).

    On Your Own

    Mix and Match: On the top are some fractions that have not been simplified. On the bottom are the simplified answers, but in random order. Which simplified answer goes with which fraction? (Notice that there are fewer answers than questions!)

    1. \(\frac{10}{20}\)
    2. \(\frac{50}{75}\)
    3. \(\frac{24000}{36000}\)
    4. \(\frac{24}{14}\)
    5. \(\frac{18}{32}\)
    6. \(\frac{1}{40}\)
    1. \(\frac{2}{3}\)
    2. \(\frac{9}{16}\)
    3. \(\frac{12}{7}\)
    4. \(\frac{1}{40}\)
    5. \(\frac{1}{2}\)
    Think / Pair / Share

    Use the “Pies Per Child Model” to explain why the key fraction rule holds. That is, explain why each individual child gets the same amount of pie in these two situations:

    • if you have a pies and b kids, or
    • if you have xa pies and xb kids.

    This page titled 4.3: The Key Fraction Rule is shared under a CC BY-SA 4.0 license and was authored, remixed, and/or curated by Michelle Manes via source content that was edited to the style and standards of the LibreTexts platform.