
1.1.3: Grid Moves
- Page ID
- 33487

\( \newcommand{\vecs}[1]{\overset { \scriptstyle \rightharpoonup} {\mathbf{#1}} } \)
\( \newcommand{\vecd}[1]{\overset{-\!-\!\rightharpoonup}{\vphantom{a}\smash {#1}}} \)
\( \newcommand{\id}{\mathrm{id}}\) \( \newcommand{\Span}{\mathrm{span}}\)
( \newcommand{\kernel}{\mathrm{null}\,}\) \( \newcommand{\range}{\mathrm{range}\,}\)
\( \newcommand{\RealPart}{\mathrm{Re}}\) \( \newcommand{\ImaginaryPart}{\mathrm{Im}}\)
\( \newcommand{\Argument}{\mathrm{Arg}}\) \( \newcommand{\norm}[1]{\| #1 \|}\)
\( \newcommand{\inner}[2]{\langle #1, #2 \rangle}\)
\( \newcommand{\Span}{\mathrm{span}}\)
\( \newcommand{\id}{\mathrm{id}}\)
\( \newcommand{\Span}{\mathrm{span}}\)
\( \newcommand{\kernel}{\mathrm{null}\,}\)
\( \newcommand{\range}{\mathrm{range}\,}\)
\( \newcommand{\RealPart}{\mathrm{Re}}\)
\( \newcommand{\ImaginaryPart}{\mathrm{Im}}\)
\( \newcommand{\Argument}{\mathrm{Arg}}\)
\( \newcommand{\norm}[1]{\| #1 \|}\)
\( \newcommand{\inner}[2]{\langle #1, #2 \rangle}\)
\( \newcommand{\Span}{\mathrm{span}}\) \( \newcommand{\AA}{\unicode[.8,0]{x212B}}\)
\( \newcommand{\vectorA}[1]{\vec{#1}} % arrow\)
\( \newcommand{\vectorAt}[1]{\vec{\text{#1}}} % arrow\)
\( \newcommand{\vectorB}[1]{\overset { \scriptstyle \rightharpoonup} {\mathbf{#1}} } \)
\( \newcommand{\vectorC}[1]{\textbf{#1}} \)
\( \newcommand{\vectorD}[1]{\overrightarrow{#1}} \)
\( \newcommand{\vectorDt}[1]{\overrightarrow{\text{#1}}} \)
\( \newcommand{\vectE}[1]{\overset{-\!-\!\rightharpoonup}{\vphantom{a}\smash{\mathbf {#1}}}} \)
\( \newcommand{\vecs}[1]{\overset { \scriptstyle \rightharpoonup} {\mathbf{#1}} } \)
\( \newcommand{\vecd}[1]{\overset{-\!-\!\rightharpoonup}{\vphantom{a}\smash {#1}}} \)
Lesson
Let's transform some figures on grids.
Exercise \(\PageIndex{1}\): Notice and Wonder: The Isometric Grid
What do you notice? What do you wonder?

Exercise \(\PageIndex{2}\): Transformation Information
Follow the directions below each statement to tell GeoGebra how you want the figure to move. It is important to notice that GeoGebra uses vectors to show translations. A vector is a quantity that has magnitude (size) and direction. It is usually represented by an arrow.
These applets are sensitive to clicks. Be sure to make one quick click, otherwise it may count a double-click.
After each example, click the reset button, and then move the slider over for the next question.
- Translate triangle \(ABC\) so that \(A\) goes to \(A'\).
- Select the Vector tool.

- Click on the original point \(A\) and then the new point \(A'\). You should see a vector.
- Select the Translate by Vector tool.

- Click on the figure to translate, and then click on the vector.
- Select the Vector tool.
- Translate triangle \(ABC\) so that \(C\) goes to \(C'\).
- Rotate triangle \(ABC\: 90^{\circ}\) counterclockwise using center \(O\).
- Select the Rotate around Point tool.

- Click on the figure to rotate, and then click on the center point.
- A dialog box will open; type the angle by which to rotate and select the direction of rotation.
- Click on ok.
- Select the Rotate around Point tool.
- Reflect triangle \(ABC\) using line \(l\).
- Select the Reflect about Line tool.

- Click on the figure to reflect, and then click on the line of reflection.
- Select the Reflect about Line tool.
- Rotate quadrilateral \(ABCD\: 60^{\circ}\) counterclockwise using center \(B\).
- Rotate quadrilateral \(ABCD\: 60^{\circ}\) clockwise using center \(C\).
- Reflect quadrilateral \(ABCD\) using line \(l\).
- Translate quadrilateral \(ABCD\) so that \(A\) goes to \(C\).
Try your own translations, reflections, and rotations.
- Make your own polygon to transform, and choose a transformation.
- Predict what will happen when you transform the image. Try it - were you right?
- Challenge your partner! Right click on any vectors or lines and uncheck Show Object. Can they guess what transformation you used?
Visit ggbm.at/eFeE2Veu for the applet.
Summary
When a figure is on a grid, we can use the grid to describe a transformation. For example, here is a figure and an image of the figure after a move.
Quadrilateral \(ABCD\) is translated 4 units to the right and 3 units down to the position of quadrilateral \(A'B'C'D'\).

A second type of grid is called an isometric grid. The isometric grid is made up of equilateral triangles. The angles in the triangles all measure 60 degrees, making the isometric grid convenient for showing rotations of 60 degrees.
Here is quadrilateral \(KLMN\) and its image \(K'L'M'N'\) after a 60-degree counterclockwise rotation around a point \(P\).

Glossary Entries
Definition: Clockwise
An object is rotating clockwise if it is turning in the same way that the hour or minute hand goes around a clock.
The tilted square is rotated \(15^{\circ}\) clockwise from the square sitting horizontally on its base.

Definition: Corresponding
If a part of the original figure matches up with a part of the copy, we call them corresponding parts. The part could be an angle, point, or side, and you can have corresponding angles, corresponding points, or corresponding sides.
If you have a distance between two points in the original figure, then the distance between the corresponding points in the copy is called the corresponding distance.
Definition: Counterclockwise
An object is rotating counterclockwise if it is turning in the opposite way to the way that the hour or minute hand goes around a clock.
The tilted square is rotated \(15^{\circ}\) counterclockwise from the square with a horizontal base.

Definition: Image
Translations, rotations, and reflections move objects in the plane. Points, segments, and other parts of the original all have corresponding parts on the “moved object.” The moved object is called the image.
For example, here is triangle \(ABC\) and a translation to the right and up which is labeled \(DEF\).
Point \(F\) in the image corresponds to point \(C\), segment \(EF\) in the image corresponds to segment \(BD\), and angle \(DEF\) corresponds to angle \(ABC\).

Definition: Reflection
The reflection of a figure across a line takes every point of the figure to a point directly opposite to it on the other side of the line and the same distance from the line. In the figure, the triangle \(B\) is the reflection of the triangle \(A\) across the line \(l\).
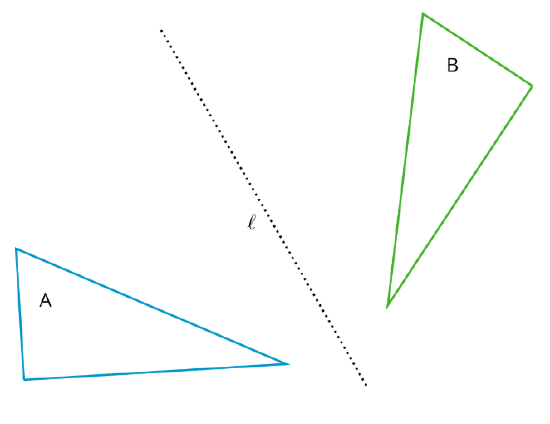
Definition: Rotation
A rotation has a center, an angle, and a direction. It moves every point of a figure in a circle around the center, in the direction specified (clockwise or counterclockwise), and for a distance specified by the angle. For example, in the figure, triangle \(A\) is rotated \(55^{\circ}\) clockwise about center \(O\) to get triangle \(B\).

Definition: Translation
A translation has a distance and a direction. It moves every point in a figure the given distance in the given direction.
The figure on the left is translated to the figure on the right in the direction from \(A\) to \(B\), using the distance from \(A\) to \(B\).

Practice
Exercise \(\PageIndex{3}\)
Apply each transformation described to Figure A. If you get stuck, try using tracing paper.

- A translation which takes \(P\) to \(P'\)
- A counterclockwise rotation of \(A\), using center \(P\), of 60 degrees
- A reflection of \(A\) across line \(l\)
Exercise \(\PageIndex{4}\)
Here is triangle \(ABC\) drawn on a grid.
On the grid, draw a rotation of triangle \(ABC\), a translation of triangle \(ABC\), and a reflection of triangle \(ABC\). Describe clearly how each was done.

Exercise \(\PageIndex{5}\)
1. Draw the translated image of \(ABCDE\) so that vertex \(C\) moves to \(C'\). Tracing paper may be useful.
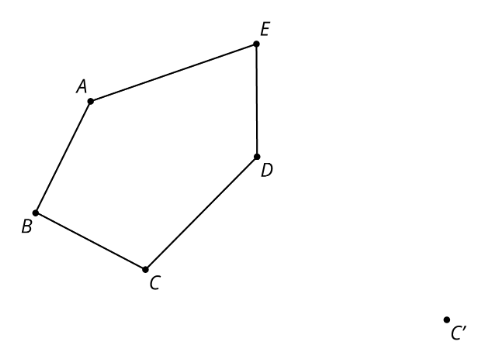
2. Draw the reflected image of Pentagon \(ABCDE\) with line of reflection \(l\). Tracing paper may be useful.

3. Draw the rotation of Pentagon \(ABCDE\) around \(C\) clockwise by an angle of 150 degrees. Tracing paper and a protractor may be useful.

(From Unit 1.1.2)