5.2: Combining
- Page ID
- 132887

\( \newcommand{\vecs}[1]{\overset { \scriptstyle \rightharpoonup} {\mathbf{#1}} } \)
\( \newcommand{\vecd}[1]{\overset{-\!-\!\rightharpoonup}{\vphantom{a}\smash {#1}}} \)
\( \newcommand{\dsum}{\displaystyle\sum\limits} \)
\( \newcommand{\dint}{\displaystyle\int\limits} \)
\( \newcommand{\dlim}{\displaystyle\lim\limits} \)
\( \newcommand{\id}{\mathrm{id}}\) \( \newcommand{\Span}{\mathrm{span}}\)
( \newcommand{\kernel}{\mathrm{null}\,}\) \( \newcommand{\range}{\mathrm{range}\,}\)
\( \newcommand{\RealPart}{\mathrm{Re}}\) \( \newcommand{\ImaginaryPart}{\mathrm{Im}}\)
\( \newcommand{\Argument}{\mathrm{Arg}}\) \( \newcommand{\norm}[1]{\| #1 \|}\)
\( \newcommand{\inner}[2]{\langle #1, #2 \rangle}\)
\( \newcommand{\Span}{\mathrm{span}}\)
\( \newcommand{\id}{\mathrm{id}}\)
\( \newcommand{\Span}{\mathrm{span}}\)
\( \newcommand{\kernel}{\mathrm{null}\,}\)
\( \newcommand{\range}{\mathrm{range}\,}\)
\( \newcommand{\RealPart}{\mathrm{Re}}\)
\( \newcommand{\ImaginaryPart}{\mathrm{Im}}\)
\( \newcommand{\Argument}{\mathrm{Arg}}\)
\( \newcommand{\norm}[1]{\| #1 \|}\)
\( \newcommand{\inner}[2]{\langle #1, #2 \rangle}\)
\( \newcommand{\Span}{\mathrm{span}}\) \( \newcommand{\AA}{\unicode[.8,0]{x212B}}\)
\( \newcommand{\vectorA}[1]{\vec{#1}} % arrow\)
\( \newcommand{\vectorAt}[1]{\vec{\text{#1}}} % arrow\)
\( \newcommand{\vectorB}[1]{\overset { \scriptstyle \rightharpoonup} {\mathbf{#1}} } \)
\( \newcommand{\vectorC}[1]{\textbf{#1}} \)
\( \newcommand{\vectorD}[1]{\overrightarrow{#1}} \)
\( \newcommand{\vectorDt}[1]{\overrightarrow{\text{#1}}} \)
\( \newcommand{\vectE}[1]{\overset{-\!-\!\rightharpoonup}{\vphantom{a}\smash{\mathbf {#1}}}} \)
\( \newcommand{\vecs}[1]{\overset { \scriptstyle \rightharpoonup} {\mathbf{#1}} } \)
\(\newcommand{\longvect}{\overrightarrow}\)
\( \newcommand{\vecd}[1]{\overset{-\!-\!\rightharpoonup}{\vphantom{a}\smash {#1}}} \)
\(\newcommand{\avec}{\mathbf a}\) \(\newcommand{\bvec}{\mathbf b}\) \(\newcommand{\cvec}{\mathbf c}\) \(\newcommand{\dvec}{\mathbf d}\) \(\newcommand{\dtil}{\widetilde{\mathbf d}}\) \(\newcommand{\evec}{\mathbf e}\) \(\newcommand{\fvec}{\mathbf f}\) \(\newcommand{\nvec}{\mathbf n}\) \(\newcommand{\pvec}{\mathbf p}\) \(\newcommand{\qvec}{\mathbf q}\) \(\newcommand{\svec}{\mathbf s}\) \(\newcommand{\tvec}{\mathbf t}\) \(\newcommand{\uvec}{\mathbf u}\) \(\newcommand{\vvec}{\mathbf v}\) \(\newcommand{\wvec}{\mathbf w}\) \(\newcommand{\xvec}{\mathbf x}\) \(\newcommand{\yvec}{\mathbf y}\) \(\newcommand{\zvec}{\mathbf z}\) \(\newcommand{\rvec}{\mathbf r}\) \(\newcommand{\mvec}{\mathbf m}\) \(\newcommand{\zerovec}{\mathbf 0}\) \(\newcommand{\onevec}{\mathbf 1}\) \(\newcommand{\real}{\mathbb R}\) \(\newcommand{\twovec}[2]{\left[\begin{array}{r}#1 \\ #2 \end{array}\right]}\) \(\newcommand{\ctwovec}[2]{\left[\begin{array}{c}#1 \\ #2 \end{array}\right]}\) \(\newcommand{\threevec}[3]{\left[\begin{array}{r}#1 \\ #2 \\ #3 \end{array}\right]}\) \(\newcommand{\cthreevec}[3]{\left[\begin{array}{c}#1 \\ #2 \\ #3 \end{array}\right]}\) \(\newcommand{\fourvec}[4]{\left[\begin{array}{r}#1 \\ #2 \\ #3 \\ #4 \end{array}\right]}\) \(\newcommand{\cfourvec}[4]{\left[\begin{array}{c}#1 \\ #2 \\ #3 \\ #4 \end{array}\right]}\) \(\newcommand{\fivevec}[5]{\left[\begin{array}{r}#1 \\ #2 \\ #3 \\ #4 \\ #5 \\ \end{array}\right]}\) \(\newcommand{\cfivevec}[5]{\left[\begin{array}{c}#1 \\ #2 \\ #3 \\ #4 \\ #5 \\ \end{array}\right]}\) \(\newcommand{\mattwo}[4]{\left[\begin{array}{rr}#1 \amp #2 \\ #3 \amp #4 \\ \end{array}\right]}\) \(\newcommand{\laspan}[1]{\text{Span}\{#1\}}\) \(\newcommand{\bcal}{\cal B}\) \(\newcommand{\ccal}{\cal C}\) \(\newcommand{\scal}{\cal S}\) \(\newcommand{\wcal}{\cal W}\) \(\newcommand{\ecal}{\cal E}\) \(\newcommand{\coords}[2]{\left\{#1\right\}_{#2}}\) \(\newcommand{\gray}[1]{\color{gray}{#1}}\) \(\newcommand{\lgray}[1]{\color{lightgray}{#1}}\) \(\newcommand{\rank}{\operatorname{rank}}\) \(\newcommand{\row}{\text{Row}}\) \(\newcommand{\col}{\text{Col}}\) \(\renewcommand{\row}{\text{Row}}\) \(\newcommand{\nul}{\text{Nul}}\) \(\newcommand{\var}{\text{Var}}\) \(\newcommand{\corr}{\text{corr}}\) \(\newcommand{\len}[1]{\left|#1\right|}\) \(\newcommand{\bbar}{\overline{\bvec}}\) \(\newcommand{\bhat}{\widehat{\bvec}}\) \(\newcommand{\bperp}{\bvec^\perp}\) \(\newcommand{\xhat}{\widehat{\xvec}}\) \(\newcommand{\vhat}{\widehat{\vvec}}\) \(\newcommand{\uhat}{\widehat{\uvec}}\) \(\newcommand{\what}{\widehat{\wvec}}\) \(\newcommand{\Sighat}{\widehat{\Sigma}}\) \(\newcommand{\lt}{<}\) \(\newcommand{\gt}{>}\) \(\newcommand{\amp}{&}\) \(\definecolor{fillinmathshade}{gray}{0.9}\)Combining with Exchanges
Let’s pretend we have 20 of each of the following: pennies, dimes, one dollar bills, ten dollar bills, hundred dollar bills, and thousand dollar bills. Instead of drawing pictures of the money, these abbreviations for each kind of coin or bill will be used: penny (A), dime (B), one dollar bill (C), ten dollar bill (D), hundred dollar bill (E), and thousand dollar bill (F).
Before we combine amounts, let's look at how we can do exchanges.
Suppose you had the following amount of currency: AABCCCCCDDDDDDDDDDDDDE. Make any possible exchanges to have fewer pieces of currency.
Solution
Since 10 ten dollar bills forms $100, DDDDDDDDDD = E. So, AABCCCCCDDDDDDDDDDDDDE = AABCCCCCDDDEE.
Now try the following exercise.
Show what exchanges could be made for each of the following:
| a. AAAAAAAAAA = ____ | b. CCCCCCCCCC = ____ | c. FFFFFFFFFF = ____ |
At this point, we are better equipped to start combining two or more amounts of money.
In one pile, you have BBCCCCCCCCCCCCCDDDEEEEE. In another pile, you have AAAABCDDDDDDDDDF. What do you have in total? Perform any exchanges possible to have fewer pieces of currency.
Solution
We will proceed by literally combining them (in terms of the letters, this is called concatenation), rearranging the letters to make it more clear about how much we have of each type of currency, and then making the exchanges.
BBCCCCCCCCCCCCCDDDEEEEE + AAAABCDDDDDDDDDF = BBCCCCCCCCCCCCCDDDEEEEEAAAABCDDDDDDDDDF
= AAAABBBCCCCCCCCCCCCCCDDDDDDDDDDDDEEEEEF = AAAABBBCCCCDDDDDDDDDDDDDEEEEEF
= AAAABBBCCCCDDDEEEEEEF
Now try the following exercise.
Form each sum by combining the two addends into one lump. Make exchanges as necessary so that the sum is represented by the least number of coins or bills. Show all steps, indicating any exchanges made.
| a. CCAADDDCB + BBBBBBBBBAAACC |
| b. AAAACCCCCCCCCEEE + CCCCCCBBA |
| c. EEEEEEEEAAAAAAAA + EEEAA |
| d. DDDDCCCCCBBBBB + DDDDDCCCCBBBBB |
To add in the Maya system, the first step is to combine the symbols at each level together. The symbols at each level must be combined separately. Try to explain to yourself or another person why this is. Then, at each level, look to see if any exchanges can be made.
- A group of five dots can always be exchanged for a bar (also referred to as a line segment).
- Exchanges from one level to the next are a little trickier. A group of 20 at one level can be traded for one dot at the next level up except from the second to the third level where a group of 18 at the second level can be traded for one dot at the third level.
Study the following examples of one level Maya numerals being added together. Any time an exchange is being made, a circle or box will be put around what will be replaced at the next step. An arrow will be used to indicate if an exchange is being made from one level to the next level up. The arrow indicates a dot will be on the next level up in the next step in place of the amount boxed at the original level.
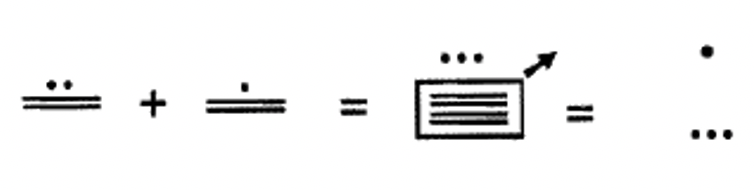
Use Maya numerals to add 8 + 9.
Solution

In the previous example, we only needed to exchange 5 dots for 1 bar. Let's see an example in which we will have to "carry" from one level to the next.
Use Maya numerals to add 12 + 11.
Solution
Let's now see an example in which both kinds of exchanges are made.
Use Maya numerals to add 14 + 9.
Solution

The previous example shows two exchanges happen separately, but we could have exchanged 20 in the form of 4 bars and 5 dots all at once. You'll see this in the next example.
Use Maya numerals to add 17 + 19.
Solution

Now, try some on your own.
Add the following single-level Maya numerals together. Make any necessary exchanges and show all steps.
|
a.  |
|
b.  |
|
c.  |
All of the previous examples and exercises involving Maya numerals only used one level each for the addends. Things get tougher when we add more levels both because there are more levels to deal with and we have to look for a new kind of exchange: 18 in the second level can be exchanged for 1 in the third level.
Write 155 and 31 with Maya numerals. Then add 155+31 using Maya numerals. Make any necessary exchanges so that the final value is a properly-written Maya numeral.
Solution

So far, we have not need to use the Maya symbol for zero. Let's see an example of that.
Write 152 and 148 with Maya numerals. Then add 152+148 using Maya numerals. Make any necessary exchanges so that the final value is a properly-written Maya numeral.
Solution

Let's now see what exchanging looks like from the second level to the third level.
Write 210 and 202 with Maya numerals. Then add 210+202 using Maya numerals. Make any necessary exchanges so that the final value is a properly-written Maya numeral.
Solution

Remember, a group of 18 at the second level can be exchanged for a dot at the third level! Let's now see an example in which we need to use the zero symbol and we need to make exchanges at multiple levels.
Write 2392 and 1211 with Maya numerals. Then add 155+31 using Maya numerals. Make any necessary exchanges so that the final value is a properly-written Maya numeral.
Solution

In the next example, notice that something that may look a little strange happens. Instead of exchanging 5 dots for 1 bar, we exchange 1 bar for 5 dots. This is because at that level (the second level), the amount we need to exchange to move up to the next level is 18, not 20. So, we need to be able to see 18. Since 18 is 3 bars and 3 dots, we need to exchange a bar for dots in order to get a group of 18.
Write 76896 and 46754 with Maya numerals. Then add 76896+46754 using Maya numerals. Make any necessary exchanges so that the final value is a properly-written Maya numeral.
Solution

After doing each of the above examples solely in Maya, I checked each problem by adding in the Hindu-Arabic (base ten) and converting the sum into Maya. You can also leave that sum in Hindu-Arabic and convert your Maya sum into Hindu-Arabic to compare those two numbers. When I checked the previous example (76,896 + 46,754 = 123,650), a fairly complicated problem, the answers didn't match. So I reworked the problem until I got it right. It's a good idea to check your work carefully as you go along which requires strong doses of concentration, effort and patience. Otherwise, it's quite easy to make one or more mistakes during computation. Keep in mind that if all you do is convert to Hindu-Arabic, add and convert back to Maya, you won't get the benefit of these examples and exercises. The purpose is to practice the combining, exchanging, etc. that you are required to show when you do the exercises. Try each of the following exercises.
Add the following Maya numerals together. Make any necessary exchanges and show all steps. It's a very good idea to check your work and that doesn't mean looking up the answer in the solutions! After adding in Maya, convert the answer to Hindu-Arabic. Then, convert the original two numbers to Hindu-Arabic and add together and see if it matches the answer.
|
a.  |
|
b. 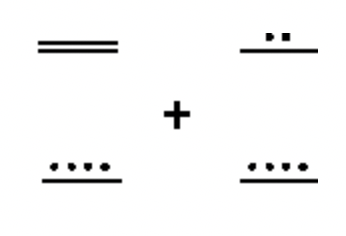 |
|
c.  |
|
d.  |
|
e.  |
Combining in a Classroom
In a classroom, you won't be using Maya numerals. Instead, you'll be adding Hindu-Arabic numerals, often represented with base ten blocks. As in many cases when learning about elementary school teaching, we will make things harder than just adding base ten numerals (which should be easy for you at this time). In the following example, you will consider a situation in which you have used base four multibase blocks.
Count out 15 units and make exchanges with base four longs and/or flats. Put them in a pile (or draw them in a group), called Pile A. Set this aside. Since you've made exchanges in base four, write 15 as a base four numeral in the space provided for Pile A below. Now, count out 13 more units and make exchanges with base four longs and/or flats. Put them in a pile (or draw them in a group), called Pile B. Write 13 as a base four numeral in the space provided for Pile B below. To add, simply combine the blocks from Pile A and Pile B to form one big pile (or drawing) of blocks. You are forming the union of Pile A and Pile B! Make all possible exchanges with base four units and longs for longs and flats. Then write the sum as a base four numeral in the space provided for the combined pile.
Combining the two piles is the same as forming the sum of the two numerals. You have just added two numbers together in base four.
Below is the addition problem you have just performed in base four.
____________ [Pile A] + _____________ [Pile B] = ____________ [Combined Pile]
Let's redo the exercise but in base seven.
Count out 15 unit blocks and make exchanges with base seven longs and/or flats. Put them in a pile (or draw them in a group), called Pile A. Set this aside. Since you've made exchanges in base seven, write 15 as a base seven numeral in the space provided for Pile A below. Now, count out 13 more units and make exchanges with base seven longs and/or flats. Put them in a pile (or draw them in a group), called Pile B. Write 13 as a base seven numeral on the space provided for Pile B below. To add, combine the blocks from Pile A and Pile B to form one big pile (or drawing) of blocks. Make all possible exchanges with base seven units and longs for longs and flats. Then write the sum as a base seven numeral in the space provided for the combined pile.
Combining the two piles is the same as forming the sum of the two numerals. You have just added two numbers together in base seven.
Below is the addition problem you have just performed in base seven.
____________ [Pile A] + _____________ [Pile B] = ____________ [Combined Pile]
Let's go to a smaller base. Note that this time, we need more place values (and more versions of multibase blocks).
Count out 15 unit blocks and make exchanges with base two longs, flats, etc. Put them in a pile (or draw them in a group), called Pile A. Set this aside. Since you've made exchanges in base two, write 15 as a base two numeral in the space provided for Pile A below. Now, count out 13 more units and make exchanges with base two longs, flats, etc. Put them in a pile (or draw them in a group), called Pile B. Write 13 as a base two numeral on the space provided for Pile B below. To add, combine the blocks from Pile A and Pile B to form one big pile (or drawing) of blocks. Make all possible exchanges with base two units, longs, etc. for longs, flats, etc. Then write the sum as a base two numeral in the space provided for the combined pile.
Combining the two piles is the same as forming the sum of the two numerals. You have just added two numbers together in base two.
Below is the addition problem you have just performed in base two.
____________ [Pile A] + _____________ [Pile B] = ____________ [Combined Pile]
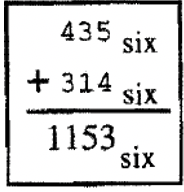
Write the three addition problems from exercises 5, 6, and 7 in a vertical format like the one in base six shown below. Study this base six problem. Try to figure out a way to do the addition problems using paper and pencil instead of by using the multibase blocks. In other words, try to come up with your own algorithm (method) for doing addition in other bases. Explain your method and show a few examples.