
3.3.1: Introduction and Basic Number and Counting Systems
- Page ID
- 51845

\( \newcommand{\vecs}[1]{\overset { \scriptstyle \rightharpoonup} {\mathbf{#1}} } \)
\( \newcommand{\vecd}[1]{\overset{-\!-\!\rightharpoonup}{\vphantom{a}\smash {#1}}} \)
\( \newcommand{\dsum}{\displaystyle\sum\limits} \)
\( \newcommand{\dint}{\displaystyle\int\limits} \)
\( \newcommand{\dlim}{\displaystyle\lim\limits} \)
\( \newcommand{\id}{\mathrm{id}}\) \( \newcommand{\Span}{\mathrm{span}}\)
( \newcommand{\kernel}{\mathrm{null}\,}\) \( \newcommand{\range}{\mathrm{range}\,}\)
\( \newcommand{\RealPart}{\mathrm{Re}}\) \( \newcommand{\ImaginaryPart}{\mathrm{Im}}\)
\( \newcommand{\Argument}{\mathrm{Arg}}\) \( \newcommand{\norm}[1]{\| #1 \|}\)
\( \newcommand{\inner}[2]{\langle #1, #2 \rangle}\)
\( \newcommand{\Span}{\mathrm{span}}\)
\( \newcommand{\id}{\mathrm{id}}\)
\( \newcommand{\Span}{\mathrm{span}}\)
\( \newcommand{\kernel}{\mathrm{null}\,}\)
\( \newcommand{\range}{\mathrm{range}\,}\)
\( \newcommand{\RealPart}{\mathrm{Re}}\)
\( \newcommand{\ImaginaryPart}{\mathrm{Im}}\)
\( \newcommand{\Argument}{\mathrm{Arg}}\)
\( \newcommand{\norm}[1]{\| #1 \|}\)
\( \newcommand{\inner}[2]{\langle #1, #2 \rangle}\)
\( \newcommand{\Span}{\mathrm{span}}\) \( \newcommand{\AA}{\unicode[.8,0]{x212B}}\)
\( \newcommand{\vectorA}[1]{\vec{#1}} % arrow\)
\( \newcommand{\vectorAt}[1]{\vec{\text{#1}}} % arrow\)
\( \newcommand{\vectorB}[1]{\overset { \scriptstyle \rightharpoonup} {\mathbf{#1}} } \)
\( \newcommand{\vectorC}[1]{\textbf{#1}} \)
\( \newcommand{\vectorD}[1]{\overrightarrow{#1}} \)
\( \newcommand{\vectorDt}[1]{\overrightarrow{\text{#1}}} \)
\( \newcommand{\vectE}[1]{\overset{-\!-\!\rightharpoonup}{\vphantom{a}\smash{\mathbf {#1}}}} \)
\( \newcommand{\vecs}[1]{\overset { \scriptstyle \rightharpoonup} {\mathbf{#1}} } \)
\(\newcommand{\longvect}{\overrightarrow}\)
\( \newcommand{\vecd}[1]{\overset{-\!-\!\rightharpoonup}{\vphantom{a}\smash {#1}}} \)
\(\newcommand{\avec}{\mathbf a}\) \(\newcommand{\bvec}{\mathbf b}\) \(\newcommand{\cvec}{\mathbf c}\) \(\newcommand{\dvec}{\mathbf d}\) \(\newcommand{\dtil}{\widetilde{\mathbf d}}\) \(\newcommand{\evec}{\mathbf e}\) \(\newcommand{\fvec}{\mathbf f}\) \(\newcommand{\nvec}{\mathbf n}\) \(\newcommand{\pvec}{\mathbf p}\) \(\newcommand{\qvec}{\mathbf q}\) \(\newcommand{\svec}{\mathbf s}\) \(\newcommand{\tvec}{\mathbf t}\) \(\newcommand{\uvec}{\mathbf u}\) \(\newcommand{\vvec}{\mathbf v}\) \(\newcommand{\wvec}{\mathbf w}\) \(\newcommand{\xvec}{\mathbf x}\) \(\newcommand{\yvec}{\mathbf y}\) \(\newcommand{\zvec}{\mathbf z}\) \(\newcommand{\rvec}{\mathbf r}\) \(\newcommand{\mvec}{\mathbf m}\) \(\newcommand{\zerovec}{\mathbf 0}\) \(\newcommand{\onevec}{\mathbf 1}\) \(\newcommand{\real}{\mathbb R}\) \(\newcommand{\twovec}[2]{\left[\begin{array}{r}#1 \\ #2 \end{array}\right]}\) \(\newcommand{\ctwovec}[2]{\left[\begin{array}{c}#1 \\ #2 \end{array}\right]}\) \(\newcommand{\threevec}[3]{\left[\begin{array}{r}#1 \\ #2 \\ #3 \end{array}\right]}\) \(\newcommand{\cthreevec}[3]{\left[\begin{array}{c}#1 \\ #2 \\ #3 \end{array}\right]}\) \(\newcommand{\fourvec}[4]{\left[\begin{array}{r}#1 \\ #2 \\ #3 \\ #4 \end{array}\right]}\) \(\newcommand{\cfourvec}[4]{\left[\begin{array}{c}#1 \\ #2 \\ #3 \\ #4 \end{array}\right]}\) \(\newcommand{\fivevec}[5]{\left[\begin{array}{r}#1 \\ #2 \\ #3 \\ #4 \\ #5 \\ \end{array}\right]}\) \(\newcommand{\cfivevec}[5]{\left[\begin{array}{c}#1 \\ #2 \\ #3 \\ #4 \\ #5 \\ \end{array}\right]}\) \(\newcommand{\mattwo}[4]{\left[\begin{array}{rr}#1 \amp #2 \\ #3 \amp #4 \\ \end{array}\right]}\) \(\newcommand{\laspan}[1]{\text{Span}\{#1\}}\) \(\newcommand{\bcal}{\cal B}\) \(\newcommand{\ccal}{\cal C}\) \(\newcommand{\scal}{\cal S}\) \(\newcommand{\wcal}{\cal W}\) \(\newcommand{\ecal}{\cal E}\) \(\newcommand{\coords}[2]{\left\{#1\right\}_{#2}}\) \(\newcommand{\gray}[1]{\color{gray}{#1}}\) \(\newcommand{\lgray}[1]{\color{lightgray}{#1}}\) \(\newcommand{\rank}{\operatorname{rank}}\) \(\newcommand{\row}{\text{Row}}\) \(\newcommand{\col}{\text{Col}}\) \(\renewcommand{\row}{\text{Row}}\) \(\newcommand{\nul}{\text{Nul}}\) \(\newcommand{\var}{\text{Var}}\) \(\newcommand{\corr}{\text{corr}}\) \(\newcommand{\len}[1]{\left|#1\right|}\) \(\newcommand{\bbar}{\overline{\bvec}}\) \(\newcommand{\bhat}{\widehat{\bvec}}\) \(\newcommand{\bperp}{\bvec^\perp}\) \(\newcommand{\xhat}{\widehat{\xvec}}\) \(\newcommand{\vhat}{\widehat{\vvec}}\) \(\newcommand{\uhat}{\widehat{\uvec}}\) \(\newcommand{\what}{\widehat{\wvec}}\) \(\newcommand{\Sighat}{\widehat{\Sigma}}\) \(\newcommand{\lt}{<}\) \(\newcommand{\gt}{>}\) \(\newcommand{\amp}{&}\) \(\definecolor{fillinmathshade}{gray}{0.9}\)Introduction
As we begin our journey through the history of mathematics, one question to be asked is “Where do we start?” Depending on how you view mathematics or numbers, you could choose any of a number of launching points from which to begin. Howard Eves suggests the following list of possibilities.[i]
Where to start the study of the history of mathematics…
- At the first logical geometric “proofs” traditionally credited to Thales of Miletus (600 BCE).
- With the formulation of methods of measurement made by the Egyptians and Mesopotamians/Babylonians.
- Where prehistoric peoples made efforts to organize the concepts of size, shape, and number.
- In pre-human times in the very simple number sense and pattern recognition that can be displayed by certain animals, birds, etc.
- Even before that in the amazing relationships of numbers and shapes found in plants.
- With the spiral nebulae, the natural course of planets, and other universe phenomena.
We can choose no starting point at all and instead agree that mathematics has always existed and has simply been waiting in the wings for humans to discover. Each of these positions can be defended to some degree and which one you adopt (if any) largely depends on your philosophical ideas about mathematics and numbers.
Nevertheless, we need a starting point. Without passing judgment on the validity of any of these particular possibilities, we will choose as our starting point the emergence of the idea of number and the process of counting as our launching pad. This is done primarily as a practical matter given the nature of this course. In the following chapter, we will try to focus on two main ideas. The first will be an examination of basic number and counting systems and the symbols that we use for numbers. We will look at our own modern (Western) number system as well those of a couple of selected civilizations to see the differences and diversity that is possible when humans start counting. The second idea we will look at will be base systems. By comparing our own base-ten (decimal) system with other bases, we will quickly become aware that the system that we are so used to, when slightly changed, will challenge our notions about numbers and what symbols for those numbers actually mean.
Recognition of More vs. Less
The idea of numbers and the process of counting goes back far beyond when history began to be recorded. There is some archeological evidence that suggests that humans were counting as far back as 50,000 years ago.[ii] However, we do not really know how this process started or developed over time. The best we can do is to make a good guess as to how things progressed. It is probably not hard to believe that even the earliest humans had some sense of more and less. Even some small animals have been shown to have such a sense. For example, one naturalist tells of how he would secretly remove one egg each day from a plover’s nest. The mother was diligent in laying an extra egg every day to make up for the missing egg. Some research has shown that hens can be trained to distinguish between even and odd numbers of pieces of food.[iii] With these sorts of findings in mind, it is not hard to conceive that early humans had (at least) a similar sense of more and less. However, our conjectures about how and when these ideas emerged among humans are simply that; educated guesses based on our own assumptions of what might or could have been.
The Need for Simple Counting
As societies and humankind evolved, simply having a sense of more or less, even or odd, etc., would prove to be insufficient to meet the needs of everyday living. As tribes and groups formed, it became important to be able to know how many members were in the group, and perhaps how many were in the enemy’s camp. Certainly it was important for them to know if the flock of sheep or other possessed animals were increasing or decreasing in size. “Just how many of them do we have, anyway?” is a question that we do not have a hard time imagining them asking themselves (or each other).
In order to count items such as animals, it is often conjectured that one of the earliest methods of doing so would be with “tally sticks.” These are objects used to track the numbers of items to be counted. With this method, each “stick” (or pebble, or whatever counting device being used) represents one animal or object. This method uses the idea of one to one correspondence. In a one to one correspondence, items that are being counted are uniquely linked with some counting tool.
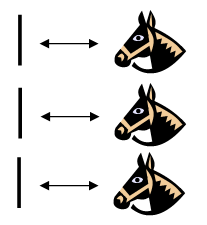 In the picture to the right, you see each stick corresponding to one horse. By examining the collection of sticks in hand one knows how many animals should be present. You can imagine the usefulness of such a system, at least for smaller numbers of items to keep track of. If a herder wanted to “count off” his animals to make sure they were all present, he could mentally (or methodically) assign each stick to one animal and continue to do so until he was satisfied that all were accounted for.
Of course, in our modern system, we have replaced the sticks with more abstract objects. In particular, the top stick is replaced with our symbol “1,” the second stick gets replaced by a “2” and the third stick is represented by the symbol “3,” but we are getting ahead of ourselves here. These modern symbols took many centuries to emerge.
Another possible way of employing the “tally stick” counting method is by making marks or cutting notches into pieces of wood, or even tying knots in string (as we shall see later). In 1937, Karl Absolom discovered a wolf bone that goes back possibly 30,000 years. It is believed to be a counting device.[iv] Another example of this kind of tool is the Ishango Bone, discovered in 1960 at Ishango, and shown below.[v] It is reported to be between six and nine thousand years old and shows what appear to be markings used to do counting of some sort.
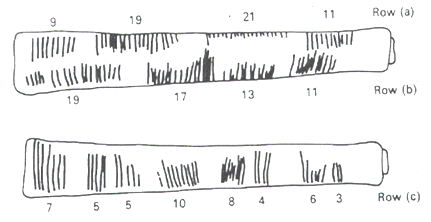 The markings on rows (a) and (b) each add up to 60. Row (b) contains the prime numbers between 10 and 20. Row (c) seems to illustrate for the method of doubling and multiplication used by the Egyptians. It is believed that this may also represent a lunar phase counter.
Spoken Words
As methods for counting developed, and as language progressed as well, it is natural to expect that spoken words for numbers would appear. Unfortunately, the developments of these words, especially those corresponding to the numbers from one through ten, are not easy to trace. Past ten, however, we do see some patterns:
Eleven comes from “ein lifon,” meaning “one left over.”
Twelve comes from “twe lif,” meaning “two left over.”
Thirteen comes from “Three and ten” as do fourteen through nineteen.
Twenty appears to come from “twe-tig” which means “two tens.”
Hundred probably comes from a term meaning “ten times.”
Written Numbers
When we speak of “written” numbers, we have to be careful because this could mean a variety of things. It is important to keep in mind that modern paper is relatively new in the overall timeline of human existence, so “writing” in times past often took on forms that might look quite unfamiliar to us today.
As we saw earlier, some might consider wooden sticks with notches carved in them as writing as these are means of recording information on a medium that can be “read” by others. Of course, the symbols used (simple notches) certainly did not leave a lot of flexibility for communicating a wide variety of ideas or information.
Other mediums on which “writing” may have taken place include carvings in stone or clay tablets, rag paper made by hand (12th century in Europe, but earlier in China), papyrus (invented by the Egyptians and used up until the Greeks), and parchments from animal skins. And these are just a few of the many possibilities.
These are just a few examples of early methods of counting and simple symbols for representing numbers. Extensive books, articles and research have been done on this topic and could provide enough information to fill this entire course if we allowed it to. The range and diversity of creative thought that has been used in the past to describe numbers and to count objects and people is staggering. Unfortunately, we don’t have time to examine them all, but it is fun and interesting to look at one system in more detail to see just how ingenious people have been.
[i] Eves, Howard; An Introduction to the History of Mathematics, p. 9.
[ii] Eves, p. 9.
[iii] McLeish, John; The Story of Numbers - How Mathematics Has Shaped Civilization, p. 7.
[iv] Bunt, Lucas; Jones, Phillip; Bedient, Jack; The Historical Roots of Elementary Mathematics, p. 2.
[v] http://www.math.buffalo.edu/mad/Ancient-Africa/mad_zaire-uganda.html