
2.6: Cayley Diagrams
- Page ID
- 98355

In this section, we will introduce visual way of encoding the abstract structure of the group in terms of a specified generating set. To get started, let’s tinker with an example.
Recall that in Problem 2.1.1, we discovered that there are a total of \(2^9\cdot 9! = 185,794,560\) possible scrambled \(3\times 3\) Spinpossible boards. Now, imagine we wanted to write a solution manual that would describe how to solve all these boards. There are many possible ways to construct such a solution manual, but here is one way.
The manual will consist of \(185,794,560\) pages such that each page lists a unique scrambling of the \(3\times 3\) board. Don’t forget that one of these scramblings is the solved board, which we will make page 1. Also, imagine that the book is arranged in such a way that it isn’t too difficult to look up a given scrambled board. On each page below the scrambled board is a table that lists all possible spins. Next to each spin, the table indicates whether doing that particular spin will result in a board that is either closer to being solved or farther away from being solved. In addition, the page number that corresponds to the resulting board is listed next to each spin.
In most cases, there will be many spins that take us closer to the solved board. Given a scrambled board, a solution would consist of following one possible sequence of pages through the book that takes us from the scrambled board to the solved board. There could be many such sequences. If we could construct such a solution manual, we would have an atlas or map for the game Spinpossible.
Note that even if we make a wrong turn (i.e., follow a page that takes us farther away from the solution), we can still get back on track by following page numbers that take us closer to the solved board. In fact, we can always flip back to the page we were on before taking a wrong turn. This page will be listed on our “wrong turn page" since doing the same spin twice has the net effect of doing nothing. If you were to actually do this, the number of pages we would need to visit would be longer than an optimal solution, but we’d get to the solved board nonetheless.
Let’s get a little more concrete. Consider the game Spinpossible, except let’s simplify it a little. Instead of playing on the \(3\times 3\) board, let’s play on a \(1\times 2\) board consisting of a single row with tiles labeled 1 and 2. The rules of the game are what you would expect; we are restricted to spins involving just the tiles in positions 1 and 2 of the original board. A scrambling of the \(1\times 2\) Spinpossible board consists of any rearrangement of the tiles 1 and 2, where either of the tiles can be right-side-up or up-side-down.
Let \(\text{Spin}_{1\times 2}\) denote the group of net actions that corresponds to compositions of allowable spins on the \(1\times 2\) Spinpossible board.
- How many scrambled boards are there for the \(1\times 2\) Spinpossible game? Write them all down. Don’t forget to include the solved board.
- What is the order of \(\text{Spin}_{1\times 2}\)?
- Verify that \(\text{Spin}_{1\times 2}=\langle s_{11}, s_{22}, s_{12}\rangle\) by writing every element as a word in \(s_{11}\), \(s_{22}\), or \(s_{12}\).
- Is \(\{s_{11}, s_{22}, s_{12}\}\) a minimal generating set for \(\text{Spin}_{1\times 2}\)?
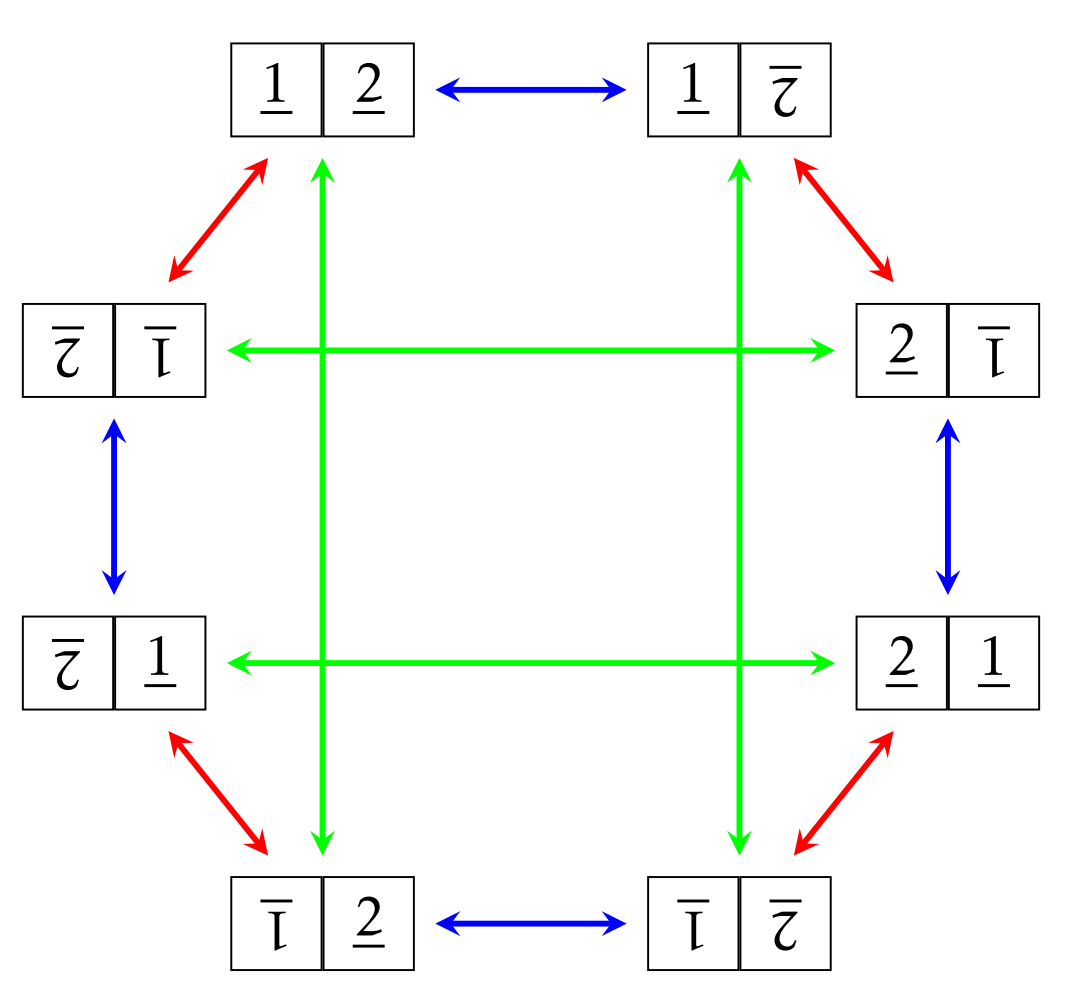
Let’s try to make a map for \(\text{Spin}_{1\times 2}\), but instead of writing a solution manual, we will draw a diagram of the group. The first thing we’ll do is draw each of the scramblings that we found in the previous problem. It doesn’t matter how we arrange all of these drawings, as long as there is some space between them. Now, for each of our 8 scrambled boards, figure out what happens when we do each of our 3 allowable spins. For each of these spins, we’ll draw an arrow from the scrambled board under consideration to the resulting board. Don’t worry about whether doing each of these spins is a good idea or not. In this case, each of our scrambled boards will have 3 arrows heading out towards 3 distinct boards. Do you see why?
In order for us to keep straight what each arrow represents, let’s color our arrows, so that doing a particular type of spin is always the same color. For example, we could color the arrows that toggle the tile in the first position as green. Recall that doing the same spin twice has the net effect of doing nothing, so let’s just make all of our arrows point in both directions.
To make sure you are following along, consider the following scrambled board.
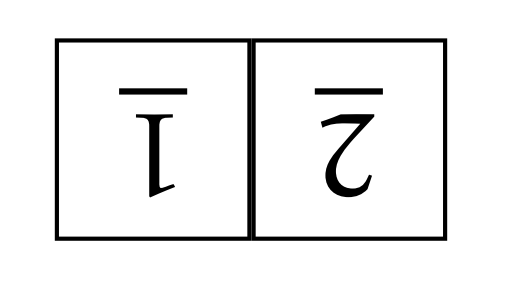
This board is one of our 8 possible scrambled \(1\times 2\) boards. We have three possible spins we can do to this board: toggle position 1, toggle position 2, or spin the whole board. Each of these spins has a corresponding two-way arrow that takes us to three different scrambled boards. Figure \(\PageIndex{2}\) provides a visual representation of what we just discussed.
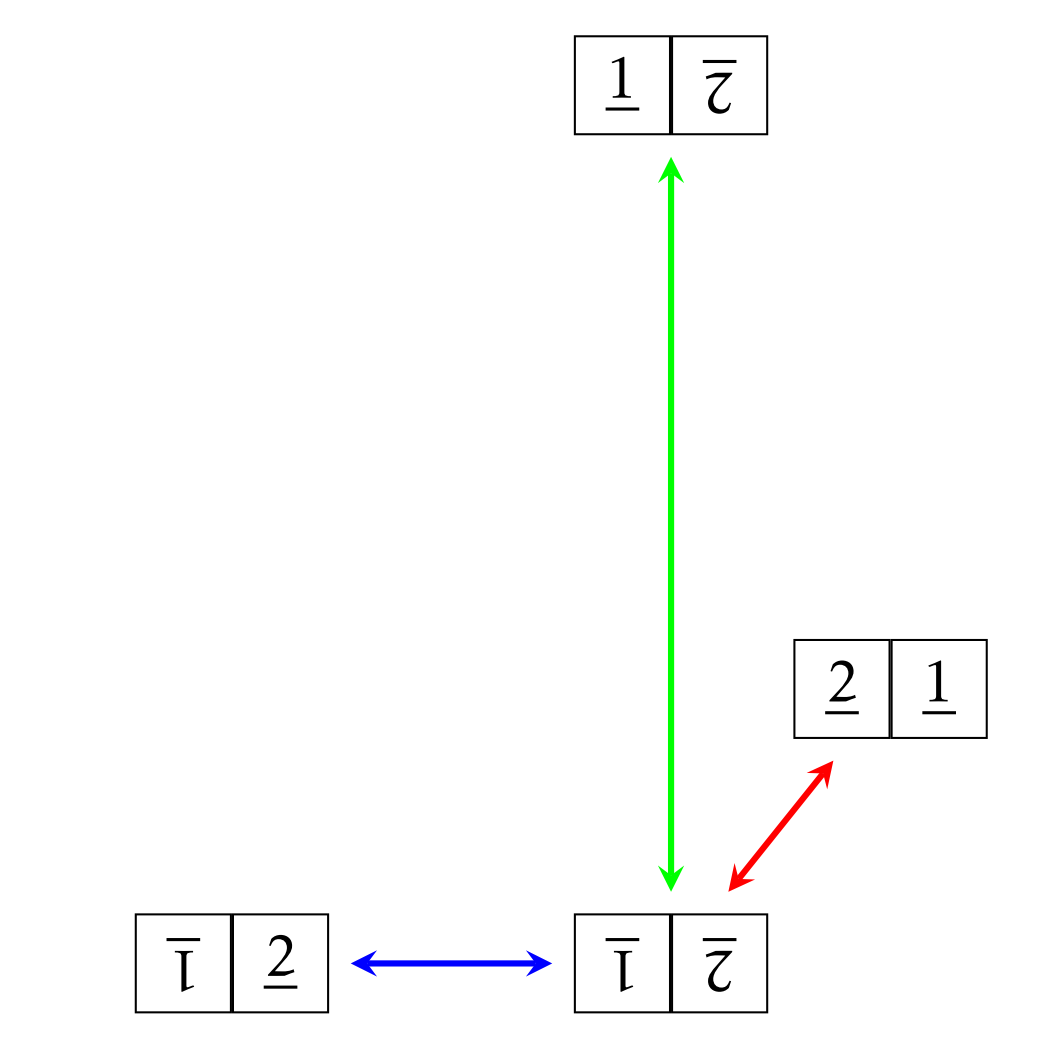
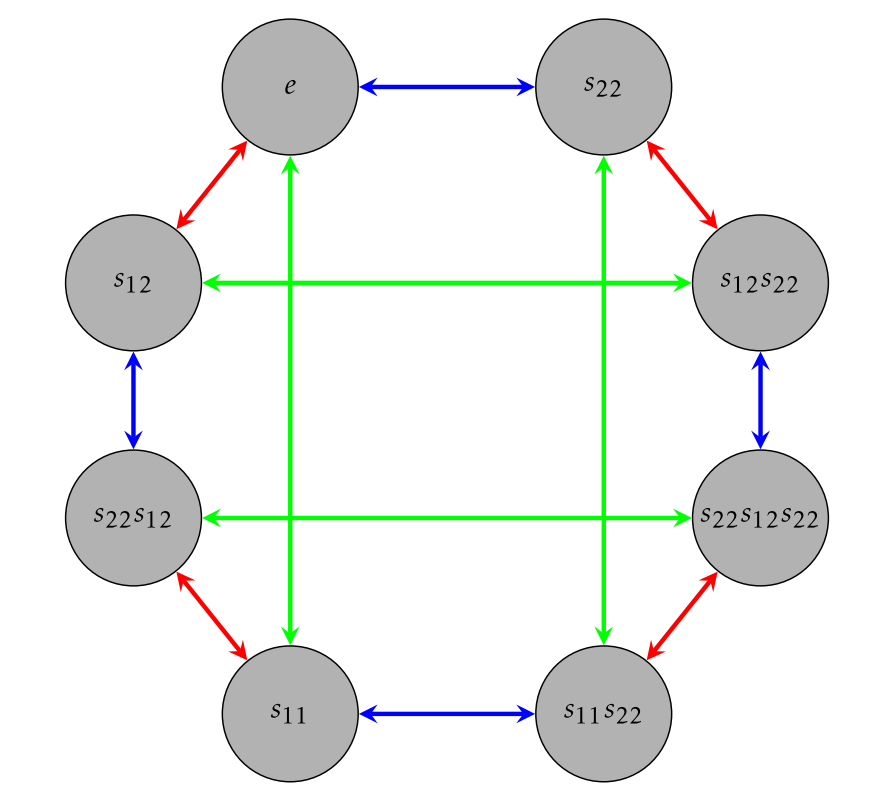
Note that I could have drawn the four scrambled boards in Figure \(\PageIndex{2}\) anywhere I wanted to, but I have a particular layout in mind. Also, notice we have three different colored arrows. In this case, a green arrow corresponds to toggling the tile in position 1 (\(s_{11}\)), a blue arrow corresponds to toggling position 2 (\(s_{22}\)), and a red arrow corresponds to spinning the whole board (\(s_{12}\)).
If we include the rest of the scrambled boards and all possible spins, we obtain Figure \(\PageIndex{3}\). Note that I’ve chosen a nice layout for the figure, but it’s really the connections between the various boards that are important.
Ultimately, we want a diagram that conveys information about the structure of the group, so instead of labeling the vertices of the diagram for \(\text{Spin}_{1\times 2}\) in Figure \(\PageIndex{3}\) with scrambled boards, we will label the vertices with the elements of the group in a way that respects the configuration of arrows. But in order to do this, we need to make a choice about how to start labeling. A natural choice to make is to label the solved board with the identity \(e\). Then each scrambled board should be labeled by the group element that corresponds to the net action that takes us from the solved board to that scrambled board.
One way to do this is to label each vertex with the word that corresponds to a path of arrows that leads to the vertex from the vertex labeled by the identity \(e\). Don’t forget
that we apply our composition of actions from right to left. This means that following a sequence of arrows out of the vertex labeled by \(e\) will get recorded as a word written right to left. That is, the first arrow out of \(e\) corresponds to the rightmost letter in the word.
For example, consider the following scrambled board.
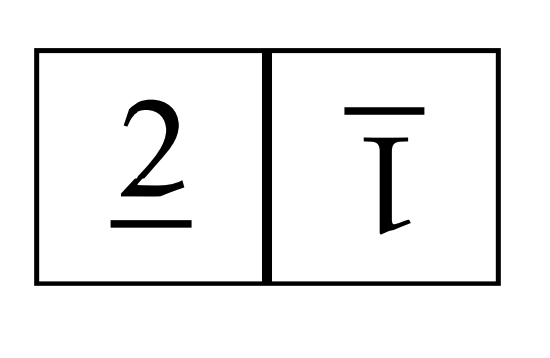
Looking at Figure \(\PageIndex{3}\), we see that one way to get to this board from the solved board is to follow a blue arrow and then a red arrow. This corresponds to the word \(s_{12}s_{22}\). However, it also corresponds to the word \(s_{22}s_{12}s_{22}s_{11}\) even though this is not an optimal solution. So, we can label the board in question with either \(s_{12}s_{22}\) or \(s_{22}s_{12}s_{22}s_{11}\) and there are other choices, as well.
Using Figure \(\PageIndex{3}\), find three distinct words in \(s_{11}, s_{22}\), or \(s_{12}\) that correspond to the following scrambled board.

If we continue labeling the vertices of the directed graph in Figure \(\PageIndex{3}\), then one possible labeling is given in Figure \(\PageIndex{6}\). Each word tells you how to reach the corresponding scrambled board from the solved board. The directed graph in Figure \(\PageIndex{6}\) is called the Cayley diagram for \(\text{Spin}_{1\times 2}\) using \(\{s_{11},s_{22},s_{12}\}\) as a generating set. It is important to point out that it will not always be the case that the arrows are two-way arrows. This happened to be the case here because each of our generators is its own inverse.
Consider the Cayley diagram for \(\text{Spin}_{1\times 2}\) in Figure \(\PageIndex{6}\).
- Removing all the red arrows corresponds to forbidding the spin that rotates the full \(1\times 2\) board. Can we obtain all of the scrambled boards from the solved board using only blue and green arrows? What does this tell you about \(\{s_{11},s_{22}\}\)?
- What if we remove the blue arrows? What does this tell you about \(\{s_{11},s_{12}\}\)?
- What if we remove the green arrows? What does this tell you about \(\{s_{22},s_{12}\}\)?
Suppose \(G\) is a group and \(S\) is a generating set of \(G\). The Cayley diagram* for \(G\) with generating set \(S\) is a colored directed graph constructed as follows:
- The vertices correspond to elements of \(G\).
- Each generator \(s\in S\) is assigned a color, say \(c_s\).
- For \(g\in G\) and \(s\in S\), there is a directed edge from \(g\) to \(sg\) with color \(c_s\).
- *
-
Cayley diagrams are named after their inventor Arthur Cayley, a nineteenth century British mathematician.
Note that following the arrow from \(g\) to \(sg\) with color \(c_s\) corresponds to applying the action of \(s\) to \(g\). Moreover, following the arrow backwards from \(sg\) to \(g\) corresponds to applying \(s^{-1}\) to \(sg\). If a generator is its own inverse (like the spins in \(\text{Spin}_{1\times 2}\)), then the arrows corresponding to that generator are two-way arrows.
Before asking you to construct some Cayley diagrams, let’s play with another example. In the next problem you will encounter a Cayley diagram where all the edges are one-way arrows.
Let \(R_6\) denote the group of rotational symmetries of a regular hexagon and let \(r\) be rotation by \(60^{\circ}\) clockwise. It’s not too hard to see that \(R_6=\langle r\rangle\) and \(|R_6|=6\). The Cayley diagram for \(R_6\) with generating set \(\{r\}\) is given in Figure \(\PageIndex{7}\).
- Is \(R_6\) cyclic?
- Is \(R_6\) abelian?
- Write \(r^{-1}\) as a word in \(r\).
- Can you find a shorter word to describe \(r^8\)?
- Does \(r^2\) generate the group?
- Does \(r^5\) generate the group?

Now, let’s build a few Cayley diagrams to further our intuition.
Construct a Cayley diagram for each of the following groups using the specified generating set.
- \(S_2\) with generating set \(\{s\}\) (see Problem 2.5.3)
- \(R_4\) with generating set \(\{r\}\) (see Problem 2.2.4)
- \(V_4\) with generating set \(\{v,h\}\) (see Problem 2.5.4)
- \(D_3\) with generating set \(\{r,s\}\) (see Problem 2.2.5)
- \(D_3\) with generating set \(\{s,s'\}\) (see Problem 2.4.3)
- \(S_3\) with generating set \(\{s_1,s_2\}\) (see Problem 2.2.7)
- \(D_4\) with generating set \(\{r,s\}\) (see Problem 2.2.6)
Not only are Cayley diagrams visually appealing, but they provide a map for the group in question. That is, they provide a method for navigating the group. Following sequences of arrows tells us how to achieve a net action. However, each Cayley diagram very much depends on the set of generators that are chosen to generate the group. If we change the generating set, we may end up with a very different looking Cayley diagram. For example, compare the Cayley diagrams for \(D_3\) that you constructed in parts (d) and (e) of Problem \(\PageIndex{5}\).
Before closing out this section, let’s tackle a few more problems.
Consider the group \((\mathbb{Z},+)\).
- Construct a portion of the Cayley diagram for \((\mathbb{Z},+)\) with generating set \(\{1\}\).
- Construct a portion of the Cayley diagram for \((\mathbb{Z},+)\) with generating set \(\{-1\}\). How does this diagram compare to the one in part (a)?
- It turns out that \(\mathbb{Z}=\langle 2,3\rangle\). Construct a portion of the Cayley diagram for \((\mathbb{Z},+)\) with generating set \(\{2,3\}\).
Assume \(G\) is a group. Suppose that \(S\) and \(S'\) are two different sets that generate \(G\). If you draw the Cayley diagram for \(G\) using \(S\) and then draw the Cayley diagram for \(G\) using \(S'\), what features of the two graphs are the same and which are potentially different?
Consider the diagrams given in Figures \(\PageIndex{8}\) and \(\PageIndex{9}\). Explain why neither of these diagrams could possibly be the Cayley diagram for a group.

While thinking about the previous problem, you likely conjectured the next couple theorems.
If \(G\) is a group with generating set \(S\), then for every \(g\in G\) and \(s\in S\), there is exactly one arrow with color \(c_s\) pointing from \(s^{-1}g\) to \(g\) and exactly one arrow with color \(c_s\) pointing from \(g\) to \(sg\).
If \(G\) is a group with generating set \(S\), then the Cayley diagram for \(G\) with generating set \(S\) is connected. That is, for every pair of vertices \(g\) and \(h\), there is a path of forward or backward arrows connecting \(g\) and \(h\). *
- *
-
Hint: First consider the case when either \(g\) or \(h\) is the identity \(e\).

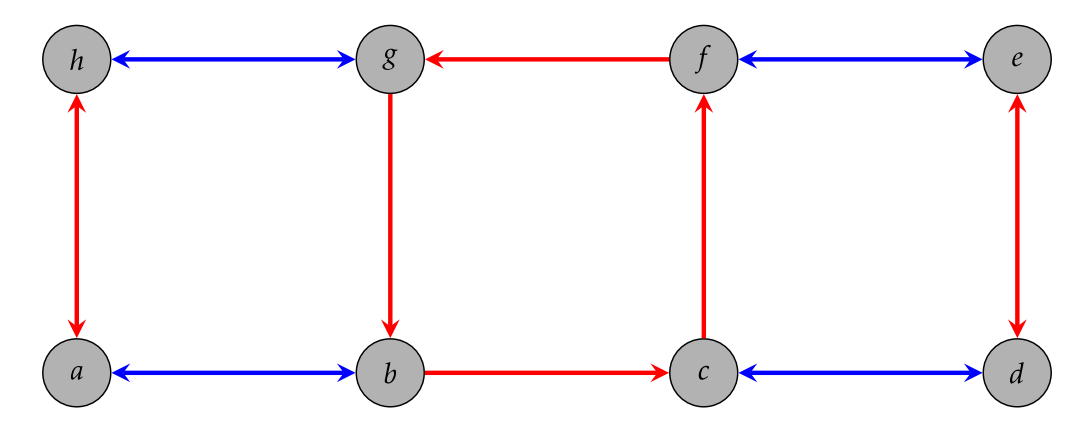
Consider the Cayley diagram for \(D_3\) with generating set \(\{r,s\}\) that is given in Figure \(\PageIndex{10}\). Notice that we labeled the lower right corner of the Cayley diagram with the word \(r^2s\). This means that we first followed a blue arrow out of \(e\) and then two red arrows. However, we could also get to this vertex by first doing a red arrow out of \(e\) followed by a blue arrow. So, we could also have labeled this vertex with the word \(sr\). The upshot is that \(r^2s=sr\). These types of group equations are called relations.
We discovered this relation by starting at \(e\) and then traveling a sequence of arrows to get to the vertex in the lower right corner. However, notice that following a blue and then two red arrows is always the same as following a red arrow and then a blue arrow regardless of which vertex we start at. That is, the local relation \(r^2s=sr\) starting at \(e\) holds globally across the entire Cayley diagram.
Cayley diagrams for groups will always have this uniform symmetry. That is, any local patterns in the diagram appear globally throughout the diagram.
Let \(G\) be a group with generating set \(S\) and consider the corresponding Cayley diagram. Suppose \[s_{x_1}s_{x_2}\cdots s_{x_n}=s_{y_1}s_{y_2}\cdots s_{y_m}\] is a relation in \(G\), where each \(s_{x_i}\) and \(s_{y_j}\) is either an element from \(S\) or the inverse of an element from \(S\). Explain what it means for this relation to hold globally across the entire Cayley diagram for \(G\).
You’ve likely noticed the following theorem while tinkering with examples.
Suppose \(G\) is a finite group with generating set \(S\) and consider the corresponding Cayley diagram. For \(s\in S\), if we follow a sequence of (forward) arrows of color \(c_s\) out of \(e\), we eventually end up back at \(e\) after a finite number of steps.
Suppose \(\{g_1,\ldots,g_n\}\) is a generating set for a group \(G\).
- Explain why \(\{g^{-1}_1,\ldots,g^{-1}_n\}\) is also a generating set for \(G\).
- How does the Cayley diagram for \(G\) with generating set \(\{g_1,\ldots,g_n\}\) compare to the Cayley diagram with generating set \(\{g^{-1}_1,\ldots,g^{-1}_n\}\)?
We close this section with two problems that ask you to think about the structure of Cayley diagrams for cyclic groups and abelian groups.
Suppose \(G\) is a cyclic group with generator \(g\in G\).
- If \(G\) is finite, what conclusions can you make about Cayley diagram for \(G\) with generating set \(\{g\}\)?
- If \(G\) is infinite, what conclusions can you make about Cayley diagram for \(G\) with generating set \(\{g\}\)?
Suppose \(G\) is an abelian group with generating set \(S\) and consider the corresponding Cayley diagram.
- If \(s,t\in S\), then what relationship must be true about the corresponding arrows?
- Is the converse of your claim in part (a) true? That is, if every pair of arrows in the Cayley diagram for \(G\) has the property you stated above, will the group be abelian?