
11.4E: Exercises
- Page ID
- 30574

\( \newcommand{\vecs}[1]{\overset { \scriptstyle \rightharpoonup} {\mathbf{#1}} } \)
\( \newcommand{\vecd}[1]{\overset{-\!-\!\rightharpoonup}{\vphantom{a}\smash {#1}}} \)
\( \newcommand{\dsum}{\displaystyle\sum\limits} \)
\( \newcommand{\dint}{\displaystyle\int\limits} \)
\( \newcommand{\dlim}{\displaystyle\lim\limits} \)
\( \newcommand{\id}{\mathrm{id}}\) \( \newcommand{\Span}{\mathrm{span}}\)
( \newcommand{\kernel}{\mathrm{null}\,}\) \( \newcommand{\range}{\mathrm{range}\,}\)
\( \newcommand{\RealPart}{\mathrm{Re}}\) \( \newcommand{\ImaginaryPart}{\mathrm{Im}}\)
\( \newcommand{\Argument}{\mathrm{Arg}}\) \( \newcommand{\norm}[1]{\| #1 \|}\)
\( \newcommand{\inner}[2]{\langle #1, #2 \rangle}\)
\( \newcommand{\Span}{\mathrm{span}}\)
\( \newcommand{\id}{\mathrm{id}}\)
\( \newcommand{\Span}{\mathrm{span}}\)
\( \newcommand{\kernel}{\mathrm{null}\,}\)
\( \newcommand{\range}{\mathrm{range}\,}\)
\( \newcommand{\RealPart}{\mathrm{Re}}\)
\( \newcommand{\ImaginaryPart}{\mathrm{Im}}\)
\( \newcommand{\Argument}{\mathrm{Arg}}\)
\( \newcommand{\norm}[1]{\| #1 \|}\)
\( \newcommand{\inner}[2]{\langle #1, #2 \rangle}\)
\( \newcommand{\Span}{\mathrm{span}}\) \( \newcommand{\AA}{\unicode[.8,0]{x212B}}\)
\( \newcommand{\vectorA}[1]{\vec{#1}} % arrow\)
\( \newcommand{\vectorAt}[1]{\vec{\text{#1}}} % arrow\)
\( \newcommand{\vectorB}[1]{\overset { \scriptstyle \rightharpoonup} {\mathbf{#1}} } \)
\( \newcommand{\vectorC}[1]{\textbf{#1}} \)
\( \newcommand{\vectorD}[1]{\overrightarrow{#1}} \)
\( \newcommand{\vectorDt}[1]{\overrightarrow{\text{#1}}} \)
\( \newcommand{\vectE}[1]{\overset{-\!-\!\rightharpoonup}{\vphantom{a}\smash{\mathbf {#1}}}} \)
\( \newcommand{\vecs}[1]{\overset { \scriptstyle \rightharpoonup} {\mathbf{#1}} } \)
\(\newcommand{\longvect}{\overrightarrow}\)
\( \newcommand{\vecd}[1]{\overset{-\!-\!\rightharpoonup}{\vphantom{a}\smash {#1}}} \)
\(\newcommand{\avec}{\mathbf a}\) \(\newcommand{\bvec}{\mathbf b}\) \(\newcommand{\cvec}{\mathbf c}\) \(\newcommand{\dvec}{\mathbf d}\) \(\newcommand{\dtil}{\widetilde{\mathbf d}}\) \(\newcommand{\evec}{\mathbf e}\) \(\newcommand{\fvec}{\mathbf f}\) \(\newcommand{\nvec}{\mathbf n}\) \(\newcommand{\pvec}{\mathbf p}\) \(\newcommand{\qvec}{\mathbf q}\) \(\newcommand{\svec}{\mathbf s}\) \(\newcommand{\tvec}{\mathbf t}\) \(\newcommand{\uvec}{\mathbf u}\) \(\newcommand{\vvec}{\mathbf v}\) \(\newcommand{\wvec}{\mathbf w}\) \(\newcommand{\xvec}{\mathbf x}\) \(\newcommand{\yvec}{\mathbf y}\) \(\newcommand{\zvec}{\mathbf z}\) \(\newcommand{\rvec}{\mathbf r}\) \(\newcommand{\mvec}{\mathbf m}\) \(\newcommand{\zerovec}{\mathbf 0}\) \(\newcommand{\onevec}{\mathbf 1}\) \(\newcommand{\real}{\mathbb R}\) \(\newcommand{\twovec}[2]{\left[\begin{array}{r}#1 \\ #2 \end{array}\right]}\) \(\newcommand{\ctwovec}[2]{\left[\begin{array}{c}#1 \\ #2 \end{array}\right]}\) \(\newcommand{\threevec}[3]{\left[\begin{array}{r}#1 \\ #2 \\ #3 \end{array}\right]}\) \(\newcommand{\cthreevec}[3]{\left[\begin{array}{c}#1 \\ #2 \\ #3 \end{array}\right]}\) \(\newcommand{\fourvec}[4]{\left[\begin{array}{r}#1 \\ #2 \\ #3 \\ #4 \end{array}\right]}\) \(\newcommand{\cfourvec}[4]{\left[\begin{array}{c}#1 \\ #2 \\ #3 \\ #4 \end{array}\right]}\) \(\newcommand{\fivevec}[5]{\left[\begin{array}{r}#1 \\ #2 \\ #3 \\ #4 \\ #5 \\ \end{array}\right]}\) \(\newcommand{\cfivevec}[5]{\left[\begin{array}{c}#1 \\ #2 \\ #3 \\ #4 \\ #5 \\ \end{array}\right]}\) \(\newcommand{\mattwo}[4]{\left[\begin{array}{rr}#1 \amp #2 \\ #3 \amp #4 \\ \end{array}\right]}\) \(\newcommand{\laspan}[1]{\text{Span}\{#1\}}\) \(\newcommand{\bcal}{\cal B}\) \(\newcommand{\ccal}{\cal C}\) \(\newcommand{\scal}{\cal S}\) \(\newcommand{\wcal}{\cal W}\) \(\newcommand{\ecal}{\cal E}\) \(\newcommand{\coords}[2]{\left\{#1\right\}_{#2}}\) \(\newcommand{\gray}[1]{\color{gray}{#1}}\) \(\newcommand{\lgray}[1]{\color{lightgray}{#1}}\) \(\newcommand{\rank}{\operatorname{rank}}\) \(\newcommand{\row}{\text{Row}}\) \(\newcommand{\col}{\text{Col}}\) \(\renewcommand{\row}{\text{Row}}\) \(\newcommand{\nul}{\text{Nul}}\) \(\newcommand{\var}{\text{Var}}\) \(\newcommand{\corr}{\text{corr}}\) \(\newcommand{\len}[1]{\left|#1\right|}\) \(\newcommand{\bbar}{\overline{\bvec}}\) \(\newcommand{\bhat}{\widehat{\bvec}}\) \(\newcommand{\bperp}{\bvec^\perp}\) \(\newcommand{\xhat}{\widehat{\xvec}}\) \(\newcommand{\vhat}{\widehat{\vvec}}\) \(\newcommand{\uhat}{\widehat{\uvec}}\) \(\newcommand{\what}{\widehat{\wvec}}\) \(\newcommand{\Sighat}{\widehat{\Sigma}}\) \(\newcommand{\lt}{<}\) \(\newcommand{\gt}{>}\) \(\newcommand{\amp}{&}\) \(\definecolor{fillinmathshade}{gray}{0.9}\)Practice Makes Perfect
In the following exercises, graph each ellipse.
- \(\frac{x^{2}}{4}+\frac{y^{2}}{25}=1\)
- \(\frac{x^{2}}{9}+\frac{y^{2}}{25}=1\)
- \(\frac{x^{2}}{25}+\frac{y^{2}}{36}=1\)
- \(\frac{x^{2}}{16}+\frac{y^{2}}{36}=1\)
- \(\frac{x^{2}}{36}+\frac{y^{2}}{16}=1\)
- \(\frac{x^{2}}{25}+\frac{y^{2}}{9}=1\)
- \(x^{2}+\frac{y^{2}}{4}=1\)
- \(\frac{x^{2}}{9}+y^{2}=1\)
- \(4 x^{2}+25 y^{2}=100\)
- \(16 x^{2}+9 y^{2}=144\)
- \(16 x^{2}+36 y^{2}=576\)
- \(9 x^{2}+25 y^{2}=225\)
- Answer
-
1.
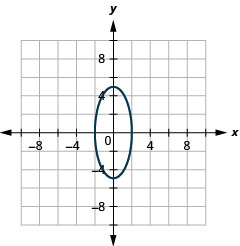
Figure 11.3.38 3.
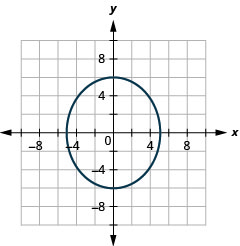
Figure 11.3.39 5.

Figure 11.3.40 7.
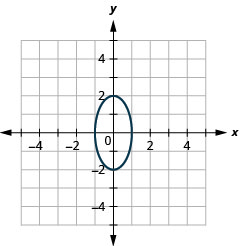
Figure 11.3.41 9.
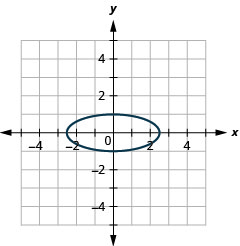
Figure 11.3.42 11.
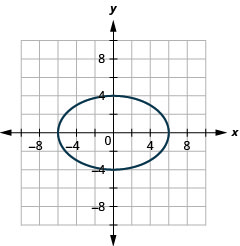
Figure 11.3.43
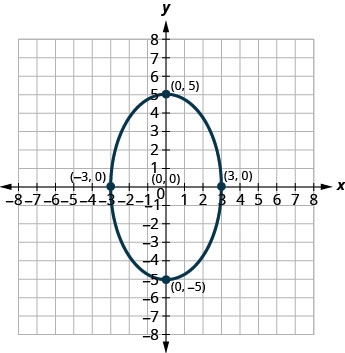
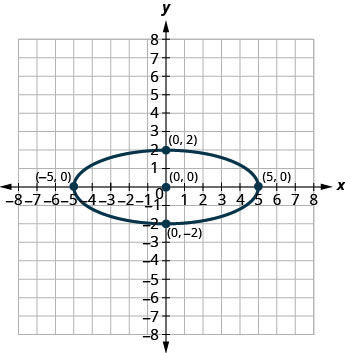
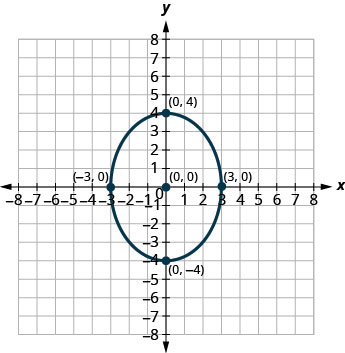
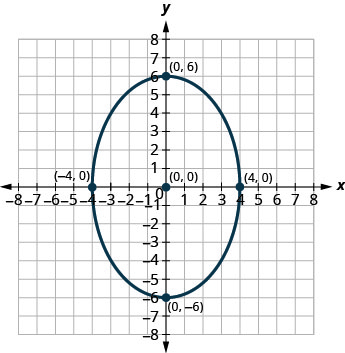
In the following exercises, find the equation of the ellipse shown in the graph.
1.
2.
3.
4.
- Answer
-
1. \(\frac{x^{2}}{9}+\frac{y^{2}}{25}=1\)
3. \(\frac{x^{2}}{9}+\frac{y^{2}}{16}=1\)
In the following exercises, graph each ellipse.
- \(\frac{(x+1)^{2}}{4}+\frac{(y+6)^{2}}{25}=1\)
- \(\frac{(x-3)^{2}}{25}+\frac{(y+2)^{2}}{9}=1\)
- \(\frac{(x+4)^{2}}{4}+\frac{(y-2)^{2}}{9}=1\)
- \(\frac{(x-4)^{2}}{9}+\frac{(y-1)^{2}}{16}=1\)
- Answer
-
1.

Figure 11.3.48 3.
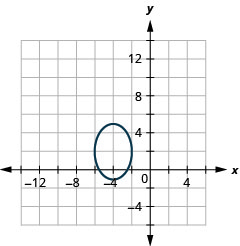
Figure 11.3.49
In the following exercises, graph each equation by translation.
- \(\frac{(x-3)^{2}}{4}+\frac{(y-7)^{2}}{25}=1\)
- \(\frac{(x+6)^{2}}{16}+\frac{(y+5)^{2}}{4}=1\)
- \(\frac{(x-5)^{2}}{9}+\frac{(y+4)^{2}}{25}=1\)
- \(\frac{(x+5)^{2}}{36}+\frac{(y-3)^{2}}{16}=1\)
- Answer
-
1.
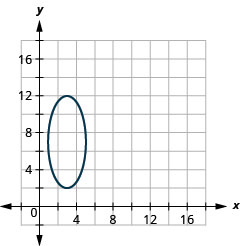
Figure 11.3.50 3.
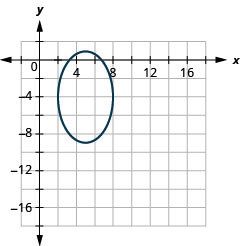
Figure 11.3.51
In the following exercises,
- Write the equation in standard form and
- Graph.
- \(25 x^{2}+9 y^{2}-100 x-54 y-44=0\)
- \(4 x^{2}+25 y^{2}+8 x+100 y+4=0\)
- \(4 x^{2}+25 y^{2}-24 x-64=0\)
- \(9 x^{2}+4 y^{2}+56 y+160=0\)
- Answer
-
1.
- \(\frac{(x-2)^{2}}{9}+\frac{(y-3)^{2}}{25}=1\)
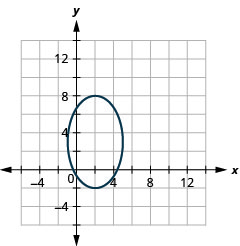
Figure 11.3.52 3.
- \(\frac{y^{2}}{4}+\frac{(x-3)^{2}}{25}=1\)
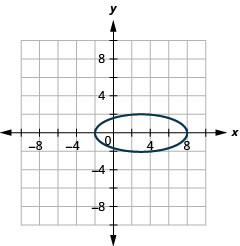
Figure 11.3.53
In the following exercises, graph the equation.
- \(x=-2(y-1)^{2}+2\)
- \(x^{2}+y^{2}=49\)
- \((x+5)^{2}+(y+2)^{2}=4\)
- \(y=-x^{2}+8 x-15\)
- \(\frac{(x+3)^{2}}{16}+\frac{(y+1)^{2}}{4}=1\)
- \((x-2)^{2}+(y-3)^{2}=9\)
- \(\frac{x^{2}}{25}+\frac{y^{2}}{36}=1\)
- \(x=4(y+1)^{2}-4\)
- \(x^{2}+y^{2}=64\)
- \(\frac{x^{2}}{9}+\frac{y^{2}}{25}=1\)
- \(y=6 x^{2}+2 x-1\)
- \(\frac{(x-2)^{2}}{9}+\frac{(y+3)^{2}}{25}=1\)
- Answer
-
1.
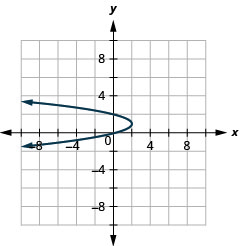
Figure 11.3.54 3.
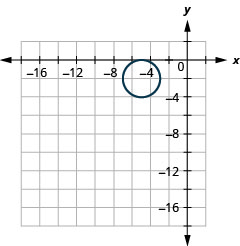
Figure 11.3.55 5.
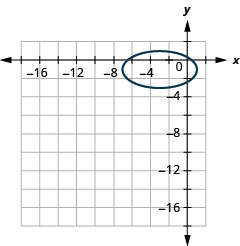
Figure 11.3.56 7.
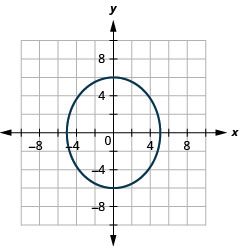
Figure 11.3.57 9.
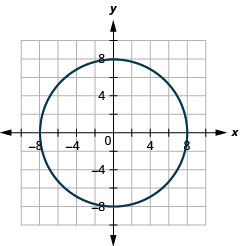
Figure 11.3.58 11.
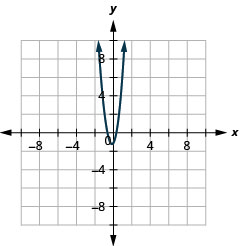
Figure 11.3.59
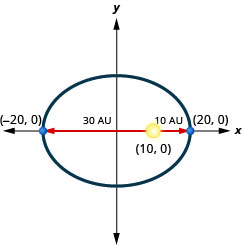
1. A planet moves in an elliptical orbit around its sun. The closest the planet gets to the sun is approximately \(10\) AU and the furthest is approximately \(30\) AU. The sun is one of the foci of the elliptical orbit. Letting the ellipse center at the origin and labeling the axes in AU, the orbit will look like the figure below. Use the graph to write an equation for the elliptical orbit of the planet.
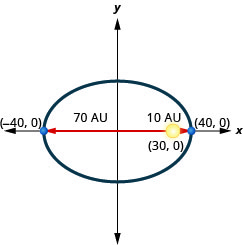
2. A planet moves in an elliptical orbit around its sun. The closest the planet gets to the sun is approximately \(10\) AU and the furthest is approximately \(70\) AU. The sun is one of the foci of the elliptical orbit. Letting the ellipse center at the origin and labeling the axes in AU, the orbit will look like the figure below. Use the graph to write an equation for the elliptical orbit of the planet.
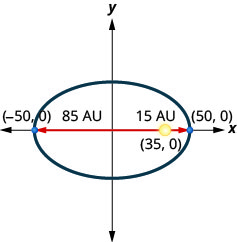
3. A comet moves in an elliptical orbit around a sun. The closest the comet gets to the sun is approximately \(15\) AU and the furthest is approximately \(85\) AU. The sun is one of the foci of the elliptical orbit. Letting the ellipse center at the origin and labeling the axes in AU, the orbit will look like the figure below. Use the graph to write an equation for the elliptical orbit of the comet.
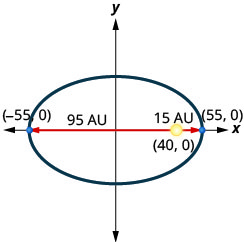
4. A comet moves in an elliptical orbit around a sun. The closest the comet gets to the sun is approximately \(15\) AU and the furthest is approximately \(95\) AU. The sun is one of the foci of the elliptical orbit. Letting the ellipse center at the origin and labeling the axes in AU, the orbit will look like the figure below. Use the graph to write an equation for the elliptical orbit of the comet.
- Answer
-
1. \(\frac{x^{2}}{400}+\frac{y^{2}}{300}=1\)
3. \(\frac{x^{2}}{2500}+\frac{y^{2}}{1275}=1\)
- In your own words, define an ellipse and write the equation of an ellipse centered at the origin in standard form. Draw a sketch of the ellipse labeling the center, vertices and major and minor axes.
- Explain in your own words how to get the axes from the equation in standard form.
- Compare and contrast the graphs of the equations \(\frac{x^{2}}{4}+\frac{y^{2}}{9}=1\) and \(\frac{x^{2}}{9}+\frac{y^{2}}{4}=1\).
- Explain in your own words, the difference between a vertex and a focus of the ellipse.
- Answer
-
1. Answers may vary
3. Answers may vary
Self Check
a. After completing the exercises, use this checklist to evaluate your mastery of the objectives of this section.
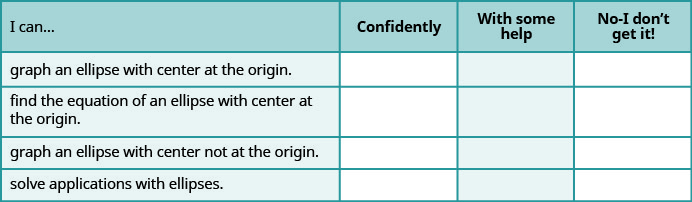
b. What does this checklist tell you about your mastery of this section? What steps will you take to improve?