31.3: Staying in Balance
- Page ID
- 40604
\( \newcommand{\vecs}[1]{\overset { \scriptstyle \rightharpoonup} {\mathbf{#1}} } \)
\( \newcommand{\vecd}[1]{\overset{-\!-\!\rightharpoonup}{\vphantom{a}\smash {#1}}} \)
\( \newcommand{\id}{\mathrm{id}}\) \( \newcommand{\Span}{\mathrm{span}}\)
( \newcommand{\kernel}{\mathrm{null}\,}\) \( \newcommand{\range}{\mathrm{range}\,}\)
\( \newcommand{\RealPart}{\mathrm{Re}}\) \( \newcommand{\ImaginaryPart}{\mathrm{Im}}\)
\( \newcommand{\Argument}{\mathrm{Arg}}\) \( \newcommand{\norm}[1]{\| #1 \|}\)
\( \newcommand{\inner}[2]{\langle #1, #2 \rangle}\)
\( \newcommand{\Span}{\mathrm{span}}\)
\( \newcommand{\id}{\mathrm{id}}\)
\( \newcommand{\Span}{\mathrm{span}}\)
\( \newcommand{\kernel}{\mathrm{null}\,}\)
\( \newcommand{\range}{\mathrm{range}\,}\)
\( \newcommand{\RealPart}{\mathrm{Re}}\)
\( \newcommand{\ImaginaryPart}{\mathrm{Im}}\)
\( \newcommand{\Argument}{\mathrm{Arg}}\)
\( \newcommand{\norm}[1]{\| #1 \|}\)
\( \newcommand{\inner}[2]{\langle #1, #2 \rangle}\)
\( \newcommand{\Span}{\mathrm{span}}\) \( \newcommand{\AA}{\unicode[.8,0]{x212B}}\)
\( \newcommand{\vectorA}[1]{\vec{#1}} % arrow\)
\( \newcommand{\vectorAt}[1]{\vec{\text{#1}}} % arrow\)
\( \newcommand{\vectorB}[1]{\overset { \scriptstyle \rightharpoonup} {\mathbf{#1}} } \)
\( \newcommand{\vectorC}[1]{\textbf{#1}} \)
\( \newcommand{\vectorD}[1]{\overrightarrow{#1}} \)
\( \newcommand{\vectorDt}[1]{\overrightarrow{\text{#1}}} \)
\( \newcommand{\vectE}[1]{\overset{-\!-\!\rightharpoonup}{\vphantom{a}\smash{\mathbf {#1}}}} \)
\( \newcommand{\vecs}[1]{\overset { \scriptstyle \rightharpoonup} {\mathbf{#1}} } \)
\( \newcommand{\vecd}[1]{\overset{-\!-\!\rightharpoonup}{\vphantom{a}\smash {#1}}} \)
\(\newcommand{\avec}{\mathbf a}\) \(\newcommand{\bvec}{\mathbf b}\) \(\newcommand{\cvec}{\mathbf c}\) \(\newcommand{\dvec}{\mathbf d}\) \(\newcommand{\dtil}{\widetilde{\mathbf d}}\) \(\newcommand{\evec}{\mathbf e}\) \(\newcommand{\fvec}{\mathbf f}\) \(\newcommand{\nvec}{\mathbf n}\) \(\newcommand{\pvec}{\mathbf p}\) \(\newcommand{\qvec}{\mathbf q}\) \(\newcommand{\svec}{\mathbf s}\) \(\newcommand{\tvec}{\mathbf t}\) \(\newcommand{\uvec}{\mathbf u}\) \(\newcommand{\vvec}{\mathbf v}\) \(\newcommand{\wvec}{\mathbf w}\) \(\newcommand{\xvec}{\mathbf x}\) \(\newcommand{\yvec}{\mathbf y}\) \(\newcommand{\zvec}{\mathbf z}\) \(\newcommand{\rvec}{\mathbf r}\) \(\newcommand{\mvec}{\mathbf m}\) \(\newcommand{\zerovec}{\mathbf 0}\) \(\newcommand{\onevec}{\mathbf 1}\) \(\newcommand{\real}{\mathbb R}\) \(\newcommand{\twovec}[2]{\left[\begin{array}{r}#1 \\ #2 \end{array}\right]}\) \(\newcommand{\ctwovec}[2]{\left[\begin{array}{c}#1 \\ #2 \end{array}\right]}\) \(\newcommand{\threevec}[3]{\left[\begin{array}{r}#1 \\ #2 \\ #3 \end{array}\right]}\) \(\newcommand{\cthreevec}[3]{\left[\begin{array}{c}#1 \\ #2 \\ #3 \end{array}\right]}\) \(\newcommand{\fourvec}[4]{\left[\begin{array}{r}#1 \\ #2 \\ #3 \\ #4 \end{array}\right]}\) \(\newcommand{\cfourvec}[4]{\left[\begin{array}{c}#1 \\ #2 \\ #3 \\ #4 \end{array}\right]}\) \(\newcommand{\fivevec}[5]{\left[\begin{array}{r}#1 \\ #2 \\ #3 \\ #4 \\ #5 \\ \end{array}\right]}\) \(\newcommand{\cfivevec}[5]{\left[\begin{array}{c}#1 \\ #2 \\ #3 \\ #4 \\ #5 \\ \end{array}\right]}\) \(\newcommand{\mattwo}[4]{\left[\begin{array}{rr}#1 \amp #2 \\ #3 \amp #4 \\ \end{array}\right]}\) \(\newcommand{\laspan}[1]{\text{Span}\{#1\}}\) \(\newcommand{\bcal}{\cal B}\) \(\newcommand{\ccal}{\cal C}\) \(\newcommand{\scal}{\cal S}\) \(\newcommand{\wcal}{\cal W}\) \(\newcommand{\ecal}{\cal E}\) \(\newcommand{\coords}[2]{\left\{#1\right\}_{#2}}\) \(\newcommand{\gray}[1]{\color{gray}{#1}}\) \(\newcommand{\lgray}[1]{\color{lightgray}{#1}}\) \(\newcommand{\rank}{\operatorname{rank}}\) \(\newcommand{\row}{\text{Row}}\) \(\newcommand{\col}{\text{Col}}\) \(\renewcommand{\row}{\text{Row}}\) \(\newcommand{\nul}{\text{Nul}}\) \(\newcommand{\var}{\text{Var}}\) \(\newcommand{\corr}{\text{corr}}\) \(\newcommand{\len}[1]{\left|#1\right|}\) \(\newcommand{\bbar}{\overline{\bvec}}\) \(\newcommand{\bhat}{\widehat{\bvec}}\) \(\newcommand{\bperp}{\bvec^\perp}\) \(\newcommand{\xhat}{\widehat{\xvec}}\) \(\newcommand{\vhat}{\widehat{\vvec}}\) \(\newcommand{\uhat}{\widehat{\uvec}}\) \(\newcommand{\what}{\widehat{\wvec}}\) \(\newcommand{\Sighat}{\widehat{\Sigma}}\) \(\newcommand{\lt}{<}\) \(\newcommand{\gt}{>}\) \(\newcommand{\amp}{&}\) \(\definecolor{fillinmathshade}{gray}{0.9}\)Lesson
Let's use balanced hangers to help us solve equations.
Exercise \(\PageIndex{1}\): Hanging Around

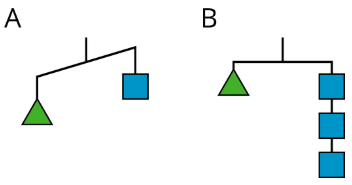
For diagram A, find:
- One thing that must be true
- One thing that could be true or false
- One thing that cannot possibly be true
For diagram B, find:
- One thing that must be true
- One thing that could be true or false
- One thing that cannot possibly be true
Exercise \(\PageIndex{2}\): Match Equations and Hangers

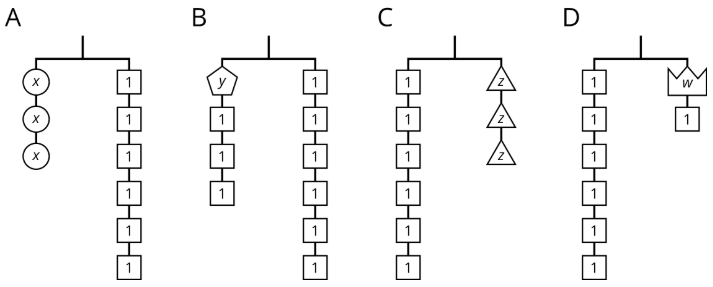
- Match each hanger to an equation. Complete the equation by writing \(x, y, z,\) or \(w\) in the empty box.

- Find a solution to each equation. Use the hangers to explain what each solution means.
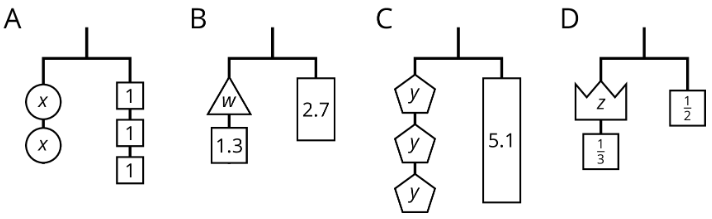
Exercise \(\PageIndex{3}\): Connecting Diagrams to Equations and Solutions
Here are some balanced hangers. Each piece is labeled with its weight.

For each diagram:
- Write an equation.
- Explain how to reason with the diagram to find the weight of a piece with a letter.
- Explain how to reason with the equation to find the weight of a piece with a letter.
Are you ready for more?
When you have the time, visit the site https://solveme.edc.org/Mobiles.html to solve some trickier puzzles that use hanger diagrams like the ones in this lesson. You can even build new ones. (If you want to do this during class, check with your teacher first!)
Summary
A hanger stays balanced when the weights on both sides are equal. We can change the weights and the hanger will stay balanced as long as both sides are changed in the same way. For example, adding 2 pounds to each side of a balanced hanger will keep it balanced. Removing half of the weight from each side will also keep it balanced.
An equation can be compared to a balanced hanger. We can change the equation, but for a true equation to remain true, the same thing must be done to both sides of the equal sign. If we add or subtract the same number on each side, or multiply or divide each side by the same number, the new equation will still be true.
This way of thinking can help us find solutions to equations. Instead of checking different values, we can think about subtracting the same amount from each side or dividing each side by the same number.

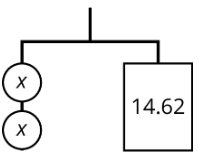
Diagram A can be represented by the equation \(3x=11\).
If we break the 11 into 3 equal parts, each part will have the same weight as a block with an \(x\).
Splitting each side of the hanger into 3 equal parts is the same as dividing each side of the equation by 3.
- \(3x\) divided by \(3\) is \(x\).
- \(11\) divided by \(3\) is \(\frac{11}{3}\).
- If \(3x=11\) is true, then \(x=\frac{11}{3}\) is true.
- The solution to \(3x=11\) is \(\frac{11}{3}\).
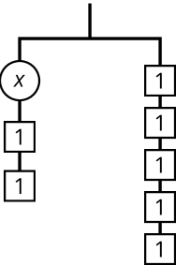
Diagram B can be represented with the equation \(11=y+5\).
If we remove a weight of 5 from each side of the hanger, it will stay in balance.
Removing 5 from each side of the hanger is the same as subtracting 5 from each side of the equation.
- \(11-5\) is \(6\).
- \(y+5-5\) is \(y\).
- If \(11=y+5\) is true, then \(6=y\) is true.
- The solution to \(11=y+5\) is \(6\).
Glossary Entries
Definition: Coefficient
A coefficient is a number that is multiplied by a variable.
For example, in the expression \(3x+5\), the coefficient of \(x\) is \(3\). In the expression \(y+5\), the coefficient of \(y\) is \(1\), because \(y=1\cdot y\).
Definition: Solution to an Equation
A solution to an equation is a number that can be used in place of the variable to make the equation true.
For example, 7 is the solution to the equation \(m+1=8\), because it is true that \(7+1=8\). The solution to \(m+1=8\) is not \(9\), because \(9+1\neq 8\).
Definition: Variable
A variable is a letter that represents a number. You can choose different numbers for the value of the variable.
For example, in the expression \(10-x\), the variable is \(x\). If the value of \(x\) is 3, then \(10-x=7\), because \(10-3=7\). If the value of \(x\) is \(6\), then \(10-x=4\), because \(10-6=4\).
Practice
Exercise \(\PageIndex{4}\)
Select all the equations that represent the hanger.
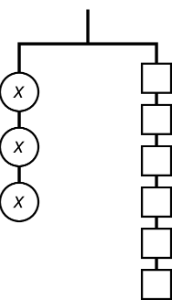
- \(x+x+x=1+1+1+1+1+1\)
- \(x\cdot x\cdot x=6\)
- \(3x=6\)
- \(x+3=6\)
- \(x\cdot x\cdot x=1\cdot 1\cdot 1\cdot 1\cdot 1\cdot 1\)
Exercise \(\PageIndex{5}\)
Write an equation to represent each hanger.

Exercise \(\PageIndex{6}\)
- Write an equation to represent the hanger.
- Explain how to reason with the hanger to find the value of \(x\).
- Explain how to reason with the equation to find the value of \(x\).

Exercise \(\PageIndex{7}\)
Andre says that \(x\) is \(7\) because he can move the two 1s with the \(x\) to the other side.

Do you agree with Andre? Explain your reasoning.
Exercise \(\PageIndex{8}\)
Match each equation to one of the diagrams.
- \(12-m=4\)
- \(12=4\cdot m\)
- \(m-4=12\)
- \(\frac{m}{4}=12\)

(From Unit 6.1.1)
Exercise \(\PageIndex{9}\)
The area of a rectangle is 14 square units. It has side lengths \(x\) and \(y\). Given each value for \(x\), find \(y\).
- \(x=2\frac{1}{3}\)
- \(x=4\frac{1}{5}\)
- \(x=\frac{7}{6}\)
(From Unit 4.4.2)
Exercise \(\PageIndex{10}\)
Lin needs to save up $20 for a new game. How much money does she have if she has saved each percentage of her goal. Explain your reasoning.
- 25%
- 75%
- 125%
(From Unit 3.4.2)